


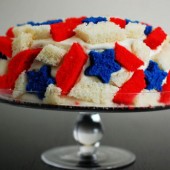
Patriotic Quake Cake
One week from tomorrow is one of my favorite holidays of the year – July 4th! I love just enjoying the day with friends and family, being outside, having a beer, and of course grilling. I always try to make a festive dessert for the holiday as well. I got an idea for a Patriotic Quake Cake a couple weeks ago and decided to make it early to share with you guys.

You see, last November when Heather from SprinkleBakes posted this Quake Cake, I knew I’d have to try it. It just looks like so much fun and super chocolatey. I’ve been coming back to it multiple times when brainstorming dessert ideas but just never taken the leap to make the cake.

Then somehow, the idea popped into my head that you could make the shapes on the outside of the cake into anything you wanted. And really, you could apply the concept of a quake cake to any cake recipe as well. I decided that making a Patriotic Quake Cake would be my first adventure in sticking cake shapes on the outside of a frosted layer cake.

And the best part is that I’m always looking for an excuse to hide my poor cake-frosting skills! And I think this might be my favorite way to cover a frosted cake. Sure nuts and coconut work well, but just look at this guy!

I decided to use three of my go-to recipes to build this cake. You could use whatever recipe you love. This would even work for a box mix if you’re in to that sort of thing. I loved that the cake on the inside was chocolate. It’s like a fun little surprise when you cut in to the cake. But again, you could really use any recipes you want.

I used my go-to chocolate cupcake recipe to make two 9″ round cake layers, which were sliced in half horizontally to make four thin layers. Then I used my go-to white cupcake recipe to make three 6″ layers, one red, one white, and one blue for the decorating on the outside. Last, I made a triple batch of my go-to cream cheese frosting recipe to bind it all together.

Putting the cake pieces onto the outside of the frosted cake was like putting together an awesome jigsaw puzzle that you can snack on when you get stumped. This would be a great activity to do with kids too! I started by placing my blue stars randomly around the cake, then filled in with the red and white stripes. As needed, I cut pieces to size to fill in random gaps as well.

I took this cake to work with me yesterday and it got rave reviews from the coworkers. I got a lot of questions about how it was made. Putting this Patriotic Quake Cake together was easier than it looks. Take it to your 4th of July get-together and I promise it’ll be the hit of the party!

One Year Ago: White Bean and Avocado Sandwich
Two Years Ago: Chicken with Artichokes and Mushrooms in Wine Sauce and Strawberry Shortcake Cake
Three Years Ago: Chocolate Chip Cookie bars
Four Years Ago: Inside Out Stuffed Peppers and Ropa Vieja


Patriotic Quake Cake
Yield: Serves 12-16
Ingredients:
For the Cake
Two 9-inch round layers of your favorite cake. I used this chocolate cupcake recipe
Your favorite white or yellow cake batter or mix, baked into 1 red 6" cake, 1 blue 6" cake, 1 white 6" cake, and 8 cupcakes out of the remaining batter (or adjust the recipe to make only the layers). I used this white cupcake recipe
Double batch of cream cheese frosting or other white frosting recipe. I used a double batch of this cream cheese frosting recipe
Special Equipment
6" cake pan
Star shaped cookie cutter
Directions:
A day or two in Advance
Bake the chocolate or other flavor 9" cake layers. Wrap in plastic wrap and store in the fridge until ready to assemble.
Bake the white cake 6" layers by making cake batter as stated in recipe. Portion out the batter. Note that a 6" cake layer requires 1/2 the amount of batter as a 9" cake layer. If your recipe makes two 9" layers, it will also produce three 6" layers and 6 cupcakes or four 6" layers.
In the batter for one layer, add enough red gel food coloring to turn the batter bright red. In another portion of the batter, add enough blue gel food coloring to turn the batter bright blue. Bake according to recipe instructions. Wrap in plastic wrap and store in the fridge.
On Assembly Day
Make a double batch of your favorite white colored frosting.
Torte the 9" layers by cutting them in half horizontally with a serrated knife. You will now have four thinner layers. Place the bottom layer on a cake round and top with 1/2 cup frosting. Spread to the edges. Repeat until all 4 layers have been stacked.
Apply a crumb coat to the cake and chill in the fridge for about 30 minutes.
While the cake is chilling, cut out the shapes for the outside of the cake. Use a star cookie cutter to cut blue stars out. After each star is cut out, slice it in half so that you have two thinner stars.
Torte the red and white layers using a serrated knife. Cut strips of cake to use as the stripes.
Remove cake from fridge and apply a healthy layer of frosting to the cake. Place the blue stars in the frosting, staggering them around the cake. Press gently into the frosting so the cake sticks to the frosting.
Arrange the red and white striped pieces around the stars until the cake is covered entirely. Keep a knife nearby to cut pieces to fit as needed.
Refrigerate to set the icing and the cake.
Inspired by Spinkle Bakes


 I am Jen the Beantown Baker. Engineer by day and baking maven by night. Hubby serves as my #1 fan and official taste tester. We got hitched back in 2006. Barefoot. In the sand. With the waves crashing behind us. It was one of the best decisions we’ve ever made.


this is such a fantastic idea!! I would make cookie dough batter with my friends in middle school… leave out the eggs, and just eat it with a spoon LOL so good!
This looks awesome! Since I’m a huge fan of cookie dough I know I will love this recipe 🙂
Ha – my husband loves the dough more than the cookie as well. I starred these – DEFINITELY making them soon.
Oooh these look delicious!! And combine the best of 2 worlds 🙂
Sues
holy cow! cookie dough + brownie? I think I’m in heaven
what a cool idea for the cookie dough layer. i used to make raw cookie dough (with egg beaters) and keep it in the freezer just for snacking
Yum. I made a similar recipe but I put a thin chocolate ganache on top. It’s one of the best recipes I’ve posted, but I’m a sucker for that raw dough.
I think I might have to agree with your bro and hubby. I love chocolate chip cookies, but it’s the dough that makes me weak in the knees! This recipe is right up my alley.
These look great! I also let my husband lick the beaters, but occasionally I slink behind the counter beside the sink and keep all the batter for myself. He’s usually too involved with TV to even notice.
LOL, oh my gosh! I just noticed this had a anti-Weight Watchers label. How funny!
Those look insanely good!!Thanks for sharing the recipe!
~ingrid
My high school made cookie dough covered brownies back in the day. They had a cult following and always sold out before the last lunch period. I never understood why you needed the brownie when a spoon works just fine.
Oh man. So sinful. Reminds me of the Ben & Jerry’s Ice Cream “Half Baked. Half brownie, half cookie dough. I can’t say no to that stuff.
Yummmm!! Oh my goodnessIsao adore cookie dough… This combination is beautiful!
sounds delicious!
these brownies looked so good I tried to make them myself! I love cookie dough AND brownies – perfect combo! Yours look much better of course. Here are mine: http://foodiesatworkdotcom.blogspot.com/2009/12/cookie-dough-brownies.html
YUM! These sound great!
AHHHH these look amaaazzzinnngggg. A little late in finding these but yeah I’m gonna need to make them.
-Whitney
AHHHH these look amaaazzzinnngggg. A little late in finding these but yeah I’m gonna need to make them.
-Whitney
I just made these and they got rave reviews at work! Definitely a keeper – thanks, as always, for sharing a great recipe and photos!
The best of both worlds!! These look awesome.
AWESOME,,,,,,,,,,,,Thank you.