


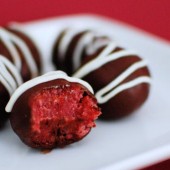
Chocolate Covered Strawberry Truffles
Is it summer yet? Not to whine, but… ok, I’m whining. About the weather. I mean seriously, the rain has GOT TO STOP. Yesterday I didn’t get rained on, but it was hot and humid (70 degrees with 95% humidity at around 10am to be exact!)

After coming home and feeling sticky from the weather, I wanted to make a cool refreshing treat for dessert. Luckily, I had pulled out the last of our frozen strawberries in the morning. I was originally planning to just snack on them or throw them on top of some ice cream. But instead, I decided to turn them into chocolate covered strawberry truffles..

I was so glad to have these freshly picked strawberries in the freezer. After they had been washed and dried completely, I laid them out in a single layer on a cookie sheet lined with waxed paper. Once they had completely frozen, I popped them into a ziplock bag.

We have been using them up throughout the year and I finally used the last of them for these truffles. These chocolate covered strawberry truffles really hit the spot and reminded me that summer (and strawberry season!) is right around the corner.


Chocolate Covered Strawberry Truffles
Yield: 12
Ingredients:
8-10 thawed frozen whole strawberries
1/2 cup sugar
2 Tbsp butter
1/2 cup flour
1/4 tsp salt
1 1/2 cups semisweet chocolate chips
1 1/2 Tbsp vegetable oil
1/3 cup white chocolate chips
Several drops of pink gel food coloring
Directions:
Pulse strawberries in the food processor to make 1 cup of strawberry puree.
Place strawberry puree, sugar, and butter in a small nonstick pan over medium low heat and simmer 15 to 20 minutes or until reduced to 1/2 cup. Mix reduced liquid with flour and salt in a small bowl. Chill truffle filling for 1 hour in the fridge or until cold.
Carefully roll chilled strawberry filling into 12 round truffles and place on a cookie sheet lined with wax paper. Chill in the fridge for 30 minutes or until cold.
Melt semisweet chocolate chips in a shallow bowl on High 1 minute, stirring after 30 seconds; stir until chips are melted and mixture is smooth, microwaving an additional 10 seconds as needed. Mix in 1 tablespoon oil. Using 2 forks, dip strawberry centers into melted chocolate and cover evenly. Place on waxed paper and smooth tops with the back of a spoon, if needed. Cool in the fridge until chocolate is set, about an hour.
Melt white chocolate chips in a shallow bowl on High 1 minute, stirring after 30 seconds; stir until chips are melted and mixture is smooth Mix in remaining 1/2 tablespoon oil and pink gel food coloring and place chocolate in a pastry bag with a number 4 tip. Drizzle chocolate over truffles.
Recipe from Cake, Batter, and Bowl

 I am Jen the Beantown Baker. Engineer by day and baking maven by night. Hubby serves as my #1 fan and official taste tester. We got hitched back in 2006. Barefoot. In the sand. With the waves crashing behind us. It was one of the best decisions we’ve ever made.


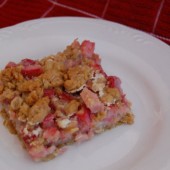
I’ve been anxious to try rhubarb but after many trips to the grocery store missed the season. (it sold out-FAST!) Did you use fresh or frozen rhubarb? I just saw the frozen kind and have been thinking about giving it a try.
~ingrid
Ingrid – I made this when I was home in the Midwest back in June. It seems easier to find out there than in the East Coast where I live. We use fresh and I’ve never used frozen although my dad does freeze his for the rhubarb rolls I made a few weeks ago too. I should have grabbed a ton and froze it myself…
I made these for a 4th of July party. we ran out of fresh and had to use frozen rhubarb, which tasted fine, we couldnt tell the difference (but we also had the fresh mixed in). Although I would suggest cutting the frozen pieces up a bit more- they came out of the bag huge! ~Jen’s older-younger sister
thanks little sis! Were they store bought or did Dad freeze them from fresh?
No kidding – those look like the best dessert ever!! I’m starring and making for sure!
Ya know what- I’ve never made anything with rhubarb! But those sure look yummy so I might have to try it 🙂
These look delicious!
I love rhubarb, what a great new way to use it;)
I really need to try rhubarb. I am afraid I won’t like it, but this looks like a great recipe!
Thank for the info Jen! I just may go ahead and give frozen a try otherwise its wait a year.
~ingrid