


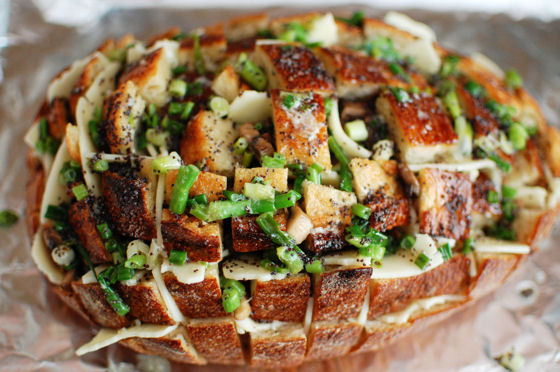
Cheesy Mushroom Pull Apart Bread
I’m just going to come out and say this bread is AMAZING. Seriously. If you are looking for ideas for the Superbowl, MAKE THIS BREAD. Actually, you should make it this weekend to test it out and play with what flavors you want to use as a practice run. Then make it again next weekend to share with your friends at the Superbowl.

But be warned, it’s quite addictive. In fact, maybe you should plan to bring two to your Superbowl party. It’s seriously so gooey from the melted cheese. The butter, green onion, and poppy seed sauce on top really takes this bread to the next level.
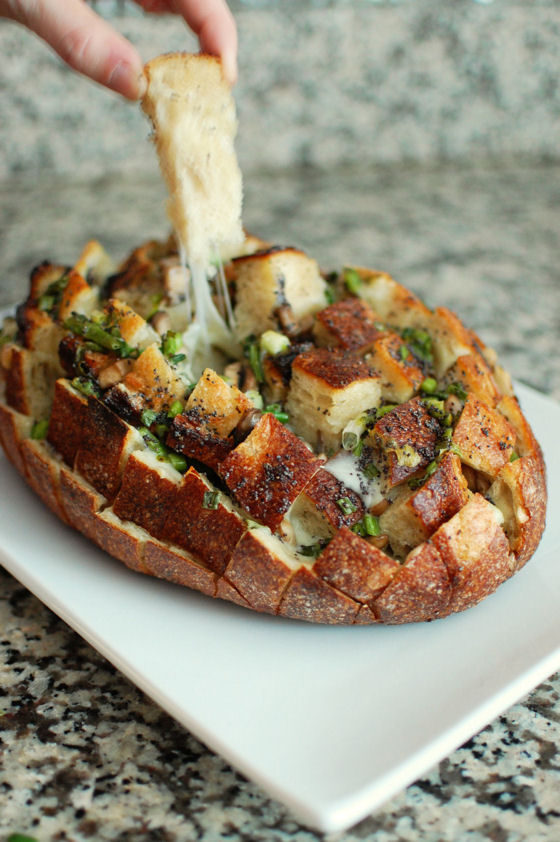
When I saw this recipe, I was instantly thinking of other flavors you could stuff into the bread. Anything that works on pizza would be great here. I went with provolone and mushroom this time. I’m sure it would be great with pepperoni and mozzarella, bacon and cheddar, or just plan old cheese. If you guys make this, you have to come back and let me know what flavors you made.
Two Years Ago: Chocolate Covered Strawberries
One Year Ago: Vegan Sugar Free Chocolate Rum Cookies


Cheesy Mushroom Pull Apart Bread
Mushrooms and cheese make this pull apart bread so delicious you won't be able to stop picking at it!
Yield: serves 6-8
Ingredients:
For the Mushrooms
12 oz sliced mushrooms
1 Tbsp butter
1 Tbsp chopped fresh thyme
For the Bread
1 unsliced loaf sourdough bread
12 ounces Provolone cheese, thinly sliced
1/2 cup butter, melted
1/2 cup finely diced green onion
2 teaspoons poppy seeds
Directions:
For the Mushrooms
Heat a medium skillet on medium. Add the butter. Once the butter is melted, add the mushrooms. Cook 4-5 minutes until they start to sweat. Add the thyme and continue to cook another 2-3 minutes.
Set mushrooms aside and allow to cool.
For the Bread
Preheat oven to 350 degrees.
Cut the bread lengthwise and widthwise without cutting through the bottom crust. This can be a little tricky going the second way but the bread is very forgiving.
Place loaf on a foil-lined baking sheet.
Insert cheese slices between cuts. Pour the mushrooms between the cuts. Use your fingers to push the mushrooms down into the loaf.
Combine butter, onion, and poppy seeds. Drizzle over bread. Wrap in foil; place on a baking sheet.
Bake at 350 degrees for 15 minutes.
Unwrap the bread and bake 10 more minutes, or until cheese is melted.
Recipe adapted from The Girl Who Ate Everything


 I am Jen the Beantown Baker. Engineer by day and baking maven by night. Hubby serves as my #1 fan and official taste tester. We got hitched back in 2006. Barefoot. In the sand. With the waves crashing behind us. It was one of the best decisions we’ve ever made.


already tasty with only the site alone.you gave the instructions in details