


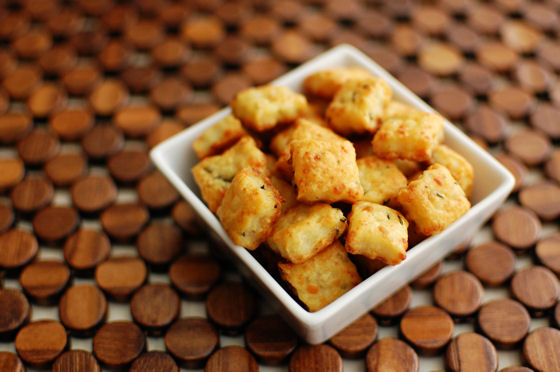
Garlic Parmesan Cheez Its
Homemade Cheez Its can be customized hundreds of ways! Garlic and cheese make a great combination for these snack crackers.
Garlic is one of Hubby’s all-time-favorite ingredients. Most times when it comes up in a recipe, we will double the amount called for in said recipe. We’re those people. While neither of us have tried anything crazy like garlic ice cream (although I’m intrigued at the thought), we are those people who always get garlic fries if they’re on the menu.
So it’s no surprise that shortly after I made my first batch of homemade Cheez-Its a couple years ago, I decided to whip up a batch with some garlic in it. I didn’t want to just use garlic salt or anything like that, so I threw a couple cloves of raw minced garlic right in to the dough. The resulting cracker is a garlicy-cheesey-crunchy cracker that’s as addictive as you would imagine.

I tossed in a little bit of rosemary just for good measure. I’ve also made this recipe without the rosemary and we like it just as much, if not more. Feel free to adapt to your tastes.


Garlic Parmesan Cheez Its
Simple crackers you can customize and make at home that taste better than the store-bought ones
Yield: ~12 dozen crackers
Ingredients:
4 oz sharp cheddar cheese, shredded
4 oz parmesan cheese, shredded
2-3 cloves garlic, minced
3 Tbsp chopped rosemary (optional)
3 Tbsp butter, softened
1 Tbsp vegetable shortening
1/2 tsp salt
1 cup flour
2 Tbsp cold water
Course sea salt for sprinkling
Directions:
In the bowl of a stand mixer, combine cheeses, garlic, rosemary, butter, shortening and salt on medium-high speed. Reduce speed to medium, slowly add flour and water.
Continue mixing until dough is smooth.
Divide dough into two, creating discs and wrapping in plastic. Chill for at least 30 minutes.
Preheat oven to 375 degrees. Prepare two baking sheets with silicone baking mats or parchment paper.
Roll out dough to 1/8″ thickness. Dough will be approximately 10"x10". Using a ruler as a guide, cut long 1" horizontal strips. Rotate ruler to slice vertically, creating 1"x1" squares. Carefully transfer individual squares to prepared baking sheet. Repeat process with remaining dough.
Using a toothpick or cake tester (I used a straw), create holes in the center of each square.
Sprinkle with course salt. Sprinkle with pepper if using.
Bake for 10-15 minutes. I removed mine at 12 minutes. The time will depend on the thickness of your squares as well as the crispness you prefer. Watch your oven closely from 10 minutes on.
Best eaten the same day. Store remainder in an airtight container.
Recipe from ReadmyMade Magazine, as seen on Baked by Rachel


 I am Jen the Beantown Baker. Engineer by day and baking maven by night. Hubby serves as my #1 fan and official taste tester. We got hitched back in 2006. Barefoot. In the sand. With the waves crashing behind us. It was one of the best decisions we’ve ever made.


YUM YUM YUM!
These look so good. Can’t wait to make these once it finally starts feeling like spring around here!
I love veggie burgers, this looks like a fantastic dinner option!
definitely delicious! i’ve been meaning to make a batch of burgers that I can stash in the freezer… these might have to be it 🙂
Dam from the look is so yummy .Cant wait to get it in my stomach.Thanks mate for such a dish…
This is a wonderful idea. I have never thought of using sweet potatoes in veggie burgers and I am thinking about it now.
beantownbaker — September 2nd, 2014 @ 7:10 pm
Definitely check them out. Sweet potato veggie burgers are where it’s at!
I’ve tried these and love them! however, how do you make them look so good and stay together? Mine are really wet (even after adding a lot more flour) and stick like crazy to my skillet. Any suggestions?
Craving Something Sweet and Delicious?
If you’re a fan of exotic flavors, why not add some Indian Mangoes to your cart? The season for these tropical delights is here! Get ready to enjoy the authentic taste of Indian Mangoes and make your fruit bowl extraordinary.
Check out our Indian Mangoes collection and order today!