


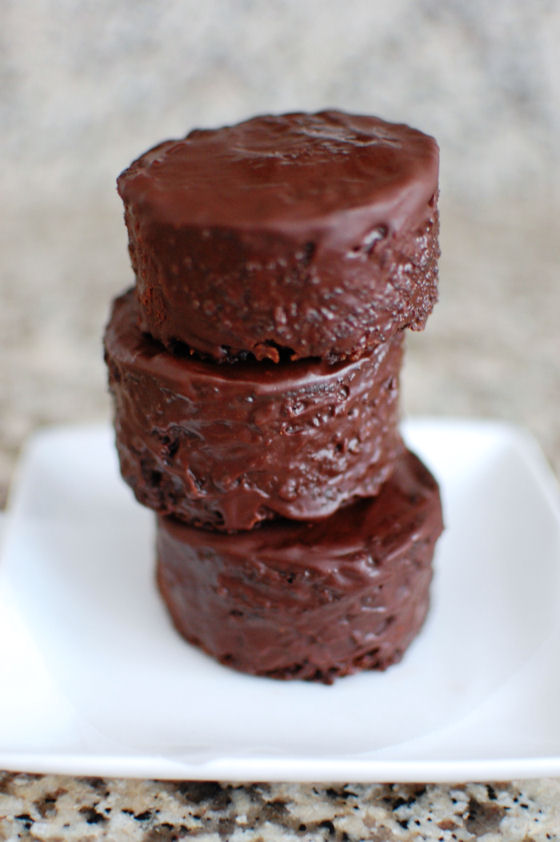
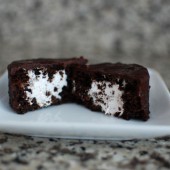
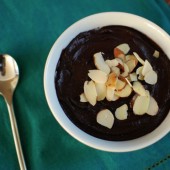
Homemade Ding Dongs or Ring Dings or whatever you call them
Our cooking club theme last month was Gourmet Kids Menu. We were all tasked to “gourmetify” a favorite kids food. We watched the movie Big while chowing down on some lobster mac and cheese, pizza with caramelized onions, goat cheese, and prosciutto, and other grown up kids foods.
Since I always make desserts, I wanted to find a classic childhood dessert and make it from scratch. I immediately thought of all the varieties of packaged desserts cakes and cookies that we always had in our lunch boxes growing up. My mom would let us choose a box of our favorite treat for our lunches. I always loved Swiss Cake Rolls and Oatmeal Cream Pies. Another favorite of mine was the Ding Dong.
Now I had no idea there was such a huge debate about these little guys, but apparently there is. Hubby of course had no idea what a Ding Dong was. I blame that he grew up on the East Coast. Once I found out the name he knew them by (Ring Dings) we were on the same page about the fact that it would be fun to try to recreate them from scratch. If you’re interested in learning more about the Ding Dong debate, check out this page on slashfood or this page on wikipedia.
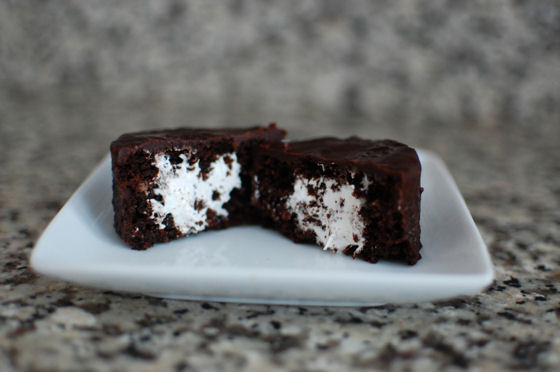
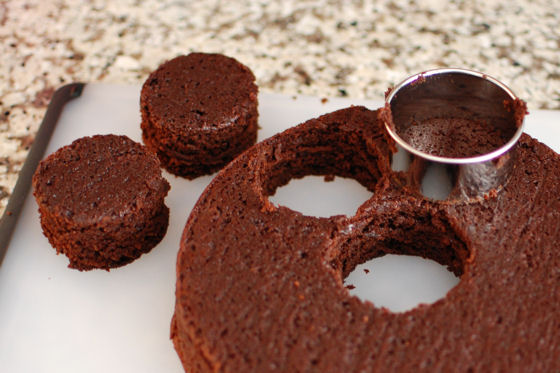
Once Hubby was on board with my idea, I set out to find a recipe. I had no idea how hard that would be, but decided to rely on one of my favorite bloggers, Deb from Smitten Kitchen. I made the cake in two nine-inch pans and after reading the comments realized that I’d have enough batter leftover for some cupcakes too – score! Instead of turning it in to a layer cake, I cut out rounds of cake (once again using those round cookie cutters my Dad thought I’d never use). Then I filled them with the whipped filling and coated them in ganache.
Let me tell you, these little Ding Dongs were amazing. The chocolate cake is so rich and moist. And how can you go wrong drenching anything in ganache? They were quite the labor of love though. I ended up using a brush to basically paint the ganache onto each one individually.
The filling was perfect as well. I have made fauxstess cupcakes before using the exact same filling recipe. This time it was much more fluffy and I definitely preferred it over the last time. Maybe I did it wrong last time, who knows.


Homemade Ding Dongs
Ding Dongs are a classic childhood lunch treat. Homemade Ding Dongs taste even better than you could imagine!
Yield: makes 12
Ingredients:
For the Cake
3 ounces fine-quality semisweet chocolate
1 1/2 cups hot brewed coffee
3 cups sugar
2 1/2 cups flour
1 1/2 cups unsweetened cocoa powder (not Dutch process)
2 tsp baking soda
3/4 tsp baking powder
1 1/4 tsp salt
3 eggs
3/4 cup vegetable oil
1 1/2 cups well-shaken buttermilk
3/4 tsp vanilla
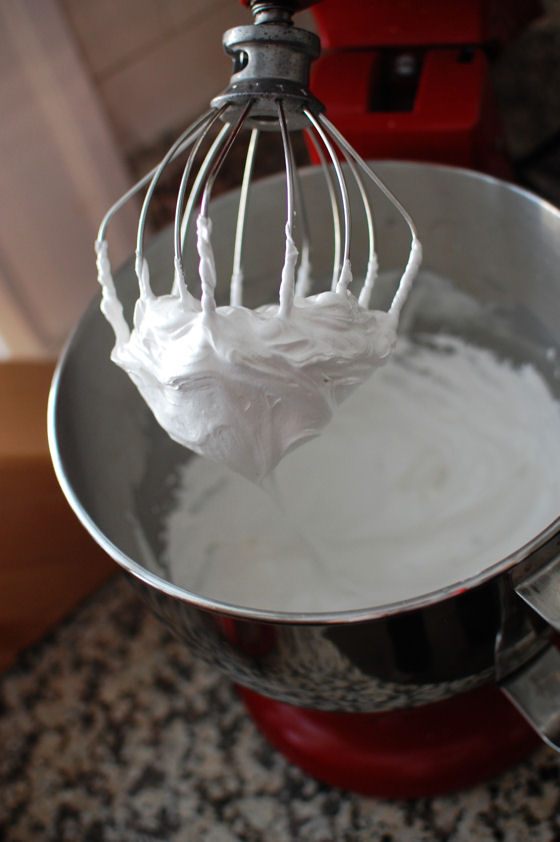
For the 7 Minute Frosting
2 egg whites
1/2 cup sugar
1/4 cup light corn syrup
2 Tbsp water
1 1/2 tsp pure vanilla extract
For the Ganache
1 cup heavy cream
1 Tbsp unsalted butter
12 oz semisweet chocolate, chopped into 1/2-ounce pieces
Directions:
For the Cake
Preheat oven to 300°F. and grease pans. Line bottoms of 2 10-inch round cake pans with wax paper and grease paper. If you don't have 10-inch cake pans, you can make 2 9-inch cake pans and a dozen cupcakes.
Finely chop chocolate and in a bowl combine with hot coffee. Let mixture stand, stirring occasionally, until chocolate is melted and mixture is smooth.
Into a large bowl sift together sugar, flour, cocoa powder, baking soda, baking powder, and salt. In another large bowl with an electric mixer beat eggs until thickened slightly and lemon colored. Slowly add oil, buttermilk, vanilla, and melted chocolate mixture to eggs, beating until combined well. Add sugar mixture and beat on medium speed until just combined well.
Divide batter between pans and bake in middle of oven until a tester inserted in center comes out clean, 1 hour to 1 hour and 10 minutes.
Cool layers completely in pans on racks. Run a thin knife around edges of pans and invert layers onto racks. Carefully remove wax paper and cool layers completely. Cake layers may be made 1 day ahead and kept, wrapped well in plastic wrap, at room temperature.
For the 7 Minute Frosting
Combine frosting ingredients with a pinch of salt in a metal bowl set over a saucepan of simmering water and beat with a handheld electric mixer at high speed until frosting is thick and fluffy, 6 to 7 minutes. Remove bowl from heat and continue to beat until slightly cooled. Use frosting the day it is made.
For the Ganache
Heat the heavy cream and the butter in a 3-quart saucepan over medium high heat. Bring to a boil.
Place the semisweet chocolate in a 3-quart stainless steel bowl. Pour the boiling cream over the chocolate and allow to stand for 5 minutes. Stir until smooth.
To assemble the Ding Dongs
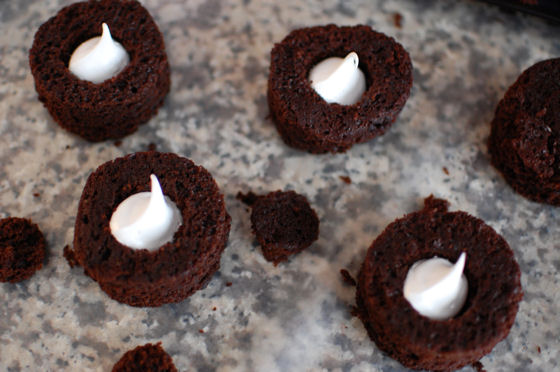
Once the cake layers have cooled completely, use a small round cookie cutter to cut small circles of cake out of the layers. Enjoy the scraps or save them for cake balls.
Using the cone method, scoop out a small portion of cake from each circle. Fill with 7-minute frosting and replace top of cake.
Using a pastry brush or spoon, cover individual cakes with ganache. Allow ganache to completely set up before serving.
Recipe from Smitten Kitchen

 I am Jen the Beantown Baker. Engineer by day and baking maven by night. Hubby serves as my #1 fan and official taste tester. We got hitched back in 2006. Barefoot. In the sand. With the waves crashing behind us. It was one of the best decisions we’ve ever made.


so there’s no cocoa or chocolate in it whatsoever or is that a typo? wondering how it gets that rich chocolate color! 🙂
beantownbaker — January 10th, 2014 @ 10:43 am
You’re right. Sorry about that – it’s a typo… I have updated the recipe. It calls for a heaping 1/2 cup of cocoa.
I just discovered your blog after looking up a recipe for Butterbeer 🙂 I love your photos and, most importantly, I want to eat them all! Looking forward to following your blog!
beantownbaker — January 10th, 2014 @ 10:43 am
Glad to have you!
I believe you have forgotten to add the chocolate part of this recipe.
beantownbaker — January 10th, 2014 @ 10:43 am
You’re right. Sorry about that. I have updated the recipe. It calls for a heaping 1/2 cup of cocoa.
i looove chocolate avocado pudding! i make mine with maple syrup and almond butter instead of honey, but i’ll have to try and mix it up from time to time 🙂
beantownbaker — January 12th, 2014 @ 2:54 pm
Oh I’ll have to try it your way too!
Thanks!! Now I gotta try this…. Can’t wait!
If some one wishes expert view concerning blogging then i recommend him/her to
go to see this blog, Keep up the fastidious work.
Thanks. An abundance of info!
Howdy! This is my first visit to your blog! We are a team of volunteers and starting
a new project in a community in the same niche. Your blog provided us useful information to work on.
You have done a wonderful job!
you are truly a just right webmaster. The web
site loading speed is incredible. It sort of feels that you’re
doing any unique trick. Furthermore, The contents are masterpiece.
you have performed a magnificent task on this topic!
Thanks so much for this recipe! It’s awesome and tastes really good. I wrapped it inside of a dark chocolate shell and they made the most perfect chocolate truffles. Everyone loved them for Christmas! Thanks again.