


Peach Cherry Pie with Crumb Topping
I found out a couple weeks ago that the number one thing my mom craved when she was pregnant with me was peaches – guess I’ve loved them since day 1! Then growing up, we had a peach tree in our back yard. I remember being very young and eating fresh juicy peaches off of our tree.

When looking through my blog, I haven’t posted many peach recipes. I think that’s because I prefer to just eat them straight up. Why mess with them by baking them?!? But a couple weeks ago my eyes were bigger than my stomach. I found myself up to my elbows in fresh ripe peaches. I just couldn’t eat them fast enough.

So I started searching for a recipe to help use up my bounty of peaches. First I stumbled upon this recipe for a peach-cherry galette. As I mentioned before, I’m not a huge fan of raw cherries. While I was browsing the internet, this recipe for a crumb topped fruit pie also caught my eye.

I decided to combine these two recipes into one amazingly delicious pie. I can definitely see myself making this pie again with a whole variety of fruit fillings. If you can dream up a combination of fruits, I’m sure it would work in this recipe.

I shared this pie with Hubby’s family on a recent weekend trip to Newport. Everyone enjoyed the pie, especially nuked for 30 seconds with a scoop of vanilla bean ice cream on top.

One Year Ago: Nectarine Blueberry Cobbler
Two Years Ago: Salmon Burgers, Chicken Parmesan Burgers, and Burger of the Gods
Three Years Ago: Cinnamon Roll Cupcakes with Cream Cheese Frosting and Strawberry Peach Basil Cupcakes
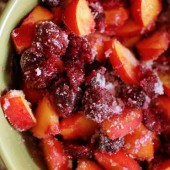


Peach Cherry Pie with Crumb Topping
Peaches and cherries prove to be a great combo in this pie
Yield: 1 pie, Serves 12
Ingredients:
For the Pie
1 pie crust
For the Pie Filling
3 cups peaches, sliced
2 cups cherries, stemmed, pitted, and cut in half
3/4 - 1 cup sugar
3 Tbsp flour
1 Tbsp lemon juice
1/8 tsp salt
For the Crumb Topping
3/4 cups flour
1/4 cup + 2 Tbsp brown sugar
2 Tbsp + 2 tsp sugar
1/8 tsp salt
1/8 tsp cinnamon
3/4 stick chilled unsalted butter, cut into pieces
Directions:
For the Pie
Preheat oven to 400 degrees.
Prepare you favorite pie crust recipe and roll into a pie plate.
For the Pie Filling
Combine 5 fruit with sugar, flour, lemon juice, and salt.
For the Crumb Topping
In a bowl, mix flour, both sugars, salt, and cinnamon.
With your hands, work in butter pieces, until large clumps form.
Assemble the Pie
Pour pie filling into pie shell. Sprinkle with the crumb topping.
Place on foil-lined baking sheet in lower third of oven; reduce heat to 350 degrees.
Bake until fruit bubbles and crust browns, 1 1/2 hours. If topping begins to brown too quickly, tent with foil. Let cool 6 hours.
Pie inspired by Martha Stewart, filling inspired by A Splash of Vanilla


 I am Jen the Beantown Baker. Engineer by day and baking maven by night. Hubby serves as my #1 fan and official taste tester. We got hitched back in 2006. Barefoot. In the sand. With the waves crashing behind us. It was one of the best decisions we’ve ever made.







How cool! These look delicious!
This totally takes me back to childhood. We ALWAYS used fresh rhubarb from our backyard to make yummy breakfast treats!
I think I will have to make these for my parents next time they visit. They will LOVE them!
Those look amazing! I’m always on the lookout for new rhubarb recipes, the season for it is so short in Western Ma, that I tend to buy WAY too much and stick in the freezer..
I have never had rhubarb before, but these look great!
They’re so pretty – I love family recipes!
I never know what to do with Rhubard, but these looks awesome!
divine. i want one. right now. pretty please?? 🙂
I love your recipes, lactose free and awesome, I will def. have to try this. Ps. we should team up and do something lactose free together in solidarity!
Thanks everyone – seriously if you have rhubarb hanging around. Make these. You won’t regret it.
I’m a little lost. The ingredients list mentions 5 c. rhubarb (and you break it into 3 c. for the filling and 2 c. for the sauce) but I don’t see in the step-by-step instructions when/where/how the 2 c. of rhubarb are used. Please help!
Thanks!
alexandjess – thanks for catching my mistake. I added the instructions about the sauce into the post, but you make the sauce by boiling 2 cups cut rhubarb, 1 cup sugar, 1 1/3 cups water. The rhubarb for the sauce can be cut in large chunks because it all falls apart anyways.
Your sisters made the rhubarb rolls and stuffed dates yesterday for our Memorial Day cookout. They were delicious!!!! Can’t wait to have another piece tonight for desert. I have a new recipe for potato salad that is delish….let me know if you want me to pass on.
i made these tonight and they went awry for a series of reasons that were my fault and won’t go all into…. one thing i did though was use half rhubarb and half strawberries, which sounded delish but i didn’t cut the sugar enough and i think that also made things more watery. my question though, is whether by ‘shortening’ you specifically mean something like crisco or whether you just mean butter or margarine or anything like that. i used butter and didn’t see how i could get away with a little ‘stirring’ before rolling. i tried to cut it in with a pastry blender, but in the end maybe that was too much action for the dough as it seemed a little gummy after cooking….
i’d appreciate any advice!
natasha – I use Crisco for the dough. I think that’s what my dad always uses as well. Hopefully that is what caused the gumminess. Sorry they didn’t turn out for you.
My family has been making these for years. I have used butter or margarine to cut into the flour mixture for the dough and have never had a problem. I always roll my dough out into a rectangle and when I cut the rolls they NEVER look as neat as the ones you have pictured! I have added strawberries but only in the sauce. My mom liked to add red food coloring to make it look more rosy. We bake for 20 minutes before pouring on the sauce and then another 20 minutes. I have to make it every spring in honor of my mom.
my grandma recipe calls thesr soringtime rollypoly, and can ad what ever frozen berries you have , frozen is the least messy
sorry thats springtime rollypolly