


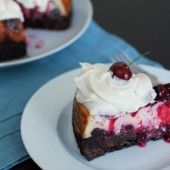
Cherry Brownie Cheesecake
I have a confession to make. While I love almost all fruits and veggies, there are just some fruits I CANNOT eat raw. Fruits that have a thin skin covering their flesh. Think blueberries, grapes, and cherries. Unlike Hubby, who can eat blueberries until his hands and mouth are literally blue, I just can’t do it. The texture really grosses me out.

Just because I don’t eat these fruit raw, doesn’t mean I don’t love baking with them. As evidenced by the plethera of blueberry recipes I’ve already posted, I clearly enjoy the flavors these fruits have to offer.
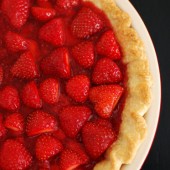
Cherries are a new food for me. Since I don’t eat them raw, and Hubby doesn’t crave them year-round, we just never buy them. On our recent strawberry picking adventure, the farm also had cherry picking available. The cherries looked amazingly juicy and full of flavor. We didn’t end up picking any, but I’ve been seeing tons of cherry recipes popping up on the internet recently.

Then I was at the store and cherries were on sale for a great price. On a whim, I stuck a bag in my cart and brought some home. Hubby was shocked and instantly started snacking on them, claiming he was taste testing them to make sure they were safe for consumption.

Before Hubby ate his way through the whole bag, I set off to find something to make with my impulse buy. There were quite a few recipes out there that caught my eye. I decided to combine this recipe for a Cherry Brownie Cheesecake and this recipe for Roasted Cherry Brownies into one.
I used my Go-To Brownie Recipe for the brownie layer. Instead of using canned cherry pie filling, I used roasted cherries in between the brownie and cheesecake layers, and more on top. I figure if I’m going to heat up the oven to 450 on a hot summer day, I might as well roast a ton of cherries at once.

Hubby and I agreed that this cheesecake was a great way to use up this bag of cherries. We also agreed that I need to buy cherries more often to bake something with them. Roasting fruit gives it a deeper, more sophisticated flavor profile. And who can beat the combination of brownies, cheesecake, and cherry?
Since I don’t have a cherry pitter, I just used a sturdy plastic straw to remove the pits of the cherries. It did take a bit of time to stem, pit, and chop a pound and a half of cherries, but it’s definitely worth it. If you’re in a hurry, you could definitely use brownie mix and store-bought whipped chream instead of making everything from scratch.

One Year Ago: Blueberry Cheesecake Bars and Raspberry Almond Coconut Breakfast Quinoa
Two Years Ago: Blueberry Almond Cake with Lemon Drizzle
Three Years Ago: Chocolate Peanut Butter Cupcakes and Goat Cheese Potato Salad
Four Years Ago: Strawberry Cupcakes with Strawberry Frosting
 I am submitting this for this month’s What’s Baking, hosted by Jaida of Sweet Beginnings. This month’s theme is Summer Fruit!


Roasted Cherry Brownie Cheesecake
Roasting fruit lends itself to a more sophisticated flavor. The combination of roasted cherries, cheesecake, and brownies will surely please anyone you serve this to.
Yield: Serves 12
Ingredients:
For the Roasted Cherries
1.5 lb (~4 cups) cherries, stemmed and pitted
1/4 cup sugar
For the Brownie Layer
1/2 cup (1 stick) unsalted butter
1 cup + 2 Tbsp sugar
1/2 cup + 2 Tbsp cocoa
1/2 tsp salt
1/2 tsp baking powder
1/2 tsp espresso powder, optional
1/2 Tbsp vanilla
2 eggs
3/4 cup flour
1 cup chocolate chips
For the Cheesecake
3 8-ounce packages cream cheese, softened
3/4 cup sugar
3 eggs
For the Garnish
4 ounces softened cream cheese
1/2 tsp vanilla
1 cup powdered sugar
1 cup heavy whipping cream
6-10 cherries
Directions:
For the Roasted Cherries
Preheat oven to 450F.
Place pitted, chopped cherries in a small casserole dish or cake pan. Top with sugar and stir. Bake for 15 minutes, stirring every 5 minutes.
Remove from oven and set to 350F.
For the Brownie Layer
While the cherries are roasting, prepare the brownie batter. Grease a 9" springform pan with baking spray.
In a saucepan set over low heat, melt the butter, then add the sugar and stir to combine.
Transfer the sugar mixture to a medium-sized mixing bowl, if you've heated it in a saucepan. Stir in the cocoa, salt, baking powder, espresso powder, and vanilla.
Whisk in the eggs, stirring until smooth.
Add the flour and chips, again stirring until smooth.
Spread into a prepared pan and bake 10-12 minutes or until brownie is just set, but not completely done.
For the Cheesecake
While the brownies are baking, in a large bowl, beat cream cheese and sugar on medium speed until well combined and smooth.
Add in the eggs on low speed and set the mixture aside.
Carefully spoon (1 cup) of the roasted cherries into the center of brownie, leave a 2-inch brownie border along sides of pan. Place remaining roasted cherries in a covered dish and refrigerate until ready to serve.
Gently scoop the cream cheese mixture over surface; carefully spread to edges of pan. Bake for 35-40 minutes or until center is set, but jiggles when the pan is lightly tapped.
Leaving the cheesecake in the oven, turn off oven and crack oven door. Allow to come to room temperature. This will take about an hour.
Cover and chill at least 4 hours before serving.
For the Garnish
Spoon the remaining roasted cherries on top of the cheesecake.
Using an electric mixer with a whisk attachment, beat the cream cheese, vanilla, and sugar until light and creamy. Beat in 1/4 cup whipping cream until smooth.
Add the rest of the cream and beat until it has the consistency of whipped cream (don’t overmix).
Pipe onto cheesecake and place one cherry on each swirl of whipped cream.
Recipe inspired by Tidy Mom, Brownie recipe from My Go-To Brownie Recipe, Roasted Cherries from Pastry Affair, Cream Cheese Whipped Cream from me


 I am Jen the Beantown Baker. Engineer by day and baking maven by night. Hubby serves as my #1 fan and official taste tester. We got hitched back in 2006. Barefoot. In the sand. With the waves crashing behind us. It was one of the best decisions we’ve ever made.


love strawberries
http://www.adsexperts.net