


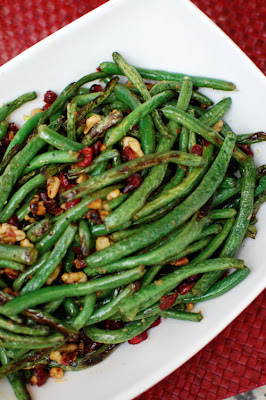
Roasted Green Beans with Cranberries and Walnuts
For anyone out there who claims they don’t like a vegetable, my suggestion is always to roast it. Roasting veggies is hands down my favorite way to prepare them. And it’s quick and easy.

I have converted my family from people who had never had brussels sprouts to people who love them thanks to roasting them. I used to be one of those people who claimed to dislike green beans. I think it’s because I grew up eating canned green beans. And French cut no less. Blech. Once my eyes were opened to the wonders of fresh green beans, I started to really appreciate them. I did what I do best and roasted them. Now there’s no turning back.
I love that this recipe has a festive twist by adding the dried cranberries and walnuts to already delicious roasted green beans. This would make a great contribution to any dinner, whether it’s for a holiday or just any old night of the week.
One Year Ago: Homemade Pumpkin Puree
Two Years Ago: Butternut Squash Lasagna Rolls and Spiced Butternut Squash Cupcakes
Three Years Ago: Cranberry Almond Caramel Tart and Cranberry Apple Pumpkin Muffins
Four Years Ago: Depths-of-Fall Butternut Squash Pie and The Ultimate Chewy and Soft Chocolate Chunk Cookies


Roasted Green Beans with Cranberries and Walnuts
Roasted green beans are delicious in their own right. Add some dried cranberries and walnuts and you have a perfect holiday side dish.
Yield: Serves 4-6
Ingredients:
2 pounds fresh green beans, stem ends trimmed
4 cloves garlic, peeled and sliced into quarters
2 Tbsp extra virgin olive oil
1 1/4 tsp kosher salt
1/2 tsp freshly ground black pepper
1/4 tsp sugar
zest of one lemon
juice of one lemon
1/2 cup dried cranberries
1/2 cup walnuts, toasted
Directions:
Preheat oven to 450 degrees. Line a rimmed baking sheet with aluminum foil.
Toss green beans with garlic, olive oil, salt, pepper and sugar directly on the prepared baking sheet.
Roast the beans for 15 minutes, then stir with a spatula to promote even cooking.
Meanwhile, in a small bowl, combine lemon zest, lemon juice, cranberries and walnuts and toss well.
Continue roasting until beans are tender, slightly browned and just starting to shrivel, about 10 minutes more.
Toss beans with cranberry mixture. Taste and adjust seasoning with salt, pepper and more lemon juice if desired.
Recipe from Once Upon a Chef


 I am Jen the Beantown Baker. Engineer by day and baking maven by night. Hubby serves as my #1 fan and official taste tester. We got hitched back in 2006. Barefoot. In the sand. With the waves crashing behind us. It was one of the best decisions we’ve ever made.


