


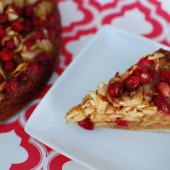
Cranberry Almond Caramel Tart

Have you heard of Smitten Kitchen? If you haven’t, you should check it out. It’s definitely one of my favorite food blogs (I’ve made a fewof herrecipes over the past couple of years). I love the photography and I want to try almost all of her recipes… I’ve had my eye on this recipe for quite some time now. Again, I think it’s the pictures on SK that really draw me in. When I showed it to Hubby, he was intrigued by the homemade caramel in the tart. See he’s a caramel man. Put caramel on anything and he’d eat it. I’m convinced of that… I’m definitely more of a chocolate girl myself.

We had more friends over for dinner and again, I was looking for something special to make. This recipe immediately came to mind. Usually, I am very organized about my baking. I plan everything out and work recipes in parallel so that I’m not sitting around waiting for something to finish before moving on to the next step. I failed at that organizational calmness with this recipe. I had read the entire recipe through, it just didn’t process that day. I had the dough chilling while the caramel was chilling, but I missed the fact that the dough had to be pre-baked. So then I had to bake the dough, allow it to cool again prior to putting the filling into the tart. Then the whole thing had to bake and cool prior to eating. I realized that the dough hadn’t been pre-baked about 20 minutes before our guests arrived.

And to make matters worse, I had visions in my head of cute mini-tarts just like Deb did, however it just wasn’t in the cards. I tried to hit up a Bed Bath and Beyond on my way home from a doctor’s appointment the morning of the dinner party and they didn’t have any tart pans in stock. No mini tart pans, no big tart pans. So I decided to use my 9″ springform pan instead.

In the end, it all worked out and this tart tasted amazing. The combination of a velvety smooth caramel, the tart fresh cranberries, and the crunch of the slivered almonds is just amazing. The sweet dough holding all of those components together is divine. This tart does take some time and patience to put together, but boy is it worth it!
Since Deb at Smitten Kitchen said that the dough in her recipe didn’t turn out so great for her, I read all the comments and decided to use Dorie Greenspan’s sweet tart dough recipe instead. It was very easy to work with and tasted great.


Cranberry Almond Caramel Tart
Ingredients:
For the Dough
1 1/2 cups all-purpose flour
1/2 cup confectioners' sugar
1/4 teaspoon salt
1 stick plus 1 tablespoon (4 1/2 ounces) very cold (or frozen) unsalted butter, cut into small pieces
1 large egg yolk
For the Filling
1 1/4 cups heavy cream
1/2 cup (1 stick) unsalted butter, cut into eight pieces
1 cup granulated sugar
1 3/4 cup frozen cranberries
2 cups unblanched sliced almonds
Directions:
For the Dough
Put the flour, confectioners' sugar and salt in the workbowl of a food processor and pulse a couple of times to combine. Scatter the pieces of butter over the dry ingredients and pulse until the butter is cut in coarsely - you'll have pieces the size of oatmeal flakes and pea-size pieces and that's just fine. Stir the egg, just to break it up, and add it a little at a time, pulsing after each addition. When the egg is in, process in long pulses - about 10 seconds each - until the dough, which will look granular soon after the egg is added, forms clumps and curds. Just before your reaches this clumpy stage, the sound of the machine working the dough will change - heads up. Turn the dough out onto a work surface.
Very lightly and sparingly - make that very, very lightly and sparingly - knead the dough just to incorporate any dry ingredients that might have escaped mixing.
If you want to press the dough into a tart pan, now is the time to do it.
If you want to chill the dough and roll it out later (doable, but fussier than pressing), gather the dough into a ball (you might have to use a little more pressure than you used to mix in dry bits, because you do want the ball to be just this side of cohesive), flatten it into a disk, wrap it well and chill it for at least 2 hours or for up to 1 day.
Butter the tart pan and press the dough evenly along the bottom and up the sides of the pan. Don't be stingy - you want a crust with a little heft because you want to be able to both taste and feel it. Also, don't be too heavy-handed - you want to press the crust in so that the pieces cling to one another and knit together when baked, but you don't want to press so hard that the crust loses its crumbly shortbreadish texture. Freeze the crust for at least 30 minutes, preferably longer, before baking.
Center a rack in the oven and preheat the oven to 375 degrees F. Butter the shiny side of a piece of aluminum foil and fit the foil tightly against the crust. Bake the crust 25 minutes, then carefully remove the foil. If the crust has puffed, press it down gently with the back of a spoon. Bake for another 3 to 5 minutes, then transfer the crust to a cooling rack; keep it in its pan.
For the Filling and Assembly
Measure the cream and butter into a saucepan and heat it over low heat. When the butter has melted completely, remove from heat.
To make the caramel, spread the sugar evenly in a perfectly dry, deep 10-inch skillet and place it over medium-low heat.
The sugar should turn straw-colored, then gold and then a nutty-brown caramel after about 10 minutes. If the sugar cooks unevenly, gently tilt or swirl the pan to evenly distribute the sugar. Remove from heat and slowly whisk the cream and butter into the sugar, which can splatter as the cream is added. If the caramel seizes, return it to the heat and continue to stir until it is smooth and creamy. Strain the caramel into a bowl and cool it for 30 minutes.
Stir the frozen cranberries and the almonds into the caramel and mix until all the fruit and nuts are coated. Spoon the filling into the partially baked tart dough mounding toward the center.
Bake for 25 to 30 minutes, until the juices and the caramel are bubbling slowly around the edges. Remove from the oven and let stand for 1 hour, then gently lift the tart ring off the pastry.
Carefully transfer the tart to a serving platter. Serve warm or at room temperature.
Filling recipe from Smitten Kitchen
Tart dough recipe from Dorie Greenspan as seen in Baking from my Home to Yours
Check out my week of Cranberries here.

 I am Jen the Beantown Baker. Engineer by day and baking maven by night. Hubby serves as my #1 fan and official taste tester. We got hitched back in 2006. Barefoot. In the sand. With the waves crashing behind us. It was one of the best decisions we’ve ever made.


WOW – I would like to have a piece of that cake as soon as possible! looks beautiful and delicious!
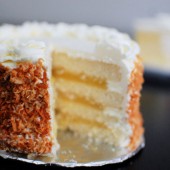
This cake looks beautiful and I love the addition of toasted coconut!
I love love cakes with coconut. So delicious.
Beautiful cake!
Totally agree – the more layers the better! The cake looks stunning!
Had I been at your dinner party you wouldn’t have had to cook anything. I would have just completely indulged in this gorgeous cake!
This cake looks incredible! coconut and lemon are two of my favorite flavors; I’m glad you don’t have to choose one or the other with this recipe.
This sounds wonderful. Coconut with lemon curd, yummmm!
This looks fantastic – so springy and beautiful, and absolutely delish 🙂
what a wonderful cake!
Beautiful cake! I’ve been craving a coconut cake, but I know too many people who don’t like coconut cake that if I made it I wouldn’t have anyone to share. Boo.
ooh, fabulous. love the lemon curd-coconut combo, and in a layer cake, fun!!
OF COURSE 4 is better than 2!!! This looks amazing….I love the idea of lemon and coconut together-and it’s gorgeous!
Love lemon curd, love coconut, especially love a cake that lets me “frost” the sides with ease. This looks so yummy!!
Such a delicious cake! I honestly didn’t know a 6 inch was half of a 9 inch….thank you 🙂
I told my girlfriend I would bake her a cake for her birthday this Sunday !!! I got lemon curd and coconut stuck in my brain, so I started googling… which led me to your page !!! This recipie looks almost perfect !!
Couple questions…
Do you think the coconut extract was too strong for the cake, because you also have the browned coconut pcs too? I was considering vanilla bean cake, lemon curd and toasted coconut on the outside… but perhaps that wouldn’t be enough coconut flavour…. your thoughts?
Lastly… what did you use as the frosting to keep the toasted coconut on? It looks like whipping cream…. ?!?!?
Thanks !!!
Kelly
P.S
This is the first cake I’ve ever baked !!! lol