


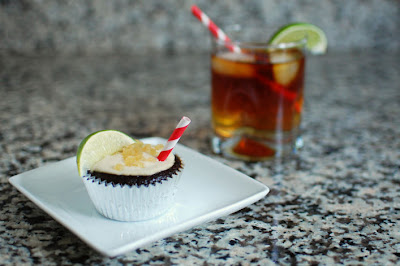
Dark and Stormy Cupcakes
First, I have to give a shout-out to my younger sister Brooke – today is her birthday! Happy birthday sis – see you next weekend!!
Last week, I shared one of my favorite cocktail recipes. If you follow me on Instagram, you know that I enjoy a Dark and Stormy whenever I get the chance. A fellow Boston area blogger, Amanda of Tales from a Kitchen Misfit, also loves a good Dark and Stormy.
She’s usually the first to like my Dark and Stormy pics or comments and has shared quite a few herself. Earlier this year, she made her own birthday cake. As a baker, I can appreciate the feeling. People ask why I don’t want someone else to make my birthday cake and it’s an obvious answer. By making my own, I have complete control over the complexity, flavors, decorations, etc. I can make a big old cake exactly how I want it. But I digress.
Amanda’s birthday cake this year was a Dark and Stormy cake. Mind blown. I knew I had to make this cake the second I saw it. I decided to mix things up a bit to really enhance the flavor of a Dark and Stormy. I find that when baking with alcohol, the flavor of the alcohol often gets lost.
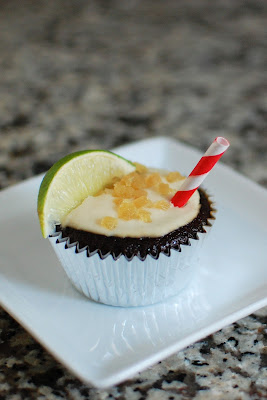
I used the same cake recipe as Amanda, but made it into cupcakes. After they were cooled, I soaked the cupcakes in some rum to really get that rum flavor in there. Instead of the frosting Amanda used, I just used a simple cream cheese frosting but added some ginger to mimic a ginger beer. And added more rum. Finally, I topped the whole thing with some candied ginger.
To say these cupcakes were a hit is an understatement. Everyone loved them and they disappeared very quickly. They were quite boozy tasting, which is what I was going for. I served them at an adult party, so no one seemed to mind. I definitely can’t wait to make these again.
By the way, the lime and straw garnish are a must for these cupcakes.
One Year Ago: Pumpkin Butterscotch Cheesecake Bars
Two Years Ago: Acorn Squash Stuffed with Autumn Fruit Compote and Lime Cilantro Sweet Potatoes with Black Beans
Three Years Ago: Rocky Road Squares
Five Years Ago: Gnocchi with Shrimp, Asparagus, and Pesto and Oreo Truffles


Dark and Stormy Cupcakes
A Dark and Stormy is one of my favorite cocktails. Making them into cupcakes is a great way to enjoy them.
Yield: 24 cupcakes
Ingredients:
For the Cupcakes
2 cups all purpose flour
2 tsp baking soda
2 tsp ground ginger
1 tsp ground cinnamon
1 tsp salt
1 cup canola oil
3/4 cup plus 2 tbsp sugar
1/2 cup dark molasses
3 large eggs
1 cup boiling water
For the Frosting
4 oz cream cheese at room temp
1/2 stick (4 Tbsp) butter at room temp
2 tsp ground ginger
2 Tbsp Gossling's Black Label rum
2 - 2 1/2 cups powdered sugar
Optional Garnishes
2/3 cup Gosling's Black Label rum
1/2 cup candied ginger, chopped
Directions:
For the cupcakes
Preheat oven to 350F. Line muffin pans with 24 cupcake liners.
In a medium bowl, whisk flour, baking soda, ginger, cinnamon and salt and set aside.
In the bowl of a stand mixer with the paddle attachment combine the oil, sugar and molasses. Mix on medium speed until blended. With the stand mixer running on low, add the eggs, one at a time, until completely mixed.
Add the flour mixture slowly and mix until just combined. Add the boiling water and mix on low speed until combined.
Divide batter into both cake pans and bake for about 25 minutes, or until a toothpick inserted in the center comes out clean.
Let cakes cool in pan for about 45 minutes.
For the Frosting
Place the cream cheese in the bowl of your mixer. Beat on medium-high until completely smooth, 3-4 minutes. Add the butter and continue to cream until fluffy.
Add ground ginger and rum. Slowly add powdered sugar (1/4 cup at a time) until desired consistency is reached.
Assemble the Cupcakes
Once cupcakes have cooled completely, poke holes into the top of each cupcake.
Pour 1 tsp rum on top of each cupcake and allow cupcakes to soak in the rum.
Spread frosting onto cupcakes and garnish with candied ginger.
Cupcake Recipe adapted from Sweet Cream and Sugar Cones, as seen on Kitchen Misfit.
Frosting Recipe adapted from My Go-To Cream Cheese Frosting Recipe


 I am Jen the Beantown Baker. Engineer by day and baking maven by night. Hubby serves as my #1 fan and official taste tester. We got hitched back in 2006. Barefoot. In the sand. With the waves crashing behind us. It was one of the best decisions we’ve ever made.


these look so fun! i, too, am LI, but i carry lactaid with me everywhere… and jp licks makes a lactose free flavor 🙂
Lactaid is my best friend. I have spare pills in the car, in Hubby’s wallet, in my purse and desk. Can’t ever be too prepared! I have had their lactose free flavors and they’re quite tasty. I wish they had more than one a month though!
Ooooh. This looks too good. I’m gonna have to try that.
I love the idea of using the cone method for ice cream cupcakes. I hadn’t thought of that. That strawberry down the middle of the cupcake is so perfect! I’m so glad you entered again!
I wouldn’t be able to live without ice cream! Your cupcakes are beautiful. Good luck in the competition!!!
They look pretty! Love the photo of the cross section where you can see the strawberry.
~ingrid
Those cupcakes look scrumptious! Oh, and you’ve gotta try Purely Decadent made with Coconut Milk Ice Cream! It’s rich and creamy, a lot like gelatto!
Thanks Vegiegail – I’ll have to check that out.
So cute! These are so pretty with the strawberry in the middle and they look delicious.
voted for your strawberry one..good luck!
gorgeous. love the inset strawberry. love the Neapolitan theme.
bethany@scoopalicious
I agree with you about the non-dairy ice creams available in stores. However, If you have an ice cream maker vegan chick-0-stick ice cream is unbelievably rich, creamy and delicious.
Here is the recipe http://couldntbeparve.blogspot.com/2008/09/chick-o-stick-ice-cream_04.html
Hey, these cupcakes sound awesome! I use to be Lactose Int., but I found the best cure ever & seriously have been L.I. cured for 7 years. I could not give up my dairy & use to take 3 Lactaid every time I ate.I heard about “Lactogen” on the radio on the way home from a trip. I would do anything to get rid of my L.I. so it was $90.00 at the time so I said what the heck I spent $200.00 a year on Lactaid. I was floored that it worked & 7 years later still no signs. I drink milk every morning, cheese everyday, & ice cream when ever. It retrains your body to except lactose, so for 42 days while you take it (a mix to drink with water) you have to stay away from all dairy & anything with dairy in it. I just went to the health food store during that time. I am sure you can find it on the web. Lactogen is the name
This is my second post, it erased my first. But for all you suffering with Lactose Int. try Lactogen it really works I have been cured for going on 7 years now. It was only $90.00 when I tried it & I was spending $200 a year on Lactaid at the time. I now can drink milk every morning, & eat cheese every day & ice cream when ever. It is not an on going thing you take it once for 43 days & that is it.