


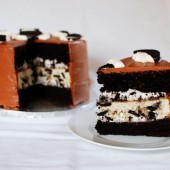
Triple Layer Oreo Cake
When Hubby and I get invited to a party, a lot of times, the host will ask me to bring a dessert. I always enjoy sharing my baked goods with friends and family members, so I’m happy to oblige.

When Hubby’s mom mentioned that she wanted me to make a cake for a surprise birthday celebration, I knew I needed to put my thinking cap on and come up with something special. I threw out a couple ideas for some layer cakes that I had in mind and it was decided to go with the Oreo/chocolate combination.

Now I can’t claim complete credit for the concept of this cake. I actually got an email from Jessica at Finance Foodie a couple months ago. She wanted to turn my Oreo Cupcake recipe into a cake. As she described her plan to me, I was instantly jealous that I hadn’t thought of it myself!

I’m so glad Jessica sent me that email to spark this idea. This cake is amazing and decadent and just delicious. I used Ina Garten’s Beatty’s Chocolate Cake recipe for the chocolate layers. I had never tried this recipe before but wow, is this a chocolatey cake. I can’t wait to make it again soon. Since I knew the Oreo layer would be pretty dense, I threw in some Oreo chunks to help give the chocolate layers some heft.

For the filling, I whipped up some cream with cream cheese and added more Oreos. And last but not least, I covered the entire cake with a decadent chocolate frosting that Hubby described as mousse-like. I do still need to work on my frosting-the-side-of-cake skills, but I’m getting there.

The cake got a little smooshed on the drive to Connecticut since it was a towering triple layer cake, but that’s ok it was still a huge success and the birthday boy was surprised! It was such a success in fact, I’m already trying to come up with another excuse to make it again. I mean, seriously, just look at it!
One Year Ago: Mixed Berry and Cream Cheese Filled King Cake and M&M Cookies
Two Years Ago: Crockpot Red Curry Chicken with Butternut Squash and Vegan Chocolate Banana Caramel Cupcakes
 I’m using this cake as my monthly What’s Baking challenge. The theme this month is Baked with Love! Be sure to check out With a Cherry on Top for the roundup later this month.


Triple Layer Oreo Cake
Ingredients:
For the Oreo Chunks
1 package Oreos
Oreo Cake Layer
1/2 stick unsalted butter, at room temperature
1/2 cup milk
1 tsp vanilla extract
1 cups flour
1/2 tsp baking powder
1/4 tsp salt
2/3 cup + 2 Tbsp + 2 tsp sugar
1.5 egg whites, at room temperature
1/4 package Oreos, cut into quarters
For the Chocolate Cake Layers
butter, for greasing the pans
1 3/4 cups flour, plus more for pans
2 cups sugar
3/4 cups cocoa powder
2 tsp baking soda
1 tsp baking powder
1 tsp kosher salt
1 cup buttermilk, shaken
1/2 cup vegetable oil
2 eggs, at room temperature
1 tsp vanilla
1 cup freshly brewed hot coffee
1/2 package Oreos, cut into quarters
For the Oreo Filling
4 ounces softened cream cheese
1/2 tsp vanilla
1 cup powdered sugar
1 cup heavy whipping cream
1/4 package Oreos, cut into quarters
For the Chocolate Frosting
6 ounces semisweet chocolate
2 sticks unsalted butter, at room temperature
1 egg yolk, at room temperature
1 tsp pure vanilla extract
1 1/4 cups powdered sugar
1 Tbsp instant coffee powder
Directions:
Plan for Making this Cake
1. Bake the cake layers. The cake layers can be made in advance and refrigerated or frozen. Layers should be completely cooled prior to assembling the cake
2. Make the Oreo filling
3. Stack the cake
4. Make the chocolate frosting
5. Frost and decorate the cake
For the Oreo Chunks
Remove 4 Oreos from the package for decorating the top of the cake.
Chop one row of the Oreos (1/4th of them), and set aside for the filling.
Chop one row of Oreos (1/4th of them), and toss with 1 Tbsp flour for the Oreo Layer and set aside.
Chop the remaining two rows of Oreos (1/2 of them), and toss with 2 Tbsp flour for the chocolate layers and set aside.
Oreo Cake Layer
Preheat over to 350F.
In a large bowl cream the butter until fluffy, about 3-5 minutes. Add the milk and vanilla and mix to combine.
In a separate bowl mix together the flour, baking powder, and salt.
Add the dry ingredients to butter mixture. Mix until integrated. Stir in sugar. With an electric mixer on low speed, beat for 30 seconds. Turn the mixer up to medium speed and beat for 2 minutes. Add the egg whites. Beat for 2 more minutes. Stir in the quartered cookies.
Bake for 25-30 min. Cool in the pans for 30 minutes, then turn them out onto a cooling rack and cool completely.
For the Chocolate Cake Layers
Preheat the oven to 350. Butter 2 (8-inch) round cake pans. Line with parchment paper, then butter and flour the pans.
Sift the flour, sugar, cocoa, baking soda, baking powder, and salt into the bowl of an electric mixer fitted with a paddle attachment and mix on low speed until combined.
In another bowl, combine the buttermilk, oil, eggs, and vanilla.
With the mixer on low speed, slowly add the wet ingredients to the dry. With mixer still on low, add the coffee and stir just to combine, scraping the bottom of the bowl with a rubber spatula.
Stir in the Oreo chunks.
Pour the batter into the prepared pans and bake for 35 to 40 minutes, until a cake tester comes out clean. Cool in the pans for 30 minutes, then turn them out onto a cooling rack and cool completely.
For the Oreo Filling
Using an electric mixer with a whisk attachment, beat the cream cheese, vanilla, and sugar until light and creamy. Beat in 1/4 cup whipping cream until smooth. Add the rest of the cream and beat until it has the consistency of whipped cream (don’t overmix).
Reserve 1/2 cup to use to decorate the top of the cake. Place in the refrigerator until ready to use.
Stir in the reserved Oreo chunks into the remaining whipped cream mixture. Immediately spread filling on top of the Oreo layer and one of the chocolate layers.
For the Chocolate Frosting
Chop the chocolate and place it in a heat-proof bowl set over a pan of simmering water. Stir until just melted and set aside until cooled to room temperature.
In the bowl of an electric mixer fitted with a paddle attachment, beat the butter on medium-high speed until light yellow and fluffy, about 3 minutes.
Add the egg yolk and vanilla and continue beating for 3 minutes.
Turn the mixer to low, gradually add the confectioners' sugar, then beat at medium speed, scraping down the bowl as necessary, until smooth and creamy.
Dissolve the coffee powder in 2 teaspoons of the hottest tap water. On low speed, add the chocolate and coffee to the butter mixture and mix until blended. Don't whip! Spread immediately on the cooled cake.
Oreo cake layer from Me, Chocolate cake layers and Frosting from Ian Garten, Filling from Me


 I am Jen the Beantown Baker. Engineer by day and baking maven by night. Hubby serves as my #1 fan and official taste tester. We got hitched back in 2006. Barefoot. In the sand. With the waves crashing behind us. It was one of the best decisions we’ve ever made.


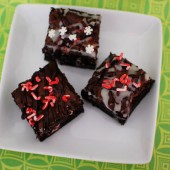
You just can’t beat the combination of chocolate and mint- Yum!
Happy holidays!
I too love your tree.
Oh, I love your tree. It’s the perfect size, and I love the decorations.
The brownies look great. I love the KAF brownies; I just made them a few weeks ago.
Oh, HAPPY HOLIDAYS!!!
I hope you had a very Merry Christmas! Love your gorgeous tree (and your high ceilings!). Yum, peppermint & chocolate…
I love the chocolate and mint combination. Nothing is better at this time of year!
Happy Holidays!
With love and cupcakes,
Cookteen
P.S –check out my blog…Cookteen.blogspot.com
Merry Christmas! Love your peppermint brownies – they sound so perfect for the season! I actually just bought a box of those TJ cookies, and can’t wait to try them 🙂