


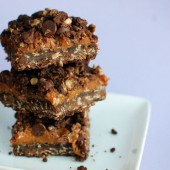
Chocolate Oat Dulce De Leche Bars
Everyone knows how much Hubby loves caramel. He also loves caramel’s first cousin, dulce de leche. I’ve made Homemade Dulce De Leche in the Crockpot, but sometimes life calls for shortcuts.

Hubby was feeling neglected since it had been all of 3 days since my last baking adventure. So I decided to make a treat that he would really enjoy. Seriously, best wife ever. As I was standing in the baking aisle in my grocery store, a small can caught my eye. I had never seen canned dulce de leche before and I was intrigued to try it.

These Chocolate Oat Dulce De Leche Bars are pretty freaking amazing. You’ve got chocolate and oats and chocolate chips and dulce de leche. They’re out of control.
One Year Ago: French Macarons – Chocolate with Espresso Buttercream and French Macarons – Hazelnut with Chocolate Ganache
Two Years Ago: White Chocolate and Macadamia Nut Bars and Chocolate Almost Candy Bars
Three Years Ago: Crockpot Pulled Pork
Four Years Ago: Lemon Curd Cookies


Chocolate Oat Dulce De Leche Bars
Yield: 24 bars
Ingredients:
3/4 cups flour
1 cup oats
3/4 cup brown sugar
1/4 cup cocoa powder
1/2 tsp espresso powder
1/2 tsp baking soda
1/4 tsp salt
1/2 cup unsalted butter
2 ounces unsweetened chocolate
1 13.4-ounce can dulce de leche
2 Tbsp milk
1 cup semisweet chocolate chips
Directions:
Heat oven to 350F.
Place flour, oats, brown sugar, cocoa powder, espresso powder, baking soda, and salt in a large bowl and mix well.
Place butter and unsweetened chocolate in a microwave safe bowl and microwave on high for 1 minute or until butter and chocolate are melted, stirring after 30 seconds. Mix melted butter mixture into dry ingredients until crumb forms.
Reserve 1/2 cup of crumb mixture. Place remaining crumb mixture in a greased 8×8-inch pan and press down evenly. Bake crust for 10 minutes.
Place dulce de leche and milk in a small bowl and mix well until smooth. Evenly spread dulce de leche over partially baked crust.
Top evenly with chocolate chips and remaining 1/2 cup chocolate crumb mixture. Bake an additional 12 to 15 minutes or until set.
Cool 1 hour at room temperature and refrigerate 1 to 2 hours or until filling is set. Cut into 16 bars and store in the refrigerator.
Recipe from Cake Batter and Bowl


 I am Jen the Beantown Baker. Engineer by day and baking maven by night. Hubby serves as my #1 fan and official taste tester. We got hitched back in 2006. Barefoot. In the sand. With the waves crashing behind us. It was one of the best decisions we’ve ever made.


this sounds delicious and looks absolutely amazing! that swirl on top- so professional, how’d you do it?!
beantownbaker — December 20th, 2013 @ 9:19 am
Thanks. I have a rotating cake thingy for decorating cakes. They’re like $10 from Michaels. SO worth it for frosting layer cakes. Anyways, I spread the mousse on, then I just hold the knife and rotate the plate so it spins. Slowly pull the knife in towards the middle while it’s spinning and voila – a nice swirl! And it’s fun to do 🙂
This looks so beautiful! Would be a gorgeous cake to bring to christmas dinner, I love it 🙂