


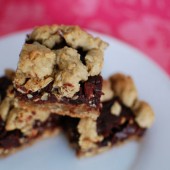
Chocolate Oatmeal Almost Candy Bars
 After two days of bars without chocolate (!?!) it’s time to get some chocolate in here. Dorie Greenspan’s Baking: From My Home to Yours is one of my favorite cookbooks. The thing has some heft. It’s bigger than a sheet of paper and a couple inches thick. And it’s HEAVY! The pictures in it are beautiful and I love reading Dorie’s little stories before each recipe.
 I told Hubby that I was thinking about these bars. I know the TWD group did them not too long ago, but instead of showing him a picture, I just told him about the ingredients in the bar. He just said “eh” when I told him they had chocolate, peanuts, raisins, and oats. I have to admit, I’m not a huge raisin fan myself, but I was definitely intrigued by the combination and decided to just go for it.
 Boy am I glad I did! I think everyone who got to enjoy these gems was glad I didn’t just keep searching for another recipe after Hubby was less than enthusiastic about the ingredient list. The raisins give a nice chewiness and sweetness without overpowering the bars. The peanuts and oats give a nice contrast of textures. Overall this bar has it all. They’re not overly sweet and definitely hit the spot.
 On top of all that, I’ve been totally digging bars with layers recently. I’m not quite sure why but I have been gravitating towards them. I’m sure you’ll see more layered bars in the future!
 One Year Ago: Crockpot Pulled Pork
Two Years Ago: Lemon Curd Cookies
Check out my entire week of bars and brownies here.


Chocolate Oatmeal Almost Candy Bars
Yield: ~36
Ingredients:
For the oatmeal layer
2 1/2 cups all-purpose flour
1 tsp baking soda
1 tsp salt
1/2 tsp ground cinnamon
2 sticks unsalted butter, at room temperature
2 cups brown sugar
2 eggs
2 tsp pure vanilla extract
3 cups old-fashioned oats
1 cup salted peanuts, coarsely chopped
For the chocolate layer
14-ounce can sweetened condensed milk
2 cups semi-sweet chocolate chips
2 Tbsp unsalted butter
1/4 tsp salt
1 tsp vanilla extract
1 cup moist, plump raisins
3/4 cup coarsely chopped peanuts, preferably salted
Directions:
Preheat oven to 350. Line a 9x13 pan with parchment paper and place the pan on a baking sheet.
To make the oatmeal layer
Whisk together the flour, baking soda, salt and cinnamon.
Beat the butter on medium speed until it is soft and creamy. Add the brown sugar and beat for 2 minutes, then add the eggs, one at a time, beating after each one. Beat in the vanilla. Reduce the mixer speed to low and add the dry ingredients, mixing just until they disappear. Still on low speed, or working by hand with a rubber spatula, stir in the oats and chopped peanuts.
Set aside 1 1/2 cups of the mixture, then turn the remaining dough into the buttered pan. Gently and evenly press the dough over the bottom of the pan. Set aside while you prepare the next layer.
To make the chocolate layer
Put the condensed milk, chocolate chips, butter, and salt in a bowl over a saucepan of simmering water and stir occasionally until the milk is warm and the chocolate and butter are melted. Remove the bowl from the pan of water and stir in the vanilla, raisins, and peanuts.
Pour the warm chocolate over the oatmeal crust, then scatter the remaining oatmeal mixture over the top.
Bake for 25 to 30 minutes, or until the topping is golden brown and the chocolate layer is dull and starting to come away from the sides of the pan. Transfer the baking pan to a rack and cool for about 2 hours.
Using the parchment paper, pull the bars out of their pan and place on a rack. Refrigerate for at least 1 hour before cutting.
Recipe from Baking: From My Home to Yours


 I am Jen the Beantown Baker. Engineer by day and baking maven by night. Hubby serves as my #1 fan and official taste tester. We got hitched back in 2006. Barefoot. In the sand. With the waves crashing behind us. It was one of the best decisions we’ve ever made.


What an awesome way to feature goat cheese in a dessert! I never thought of turning it into a chocolate mousse – sounds like I need to try this soon. 🙂
beantownbaker — June 7th, 2013 @ 8:51 am
You definitely should. I know goat cheese isn’t for everyone, but we really enjoyed the subtle flavor in the mousse.
Jen, I love everything about this tart – from the chocolate crust to the mousse and the pretty strawberries on top. Yum! Enjoy your birthday month 🙂
beantownbaker — June 7th, 2013 @ 8:52 am
Thanks for humoring me on the whole birthday month thing 🙂
Ohhh lalalalala, I totally dig this dessert even more because it has goat cheese and strawberries…some of my fave foods!! Happy Birthday month…you better party and eat like it’s your birthday!!
beantownbaker — June 7th, 2013 @ 1:52 pm
Oh I’m definitely going to party like it’s my birthday! All month long 🙂
oh yes to the goat cheese in this tart! fabulous. happy birthday month 🙂 you might need to make this a few more times to celebrate?!
beantownbaker — June 10th, 2013 @ 12:09 pm
Oh I have been baking plenty of deliciousness this month to celebrate 🙂 You know how hard it is to repeat recipes…
Love the idea of incorporating goat cheese in a dessert- I have never seen it down with chocolate before. I will definitely be trying this soon as I have some goat cheese in my fridge waiting to be used 🙂
beantownbaker — June 11th, 2013 @ 7:20 am
Oh yea, goat cheese and chocolate go really well together.
Oh my, the use of goat cheese in this is phenomenal! I would love to try it!
beantownbaker — June 11th, 2013 @ 8:46 am
Definitely do! And you could top it with any fruit you like. I think raspberries would be good too.
Chocolate must work great with goat cheese since they’re both utterly delicious!! This recipe looks magnificent omg I think I would be able to eat the whole tart by myself *-*
Goat cheese is one of my favorite ingredients to use in desserts, and your tart looks soooo delicious! Thanks for sharing =) Definitely a must try this summer.
Oh wow this is gorgeous! I love this recipe, I bet it tastes heavenly!
I just finished making my second one for this week…we love it…it is so smooth and rich and well D E L I C I O U S!!!…my grandson requested the second one but truth be told I was gonna make it anyway…the bittersweet chocolate and the cocoa in the crust are what make it….if anyone out there hasn’t tried it do so you will be in love….
beantownbaker — June 25th, 2013 @ 5:38 pm
So glad you’ve enjoyed it! I definitely need to make this again. I have already made it with raspberries but want to try blackberries next.
you wont believe it but I made this AGAIN yesterday…I did a play on bananas foster on the top…it was a hit with my company…and good recipes for sweets for the 4th?..lol….
beantownbaker — July 3rd, 2013 @ 5:02 pm
Wow – bananas foster on top. I would never have thought of that! I am making this tart and this strawberry shortcake for the 4th.
So sinful and delicious looking 🙂
Holy yumminess. I never thought of putting goat cheese in. My mouth is watering at the thought. Strawberries are my absolute favorite berry of all time. I will have to for sure try this recipe, Got it saved to my personal file. thank you.
I love chocolate mousse and I love goat cheese, so clearly I need to make this!
Also, there is strawberry picking (not sure it is organic though if that matters) up here near Oxford. I can get you the info for next year if driving up here is not a problem (I imagine it depends on what side of Cinci you live 🙂 ).
beantownbaker — August 4th, 2013 @ 6:44 pm
I definitely don’t mind driving for freshly picked strawberries!!
I love absolutely EVERYTHING about this recipe! It’s hard to beat mixing tangy goat cheese with chocolate and berries. What a unique recipe!
beantownbaker — September 25th, 2013 @ 4:11 pm
It tastes as good as it sounds! I hope you try it.
WOW! What a wonderful recipe! Definitely one of my new favorites! Happy birthday month!
Does this go in the fridge covered or uncovered and how long does it last? Thanks!