


More Harry Potter Cupcakes (Including Golden Snitch Cupcakes)
For these Harry Potter cupcakes, I used the same template that I used a couple years ago, seen here. They were such a success last time, I figured I should make them again. Seriously, how cute are these cupcakes?

For the lightening bolts, I mixed some yellow and gold sanding sugar together and sprinkled it on top of white candy melts. I realized that actually a yellow lightening bolt doesn’t make a whole lot of sense in the context of Harry Potter. His lightening bolt is a scar, so it’s clearly not yellow… oh well!

The glasses are made of chocolate candy melts piped on top of a stencil covered with wax paper. They were a bit fragile when removed from the wax paper.

The HP logo was created by downloading a Harry Potter font to make a template. I made the HP the appropriate size, then made the mirror image of them. So when I was making them on the waxed paper, they were backwards. Then I put the yellow candy circle over the letters and when they set up, the HP was readable.

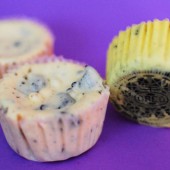
For the golden snitch cupcakes, I just frosted the chocolate cupcake and plopped one of the leftover golden snitches from the golden snitch cake pops I made the other day.

I am taking these cupcakes to a friend’s house tomorrow night. The group of eight of us that are going to the midnight showing of Harry Potter and the Deathly Hallows Part II are meeting up to watch Part I prior to heading out to the movie theatre. I might even whip up some butterbeer for everyone to enjoy!

One Year Ago: Osso Bucco Style Chicken
Three Years Ago: Red, White, and Blue No-Bake Frozen Cupcakes
No real recipe here. Just bake up your favorite cupcakes and frost with your favorite frosting.
Then make candy decorations with some candy melts. I like to tape my template to the counter, then tape a piece of wax paper on top of that. Then I use a piping bag to create my decorations. For the HP logo, I used a toothpick to get the chocolate into the details of the letters.

 I am Jen the Beantown Baker. Engineer by day and baking maven by night. Hubby serves as my #1 fan and official taste tester. We got hitched back in 2006. Barefoot. In the sand. With the waves crashing behind us. It was one of the best decisions we’ve ever made.


Bananas are such divas, they overpower anything they’re mixed with. But these look amazing, well done!