


Homemade Milky Way Candy Bars
These little candy bars were pretty easy to throw together. However, I was reminded how much I dislike dipping things. I just can’t get pretty looking candies when I dip things. No worries though because they tasted awesome and just like a Milky Way Bar.

One Year Ago: Chocolate M&M Cookies
Two Years Ago: Pink M&M Pretzel Treats
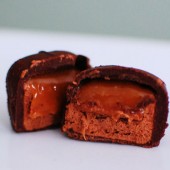


Homemade Milky Way Candy Bars
Ingredients:
2 cups semi-sweet chocolate chips
1 (8 oz.) tub frozen whipped topping, thawed
Kraft caramels, unwrapped
2 cups milk chocolate chips
2 tablespoons vegetable oil
Directions:
Line an 8 or 9-inch square pan with wax paper.
In a medium bowl, melt semi-sweet chocolate chips in the microwave at fifty percent power, or use a double boiler.
Using an electric mixer on high speed, beat melted chocolate for about 30 seconds.
Add whipped topping to melted chocolate and beat until well combined and fluffy, 30-60 seconds more.
Spread chocolate mixture evenly into prepared pan (if mixture is too stiff, press into pan with lightly dampened hands). Place in freezer for 30 minutes.
Remove pan from freezer and turn chocolate mixture onto a cutting board; cut into one-inch squares. Return squares to freezer for another 15-20 minutes.
Melt the caramels according to package instructions (or make your own!). Allow caramel to cool slightly. Spread a small amount of caramel on top of each square of the chocolate mixture. Return squares to freezer for 20 minutes.
Meanwhile, melt milk chocolate chips with 2 tablespoons of vegetable oil and stir until well combined. Dip frozen chocolate squares into melted chocolate to coat. Place on wax paper to set. Keep chocolates in an airtight container in the refrigerator.
Recipe adapted from Let's Dish

Don’t forget about my Power of Pink Challenge – make something PINK by the end of the month to raise Breast Cancer Awareness!

 I am Jen the Beantown Baker. Engineer by day and baking maven by night. Hubby serves as my #1 fan and official taste tester. We got hitched back in 2006. Barefoot. In the sand. With the waves crashing behind us. It was one of the best decisions we’ve ever made.






