


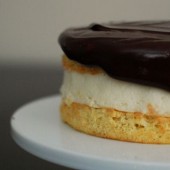
Boston Cream Pie Cheesecake
A few months back, my friends and I did a progressive dinner party. We started at one house for appetizers, went to another for the main course, and ended at our place for desserts. We decided to make a theme of New England for the evening.

The first thing that popped into mind was Boston Cream Pie. As the name implies, it was invented right in Boston. I am not a fan of pastry cream (it’s a texture thing), so I knew I couldn’t make a classic Boston Cream Pie. Since I’m always brainstorming ideas for my next cheesecake cake, this was a no-brainer for me. Cheesecake has a similar rich flavor as pastry cream, so I knew this would be a hit.

My favorite part of this dessert was the thick layer of ganache on top. I made a 6″ version of this Boston Cream Pie Cheesecake, but the recipe below reflects a full 9″ portion.

Funny side note, at the time I made this, I was convinced I was brilliant in coming up with a new dessert. Since then, Rachel posted a Boston Cream Pie Cheesecake (she used a cheesecake layer and pastry cream). You know what they say, great minds think alike!
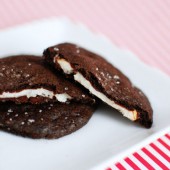
One Year Ago: Triple Chocolate Salted Cookies and Shortbread Cookies
Three Years Ago: Banana Bread and Goat Cheese and Tomato Tarts
Four Years Ago: Crispy Chicken Again and Caramel Cupcakes with Caramelized Butter Frosting
Five Years Ago: Cranberry Applesauce and Maple Walnut Cranberry Cupcakes with Cranberry Sauce and Maple Frosting


Boston Cream Pie Cheesecake
Ingredients:
For the Sponge Cake Layers
1/2 cup (2 oz) cake flour
1/4 cup (1 1/4 oz) flour
1 tsp baking powder
1/4 tsp salt
3 Tbsp milk
2 Tbsp butter
1/2 tsp vanilla
5 large eggs, at room temperature
3/4 cup (5 1/4 oz) sugar
For the Cheesecake Layer
1 1/4 pounds bar cream cheese (20 oz), room temperature
3/4 cups sugar
1/4 tsp finely grated lemon zest, plus 1 tsp fresh lemon juice
1/4 tsp coarse salt
2 eggs
1/2 cup sour cream
For the Glaze
1 cup heavy cream
1/4 cup light corn syrup
8 oz semisweet chocolate, chopping into small pieces
1/2 tsp vanilla
Directions:
For the Sponge Cake Layers
Adjust an oven rack to the lower-middle position and heat the oven to 350 degrees. Grease two 8 or 9 inch cake pans and cover the pan bottom with rounds of parchment paper or waxed paper. Whisk the flours, baking powder, and salt in a medium bowl (or sift onto wax paper). Heat the milk and butter in a small saucepan over low heat until the butter melts. Remove from the heat and add the vanilla; cover and keep warm.
Separate 3 of the eggs, placing the whites in the bowl of a standing mixer, reserving the 3 yolks plus the remaining 2 while eggs in another mixing bowl. Beat the 3 whites at low speed until foamy. Increase the mixer speed to medium and gradually add 6 tbs of the sugar; continue to beat the whites to soft, moist peaks. (Do not overbeat.) Transfer the egg whites to a large bowl and add the whole-egg mixture to the mixer bowl.
Beat the while-egg mixture with the remaining 6 tbs sugar. Beat at medium-high speed until the eggs are very thick and a pale yellow color, about 5 minute. Add the beaten eggs tot he whites.
Sprinkle the flour mixture over the beaten egg and whites; fold very gently 12 times with a large rubber spatula. Make a well in one side of the batter and pour the milk mixture into the bowl.Continue folding until the batter shows no trace of flour and the whites and whole eggs are evenly mixed, about 8 additional strokes.
Immediately pour the batter into the prepared cake pans; bake until the cake tops are light brown and feel firm and spring back when touched, about 16 minutes for 9-inch cake pans and 20 minutes for 8-inch cake pans.
Immediately run a knife around the pan perimeters to loosen the cakes. Place on pan on a towel and cover the pan with a large plate. using the towel to protect your hands and catch the cake, invert the pan and remove the pan from the cake. Peel off the parchment. Re-invert the cake from the plate onto the rack. Repeat with the remaining cake. Cool the cake layers to room temperature before proceeding with Boston Cream Pie.
For the Cheesecake Layer
Preheat oven to 325 degrees. Set a kettle of water to boil. Using an electric mixer, beat cream cheese on medium until fluffy, scraping down side of bowl. Gradually add sugar, beating until fluffy. Beat in lemon zest and juice, and salt. Beat in eggs, one at a time, scraping down side of bowl after each addition. Beat in sour cream.
Cut parchment paper in a circle and line the bottom of the cheesecake pan. Wrap bottom half of pan in foil. Pour in filling; place in a roasting pan. Pour in boiling water to come halfway up side of springform. Bake until just set in center, about 45 minutes. Remove pan from water; let cool 20 minutes. Run a paring knife around edge; let cool completely. Cover; chill overnight, then wrap in plastic wrap and freeze.
For the Glaze
Bring the cream and corn syrup to a full simmer over medium heat in a medium saucepan. Remove from the heat and add the chocolate; cover and let stand for 8 minutes. (If the chocolate has no completely melted, return the saucepan to low heat; stir constantly until melted.) Add the vanilla; stir very gently until the mixture is smooth. Cool until tepid so that a spoonful drizzled back into the pan mounds slightly. (The glaze can be refrigerated to speed up the cooling process, stirring every few minutes to ensure even cooling.)
To Assemble the Cake
Place one of the sponge cake layers on a serving plate. Stack the cheesecake layer on top of the sponge cake. Add the second sponge cake layer.
Pour glaze over entire cake and spread to nearly the edge allowing some of the glaze to spill over the side of the cake.
Inspired by Pass the Sushi, Sponge Cake recipe and Glaze recipe from Baking Illustrated, Cheesecake recipe from Martha Stewart

 I am Jen the Beantown Baker. Engineer by day and baking maven by night. Hubby serves as my #1 fan and official taste tester. We got hitched back in 2006. Barefoot. In the sand. With the waves crashing behind us. It was one of the best decisions we’ve ever made.


I can’t barely bake so the idea of finding a creative way to use leftovers astounds me. This looks AWESOME!
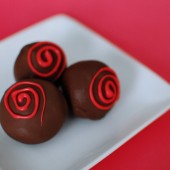
Gorgeous truffles!
I love red velvet… these look amazing.
I’ll have to remember this… I often have leftover cake too. They looks so pretty!
This is a very good recipe…thanks and happy new year, ciao Flavia
These are so pretty! Great for valentine’s day:)
These look so wonderful! Love the vibrant red!
These look so good. Wonderful idea.
Okay this is just hilarious! My grandma purchased a frozen Cheesecake Factory Red Velvet Cheesecake for Christmas. I took the remaining pieces home to make into balls, which we served at my new years eve party. SO good!
Amazing as usual! I tagged you on my blog to answer some questions:
http://bigmamashomekitchen.blogspot.com/2011/01/my-weekday-morning-routineand-ive-been.html
Have a great day! Rhondi
you are a genius! Such a great idea to use leftover and maintain portion control.
oh they look so yummi!!!
xoxo from rome
K.
http://kcomekarolina.blogspot.com/
Such a good idea, these look so good! I love the red velvet and cheesecake combo. You’re blog is awesome 🙂
Wow, these are so beautiful! Best way to use leftovers EVER! And who knew you could do so much with red velvet!
Sues
It’s not over-indulging because you’re able to stop at one. I would probably have eaten half a dozen of them, they look so good! What a great way to jazz up ‘leftovers’!
What a FANTASTIC idea!!!! These look beyond amazing!!
I remember the post about that cake. I really want to make it some day! The idea of turning some leftovers into truffles is pure genius! 😀
ooh, what a creative way to deal with the cake 🙂
I’m picky about what I bring in to work too. It bugs me when people bring in things that are clearly gnawed on, you know? This is the perfect way to reportion leftover cake into easily sharable treats.
Wives always know best! LOL
Glad you made him “eat” his words, so to speak. The truffles are so adorable and perfect for Valentine’s Day.
They’re adorable!!! They’d make a perfect Valentine treat too!!
So…. Don’t mean to appear ignorant, but some of us have NOT made cake balls from left over cake, please be more specific in your discourse, please.
ummm this cake failed. We followed the recipe to the t and it deflated and tasted bad. This recipe was extremely watery and gross and soggy. It fell apart quickly. Thanks!