


Neapolitan Ice Cream Cupcake
I look forward to this contest every year! Cupcake Project and Scoopalicious are hosting their annual Ice Cream Cupcake Contest. The only requirement is that the cupcake have a cake portion and a ice cream (or frozen) portion.

Coming up with an ice cream cupcake recipe was harder than you’d think. I had so many ideas swimming around in my head… But I wanted it to be a cupcake I could enjoy even with my lactose intolerance. Lucky for me, I’m able to find all sorts of dairy free ice cream these days. When I saw that the lactose free flavors at JPLicks were vanilla and strawberry, I couldn’t get the idea of strawberry ice cream out of my head. I bought a pint and headed home.

That night, I decided to taste some of the strawberry ice cream. I topped the ice cream with some chocolate chips and whipped cream. It’s such a classic and perfect combination. And thus, the idea of a Neapolitan Ice Cream Cupcake was born.
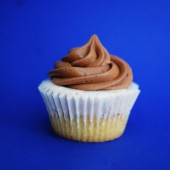
These cupcakes consist of a yellow cupcake base, layered with some strawberry ice cream, and frosted with chocolate cream cheese frosting. I love how the frosting looks like soft serve!

If you’ve never had an ice cream cupcake, I definitely recommend trying one. They’re great in the summer time and the flavor combinations are completely endless. Be sure to check out the Cupcake Project Facebook Page to see photos of all the other entries.
One Year Ago: Dark Chocolate Frosting
Three Years Ago: Pina Colada Cupcakes


Neapolitan Ice Cream Cupcakes
Yield: 12 cupcakes
Ingredients:
For the Neapolitan Ice Cream Cupcakes
12 half-filled yellow cupcakes, recipe follows
1 pint strawberry ice cream
Chocolate cream cheese frosting, recipe follows
For the Half-Filled Yellow Cupcakes
1/2 stick (1/4 cup) unsalted butter, room temperature
1/4 cup + 2 Tbsp flour
1/4 cup + 2 Tbsp cake flour (not self-rising)
3/4 tsp baking powder
1/8 tsp salt
1/4 cup + 3 Tbsp sugar
1 eggs
1/2 tsp vanilla
5 Tbsp milk
For the Chocolate Cream Cheese Frosting
4 oz cream cheese, room temperature
1/4 cup (1/2 stick) unsalted butter, room temperature
1/8 teaspoon salt
1/2 tsp vanilla extract
1 1/2 cups powdered sugar, sifted
1 1/2 ounces unsweetened chocolate, melted
Directions:
For the Neapolitan Ice Cream Cupcakes
Bake the cupcakes and allow to cool in the pan.
Take ice cream out of freezer to allow it to melt a bit while cupcakes are cooling.
With the cupcakes still in the pan, spoon semi-melted ice cream onto the cupcakes until liners are full. Place cupcake pan in freezer for 30 minutes.
Make chocolate cream cheese frosting and pipe a swirl onto the ice cream cupcakes.
Store in the freezer.
For the Half-Filled Yellow Cupcakes
Preheat oven to 350 degrees. Place 12 cupcake liners in two muffin pans. Into a medium bowl, sift together flours, baking powder, and salt; set aside.
In the bowl of an electric mixer fitted with the paddle attachment, beat the butter and sugar until light and fluffy, 3 to 4 minutes, scraping down the sides of the bowl as needed. Beat in eggs, one at a time, then beat in vanilla. With the mixer on low speed, add the flour mixture in three parts, alternating with the milk and beginning and ending with the flour; beat until combined after each addition.
Divide batter between the prepared pans. Bake for 10-12 minutes. Allow cupcakes to cool in pan.
For the Chocolate Cream Cheese Frosting
Cream the cream cheese and butter together thoroughly.
Add the salt, vanilla, and powdered sugar.
Finally, mix in the melted chocolate and blend thoroughly until smooth.
If additional thickening is needed, add more sifted powdered sugar, a little at a time, until a spreadable consistency is reached.
Half-filled yellow cupcakes Recipe adapted from Martha Stewart
Chocolate Cream Cheese Frosting Recipe adapted from Food Network


 I am Jen the Beantown Baker. Engineer by day and baking maven by night. Hubby serves as my #1 fan and official taste tester. We got hitched back in 2006. Barefoot. In the sand. With the waves crashing behind us. It was one of the best decisions we’ve ever made.


