


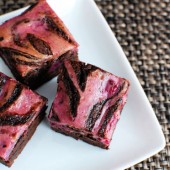
Blackberry Cheesecake Swirled Brownies
I’m not sure how many of you were around back in September of 2009 when I posted these Pumpkin Spice Cheesecake Brownies, but let me tell you, those brownies are amazing. I have been wanting to use them as inspiration for another recipe for a long time now.

When I decided to host a party with all purple food, my mind wondered back to these brownies. I decided to try mixing blackberry with chocolate to make these Blackberry Cheesecake Swirled Brownies. These were a HUGE hit to say the least.

I’m only sad that I served them at the same party as the Purple Ombre Cake because they really didn’t stand a chance compared to that cake. At any other party, they would have been the star of the show.

This recipe could be adapted to almost any flavor of cheesecake that you’d like. The blackberry pairs really well with chocolate, which I was pleased to learn. I preferred these served at room temperature, even though they should be stored in the fridge.

One Year Ago: Fudgey Banana Brownies and Cranberry Raisin Almond Banana Bread
Three Years Ago: Spicey Orange Shrimp
Four Years Ago: Perfect Summer Salsa, Dairy Free Cheesecake Pops, and Roasted Red Pepper Hummus


Blackberry Cheesecake Swirl Brownies
Yield: 16 brownies
Ingredients:
For the Blackberry Sauce
6 oz fresh blackberries
1 Tbsp sugar
1 tsp cornstarch
1/2 tsp lemon juice
2 tsp water
For the Brownie Batter
1/2 cup (1 stick) unsalted butter
1 cup + 2 Tbsp sugar
1/2 cup + 2 Tbsp cocoa
1/2 tsp salt
1/2 tsp baking powder
1/2 tsp espresso powder, optional
1/2 Tbsp vanilla
2 eggs
3/4 cups flour
For the Cheesecake
8 oz cream cheese, softened
1 egg
1/2 cup sugar
2 Tbsp + 2 tsp flour
1/2 tsp pure vanilla extract
Directions:
For the Blackberry Sauce
Place blackberries and sugar in a pan and heat until the blackberries release their juices.
Combine cornstarch, juice, and water in a small bowl. Stir together until smooth.
Add slurry to pan and stir to mix completely. Bring mixture to boil for a few minutes. Allow to cool to room temperature.
For the Brownie Batter
Preheat oven to 350F. Grease an 8x8" square metal baking pan.
In a saucepan set over low heat, melt the butter, then add the sugar and stir to combine. Return the mixture to the heat briefly, just until it's hot, but not bubbling; it'll become shiny looking as you stir it. Heating this mixture a second time will dissolve more of the sugar, which will yield a shiny top crust on your brownies.
Transfer the sugar mixture to a medium-sized mixing bowl, if you've heated it in a saucepan. Stir in the cocoa, salt, baking powder, espresso powder, and vanilla.
Whisk in the eggs, stirring until smooth. Add the flour, again stirring until smooth.
For the Cheesecake
Beat the cream cheese in the bowl of a mixer until smooth. Add remaining ingredients and beat until well combined.
Add the blackberry sauce and stir until distributed.
To Assemble the Brownies
Spread about 2/3 of chocolate batter into prepared pan, and spoon cheesecake batter over. Dollop remaining brownie batter over cheesecake batter. Swirl the batters together by running a butter knife back and forth through the pan.
Bake for 40 minutes, or until center is set. Cool completely on wire rack and chill before cutting and serving.
Brownie batter recipe adapted from My Go-To Brownie Recipe, originally from King Arthur Flour. Blackberry sauce recipe from me. Cheesecake recipe adapted from Pumpkin Spice Cheesecake Brownies


 I am Jen the Beantown Baker. Engineer by day and baking maven by night. Hubby serves as my #1 fan and official taste tester. We got hitched back in 2006. Barefoot. In the sand. With the waves crashing behind us. It was one of the best decisions we’ve ever made.


So cute!!