


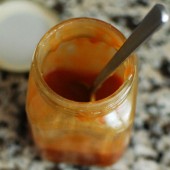
Salted Caramel Sauce
Caramel sauce might be one of Hubby’s favorite things ever. He will always choose a caramel treat over a a chocolatey treat. I’ve just recently gotten more comfortable making my own caramel sauce. It actually is so much easier than I thought it was. Having a candy thermometer is a must for making caramel at home. But that’s really all you need. If you haven’t made your own caramel sauce, do it. Trust me, it’s worth the minimal effort required.

I ended up making a triple batch of this salted caramel during the holidays. I ordered some cute jars online and gave them away as gifts to some family members. Hubby also enjoyed a bunch of this caramel sauce heated up over vanilla ice cream.

One Year Ago: Crunchy Nut Encrusted Chicken Tenders
Two Years Ago: BBQ Chicken Pizza Sticks


Salted Caramel Sauce
Salted caramel sauce is easier to make than you could ever imagine. And it makes a great gift!
Yield: 2 cups
Ingredients:
1 cup water
2 cups sugar
1 cup heavy cream
2 Tbsp cold unsalted butter
1 tsp fleur de sel
Directions:
Add water to a 2-qt saucepan. Gently add the sugar to the center of the pot - it will mound, that's fine. Cover the pot and bring to a boil over high heat.
Once boiling, uncover the pot and insert a candy thermometer. Continue cooking until the mixture registers 300 F and is just starting to develop some color, about 15 minutes.
Reduce heat under the pot to medium and cook until the syrup is amber and registers 350 F on the thermometer, about another 5 minutes.
Meanwhile, pour the cream into a small saucepan and bring to a simmer. If it simmers before the syrup is ready, just take it off the heat and set aside.
Remove the caramel from the heat and add about 1/4 of the warm cream to the pot. It will bubble furiously so be careful. Once the bubbling subsides, add the remaining cream. When it stops bubbling, whisk gently to incorporate fully. Add the butter and the salt and whisk to combine.
Refrigerate up to 1 month.
Recipe from Cook's Illustrated, as seen on Erin's Food Files


 I am Jen the Beantown Baker. Engineer by day and baking maven by night. Hubby serves as my #1 fan and official taste tester. We got hitched back in 2006. Barefoot. In the sand. With the waves crashing behind us. It was one of the best decisions we’ve ever made.


This looks so much easier than I thought it would be. I love using my candy thermometer too. I really want a chocolate thermometer now so I can work on my tempering too. Ooh… chocolate caramel corn. 🙂
Megan – I have made “caramel” corn using Hershey kisses before. You should check it out.
I LOVE caramel corn… or cracker jack 😉 I made it last spring for baseball season. It really is super easy to make and I just can’t get enough of it!
I love anything that mixes salt and sugar… this looks great!
I love caramel corn and this recipe looks delicious! I like to add roasted, salted almonds and cashews to mine…YUM!
This caramel corn looks ridiculously addictive!
This sounds awesome. I never like store bought popcorn, but freshly made homemade kind I’m sure I’ll be all about. Yum 🙂
I would have burnt my tongue too – caramel corn is also one of my favorites!