


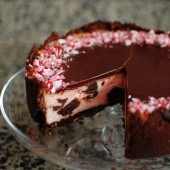
Peppermint Brownie Mosaic Cheesecake
I have been wanting to make this cheesecake FOREVER! Seriously. I think since the day I saw it posted on Smitten Kitchen back in 2007. In the summer of 2009, I put it on my Top Ten List, but it still sat on my to-bake list.

I kept telling myself I needed just the right occasion to make this over the top cheesecake. I decided to put it on my 30-while-30 List so that I’d stop making excuses and just make this recipe already.

So when Hubby and I decided to have a few people over for a holiday party, I instantly thought of this cheesecake. I decided to make it seasonal by adding peppermint and crushed candy canes to the cheesecake, ganache, and on top of the ganache.

Chocolate and peppermint is one of my favorite holiday combinations. Well I love it year round, but at the holidays, it’s just another excuse to make something choco-minty.

This cheesecake takes a bit of time due to the number of components, but it’s definitely worth the effort! I made my brownies in advance. After cutting them, I froze them for a few days prior to baking the cheesecake. Then I covered the cheesecake and threw it in the fridge for 2 days. I added the ganache the day before the party and put it back in the fridge.

The only changes I made to the recipes below was to swap out vanilla and replace it with peppermint extract. I also stirred in 3/4 cup crushed candy canes into the cheesecake batter. And I crushed more to put on top of the ganache for garnish.

One Year Ago: Caramel Corn
Two Years Ago: Eggplant Parmesan
Three Years Ago: Peppermint Chocolate Cookies and Snickerdoodles
 I am submitting this for December’s What’s Baking, hosted by Nicole of Seven Ate Nine. This month’s theme was to celebrate National Brownie Month!


Peppermint Brownie Mosaic Cheesecake
Cheesecake baked with brownie chunks right in the batter! Topped with peppermint ganache and crushed candy canes. You can leave the peppermint out if you're not in the mood for mint.
Yield: Serves 12
Ingredients:
For the One Bowl Brownies
4 ounces unsweetened chocolate
3/4 cup (1 1/2 sticks) butter
1 3/4 cups sugar
3 eggs
1 tsp vanilla
1/2 tsp salt
1 cup flour
For the Chocolate Crumb Crust
3 cups or 10 ounces finely ground cookies such as chocolate wafers or Chocolate Teddy Grahams
10 Tbsp unsalted butter, melted
2/3 cup sugar
1/4 tsp salt
For the Peppermint Cheesecake
3 (8 ounce) packages cream cheese, softened
4 eggs
1 tsp peppermint extract
1 cup sugar
2 cups brownie cubes (from recipe above)
3/4 cup crushed candy canes or peppermint candies
For the Peppermint Ganache Glaze
3 ounces bittersweet chocolate, broken up, or 1/2 cup chocolate morsels
2 ounces butter
1/4 cup heavy cream
1/2 tsp peppermint extract
1 Tbsp powdered sugar
6 candy canes, crushed
Directions:
For the One Bowl Brownies
Preheat oven to 350. Line 13×9-inch baking pan with foil, with ends of foil extending over sides of pan. Grease foil.
Microwave chocolate and butter in large microwaveable bowl on high for 2 minutes, or until butter is melted. Stir until chocolate is completely melted. Stir in sugar. Blend in eggs and vanilla. Add flour and salt; mix well. Spread into prepared pan.
Bake 30 to 35 minute or until toothpick inserted in center comes out with fudgy crumbs. Do not overbake. Cool in pan on wire rack. Remove brownies from pan, using foil handles.
Cut brownies once cooled.
For the Chocolate Crumb Crust
Stir together crust ingredients and press onto bottom and 1 inch up side of a buttered 9-inch springform pan. Fill right away or chill up to 2 hours.
For the Peppermint Cheesecake
Make crumb crust as directed above for 9-inch cheesecake. Preheat oven to 350°F.
Make filling and bake cake: Beat cream cheese with an electric mixer until fluffy and add eggs, 1 at a time, then peppermint extract and sugar, beating on low speed until each ingredient is incorporated and scraping down bowl between additions.
Fold brownie cubes in very gently and pour mixture into prepared pan. Put springform pan with crust in a shallow baking pan. Pour filling into crust and bake in baking pan (to catch drips) in middle of oven 45 minutes, or until cake is set 3 inches from edge but center is still slightly wobbly when pan is gently shaken.
When completely cool, top with following glaze.
For the Peppermint Ganache Glaze
Grind the chocolate into powder in the food processor, scald the butter and cream in a saucepan (or in a Pyrex cup in the microwave). With the machine running, pour the hot cream/butter mixture slowly through the feed tube onto the chocolate. Blend until completely smooth, stopping machine to scrape down sides once or twice. Add the extract and sugar and process until smooth.
Spread over cheesecake while ganache is still warm. Sprinkle crushed candy canes around edges of ganache for garnish.
Chill until ready to serve.
Recipe adapted from Smitten Kitchen


 I am Jen the Beantown Baker. Engineer by day and baking maven by night. Hubby serves as my #1 fan and official taste tester. We got hitched back in 2006. Barefoot. In the sand. With the waves crashing behind us. It was one of the best decisions we’ve ever made.


This looks just plain amazing…and I’m not even a huge chocolate fan! The different textures must be delectable — good thing Valentine’s Day is coming up =)
This looks like my favorite cake I’ve never tried. Yum! After reading the directions, it seems like you could reduce the prep time by simply preparing the brownie batter first and setting it aside while prepping the cake batter, and then baking them at the same time. Either way, I am putting this on my “MUSTS!” list. Thanks for sharing.
Wow!! That looks amazing. It would make a great chocolage indulgence for Valentine’s Day.
WOW! That looks amazing! I love the filling. I’m starring to try for sure. Chocolate cake is always a big winner with guests. 🙂
Mmmm….chocolate! Looks fantastic 🙂
Man, this cake is serious stuff!! I would love some of that! Thanks for all the tips on how to make it more efficiently.
Wow.
That is one amazing way to celebrate.
OMG That looks awesome. I wish I could take it out of the computer screen and eat it right now!!!
While I’m not a chocolate cake fan I have to say that is one delicious and impressive looking cake! Definitely makes wish I was into chocolate. 🙂
~ingrid
Did anyone count the calories? 😉
Thanks for sharing this recipe. I really feel hungry!
Cheers,
Carsten
tasteandshare.com
food social network * wine social network
gloof
Talk about death by chocolate! That looks incredible!
This is such a beautiful cake! I really want to give it a whirl. A lot of chocolate but totally worth it!
omg. this looks A-M-A-Z-I-N-G. can i get a piece right now please?!
wow. that looks amazing
Looks absolutely fabulous. Really wonderful photos too!
So glad I stumbled upon your blog.
🙂
ButterYum
beautiful cake! one can never be tired of Chocolate! and those strawberries steal the show!:)
Yummy! that would’ve have been a perfect finger food! love the cheesy texture:)
this would be perfect for the Valentine day giveaway I’m hosting on my blog. would be great if you could participate!
http://www.funandfoodcafe.com/2010/02/valentine-super-bowl-recipe-carnival.html
Is a cake like this even legal? This is going to be a most special addition in the KOL round up. Thanks for participating, Jen!
Wow!! Just the way the CHocorango likes! Kinda perfect!
When I made this, I almost went into a chocolate coma. But it was totally worth it!!!