


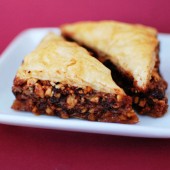
Chocolate Hazelnut Baklava
A couple weekends ago, Megan (from Delicious Dishings) and I got together to bake in her huge kitchen over in Somerville. While we were talking about what to make, we decided that we would each choose a recipe to make. Megan chose to make chocolate hazelnut baklava.

Luckily, the weather wasn’t horrible, so I hopped on the train to head over to Megan’s place. While I was making the trek from the green line, Megan prepared the filling and the syrup for the baklava recipe. We started with the other recipe that I chose and when that one got in the oven, we started on the baklava.

Megan chose this recipe becuase she loves baklava and had never worked with phyllo dough. We found out that the key to using phyllo is to first make sure it’s at the right temperature. Megan had let the dough defrost overnight in her fridge, then she let it set out on the counter for a few hours. Having it at the right temperature will ensure that the sheets won’t crack as you unroll them or stick together.

We both played around with a couple methods of picking up the individual sheets of phyllo. They’re very thin and delicate. We found it was best to slide our hands under it and lift carefully. Once you lay the sheet into the pan, you can make adjustments before coating it with more butter.
One thing I hadn’t realized was that you cut the baklava before you bake it. Then, while it’s hot and just out of the oven, you pour the syrup over the entire pan. We found this recipe to actually be pretty easy. Especially since the syrup and filling can be made ahead of time.

I ended up cutting my pieces in half again so they are more bite-sized. I placed the entire half batch into the freezer and plan to pop them out next time I need a fancy dessert to share.
One Year Ago: Two Potato Chowder and Cinnamon Roll Monkey Bread
Two Years Ago: Smashed Chickpea Salad and Red Velvet Cupcakes
Three Years Ago: Lemon Cupcakes


Chocolate Hazelnut Baklava
Ingredients:
For the Syrup
2 cups water
1 1/2 cups honey
1 cup sugar
1/2 cup cocoa nibs
2 cinnamon sticks
For the Filling
1 lb whole hazelnuts (blanched if you can find them)
12 ounces bittersweet chocolate, cut in pieces
1/2 cup sugar
1 1/2 tablespoons cinnamon
For the Dough
1 lb box of phyllo, thawed according to package instructions (you won't use all of it)
1 lb butter, melted
Directions:
Preheat oven to 325 degrees.
In a medium saucepan, combine the water, honey, cup of sugar, cocoa nibs, and cinnamon sticks. Bring the mixture to a boil, stirring to dissolve the sugar. Reduce heat to low, and continue cooking the syrup for 15 minutes. Cool and strain the syrup, and set it aside at room temp.
While the syrup is cooking, toast the hazelnuts in the preheated oven for 15 to 20 minutes, shaking them around on the pan occasionally. If you couldn't find blanched hazelnuts, rub the hazelnuts with a clean kitchen towel to remove the skins.
Once they are cool, place the hazelnuts in a food processor, and process until finely chopped. Dump them into a large bowl.
Add the chocolate and 1/2 cup sugar to the food processor, and process until chocolate is pebbly. Add this mixture to the bowl with the nuts. Stir in the cinnamon, and set the filling aside.
Line a 9-by-13 inch pan with foil, and generously butter the foil.
Carefully cut the phyllo dough in half so you have 9-by-13-inch sheets.
Place 1 sheet of phyllo dough in the bottom of the pan, and brush it with the melted butter. Repeat until you have 8 layers of buttered phyllo in the pan.
Spread 2 cups of filling over the phyllo dough.
Layer 4 more sheets of phyllo dough over the filling, buttering each.
Spread another 2 cups of filling on top.
Layer with another 4 sheets of phyllo, buttering each.
Spread the rest of the filling over the phyllo dough.
Top with another 6 sheets of phyllo, all brushed with butter.
Set the baklava aside for about 30 minutes so the butter can firm up, and then preheat the oven to 350 degrees.
Cut the baklava into 3-inch squares. You will have 1 inch extra at one end (this strip makes an excellent snack). Then cut each square diagonally, so you get two triangles out of every square.
Bake the baklava for 25 minutes, and then turn it, lower the oven to 325 degrees, and bake it for an additional 45 to 50 minutes, until golden brown on top.
Transfer the pan to a cooling rack, and immediately ladle the room temperature syrup over the baklava.
Let the baklava cool completely. Use a small spatula to remove the pieces. You may have to go back through with a knife or bench scraper and re-separate the pieces.
Recipe adapted from Food and Wine


 I am Jen the Beantown Baker. Engineer by day and baking maven by night. Hubby serves as my #1 fan and official taste tester. We got hitched back in 2006. Barefoot. In the sand. With the waves crashing behind us. It was one of the best decisions we’ve ever made.


These look and sounds great! Also thanks for the link to the cupcake carrier! I’ve been wanting to buy one for awhile now but didn’t like that Wilton’s only held 12.
Those paper cupcake liners are so pretty! I keep seeing recipes from that book and I really want to get myself a copy!
Do you think you could add a few extra ounces of chocolate to the frosting without messing up the texture?
I just posted cupcakes from that book today too! And I also have the Wilton cupcake carrier. Not to thrilled with it either, but I got it because I needed something to carry a huge sheet cake in. I would love a double decker.
Your cupcakes look great, as always! I need to work on my frosting skills. (Hence the reason I posted a recipe that could be frosted in a “rustic” style!)
Jessica – Definitely check out that carrier. Not sure if you guys have a Container Store, but I think BB&B carries it now too.
Cate – I’m not sure if more chocolate would ruin the texture… Possibly. I was underwhelmed when I tasted the frosting by itself, but when it was on the cupcake, it was really good. The subtle flavor paired really well with this cupcake. I just really prefer my chocolate frosting to be really chocolatey!
Erin – Thanks! I’m always try to improve my skills. This was the first time I’ve tried the rosette. I usually pipe from the outside in.
Yay, for packages in the mail and new kitchens!
I like how you frosted the cupcakes, very pretty. I haven’t made SMBC yet but I’m gonna soon. Sounds good!
Happy Friday!
~ingrid
I need that cupcake carrier!! Thanks for the link to it!! Ive been on the out look for a great one for a while!
These are great cupcakes! Well done!!
These look awesome! What icing tip did you use, if you don’t mind me asking?
I used my trusty old 1M tip for the frosting.
Awesome, thank you!
The frosting is so delicate looking. Just the way Martha Stewart would like it.
love the recioes and will definately try them but as i live in the uk please could you give me imperial measures rather than cupa and sticks thanks:)
Fiona
when I make chocolate SMBC I actually use cocoa powder. I think it gives it a stronger chocolate flavor without messing with the texture. Maybe you could try adding some cocoa powder if the melted chocolate doesn’t taste bold enough.
also, I saw those snap n’ stack cupcake carriers at my local Meijer and bought 2. they weren’t cheap so as I was driving home I was deciding if I was going to regret spending nearly $50 on the 2 of them, but I couldn’t be happier with them. they’re come in *so* handy.