


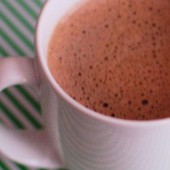
Homemade Hot Cocoa Mix
I’m definitely not the first food blogger to post a recipe for homemade hot cocoa mix. And I definitely won’t be the last. That’s because it makes such an easy and fun homemade gift, and I just couldn’t resist.

I used Ghirardelli chocolate and cocoa in mix. Of course, Hubby loved having an excuse to eat more homemade marshmallows and threw quite a few in his cup of hot cocoa!

One Year Ago: Green Bean Casserole
Two Years Ago: Snickerdoodles and Candy Cane Kiss Cookies
Three Years Ago: Chocolate and Peanut Butter Biscotti


Homemade Hot Cocoa Mix
Yield: 76-2 Tbsp servings
Ingredients:
2 vanilla beans
4 cups granulated sugar
24 oz high-quality semisweet chocolate, coarsely chopped
9 oz dark chocolate, coarsely chopped
2 cups Dutch process cocoa
Directions:
Split and scrape vanilla beans and place in a large bowl or jar with the sugar. Work seeds into the sugar with your fingers. Bury the pods under the sugar. Cover tightly and let stand overnight (or up to months–vanilla sugar keeps forever) at room temperature.
In a food processor fitted with metal blade, process semisweet chocolate and dark chocolate until finely ground, using 4-second pulses. Process in batches, if necessary.
Remove pod from sugar. Add ground chocolate and cocoa powder to sugar and whisk to blend, making sure to combine well. Store mix airtight at room temperature for up to six months.
Assemble your gifts:
Scoop 1 1/2 cups of cocoa mix into a medium sized bag. Attach a tag with the following note: Heat 8 oz milk on med-high heat until scalded. Add 2 Tbsp cocoa mix and whisk until smooth. Top with a marshmallow. Makes 12 servings.
Recipe as seen on Confections of a Foodie Bride, originally from Gourmet


 I am Jen the Beantown Baker. Engineer by day and baking maven by night. Hubby serves as my #1 fan and official taste tester. We got hitched back in 2006. Barefoot. In the sand. With the waves crashing behind us. It was one of the best decisions we’ve ever made.


Jen, I think I just died and went to heaven! Long live the Ring Ding!! LOL
http://www.simplysweeter.blogspot.com
Love this theme, so fun! The whole menu sounds delicious 🙂
Hi Jen,
Wow! These babies look really authentic. I’ve seen a lot of faux Ding Dongs in my day, and yours rank right up there. Very nice job!
🙂 Jane
Oh, I LOVE Ding Dongs!!! And yours look fabulous!
Even at 8a on a monday morning, I feel like I could eat a whole stack of those. Great job, they look delicious!
There is a local baking partnership here in the Los Angeles area that makes individual sized cakes and treats. They also recreate classic favorites such as the Ho-Ho. Thought you might enjoy the link. http://www.cakemonkey.com/
Oh your Ding Dongs look perfect. Absolutely perfect!! They make me want to jump up and make them now. Goodness!! Thanks for sharing the photos and recipe with us. I’ve yet to make the 7-minute frosting, so I’m looking forward to that.
Oh my, what a great recipe!
You’re killing me! Now I have to think about when I can fit Ring Dings into my schedule this week! They’d be so much better from scratch than they would out of the box…
These & oatmeal creme pies were my absolute favorite as a kid. I think they were called King Dons when I ate them. I definitely need to try this!
Oh, how fun. WIsh I had a couple right now.
Ring Dings! :)But that’s what they were called when Drake’s made them and we lived in NYC. Once we moved to FL they were Ding Dongs. Or do I have that backwards, hmm now I’m not exactly sure. Either way it wasn’t I that ate them but my Mom. I’ll have to give them a whirl for her and score some brownie points, hee-hee!
Hope you have a safe and Happy Memorial Day weekend!
~ingrid
omigosh YUM!! they sure do remind me of hostess cupcakes
Your ding dongs look perfect! Great job!
I’ve been thinking of making these for my mother for her birthday next week…but since she LOVE chocolate peanut butter, I thought I would fill the cakes with a peanut butter version of the white cream. Any suggestions on what peanut butter cream I should fill them with??
I would love your input, I trust you more than myself in this matter, haha.
FYI for anyone interested, I made mine into cupcakes since I don’t have round cake pans. The cupcakes take about 25 minutes to bake at the same temp. Really good but tons of work! Oh yeah I got 32 cupcakes using 1/4 cup batter in each cup. I had plenty of filling but I had to made a little more ganache, BUT I was a little heavy with it in the beginning so if you keep that in mind you could have enough.
Love these…I am an East Coat gal and I knew what you meant lol! I will NOT buy these for my kids with what is used for ingredients, but you have inspired me to make them! Thanks!
Sorry to say but mine fell apart and it was entirely to much work. Much better to just go to the store and buy them.
These look just like the original, but I bet they’re so much more tasty. Great job!
beantownbaker — January 5th, 2013 @ 11:44 pm
They sure are better than the original – a lot more work though, but definitely worth it!
Can the coffee be substitutes with anything else?
beantownbaker — January 17th, 2013 @ 4:51 pm
The coffee just enhances the chocolate flavor. You can just use water instead if you don’t have any coffee or don’t like coffee.
I just made these for my mothers birthday(ring dings are the only dessert she enjoys) they came out great! Awesome recipe
beantownbaker — February 3rd, 2013 @ 9:46 pm
So glad you enjoyed them. Happy birthday to your mother!
hey.. made these.. testing recipes for a summer camp job I start this June.. so good, but might stick with cupcakes for kids..
took cake chunks and extra frosting.. made cake balls! Rolled in melted peanut butter then dripped chocolate over… YUM… love your site.. looking for more camp ideas.. kid friendly!
beantownbaker — February 24th, 2013 @ 10:28 am
Cupcakes definitely would be less messy for kids. I really like the portability of bars and brownies. I have tons of those on my blog too.
Making cake balls with PB and chocolate on top sounds amazing!
Never had these before but look good! I might just use the whole cake and cut out rings with the cutter and fill them up in the whole cake then cover in choc. What if you put marshmallow filling? Do you think it would be to soft to cut into pieces of cake?
OMG Jen, just saw this recipe linked from HuffPo article! Sorry, can’t get the link on my phone. 🙁 Slide show on manufactured foods that taste better homemade.
beantownbaker — August 4th, 2013 @ 6:43 pm
Thanks for letting me know! I found the post.
Amazing results. Rarely do I find the recipes that claim to be “just like” the original actually live up to those claims. This one did. LOVE.
beantownbaker — August 27th, 2013 @ 7:58 am
So glad you enjoyed them!
The recipe says to use filling same day. I need to make the cakes a day or 2 ahead of party. If I fill them right away, will they hold for a day or so in the refrigerator ? I don’ t want them to get soggy.
Can these be frozen?
Made these for a friend’s birthday party. Definitely time intensive…assembly took me forever. I made 16 cupcakes and 24 mini-cupcakes and had lots of extra cake batter. The cake is amazing, super moist and flavorful…but fally-aparty so hard to work with when dipping in ganache or spreading ganache over it. After I spent hours making these, they ended up smashed together in one side of the pan that I packed them in to the party. i would highly recommend transporting them in a cupcake tin or something where they will not move. The ganache never “dried” for me so mine were gooey on the outside too, and pretty much a mess to eat. Don’t get me wrong, they taste amazing and everyone enjoyed eating them…but if I was to do it over again, I would just use the ingredients to make a cake.
Do you have to use hot coffee? Can you just use plain hot water.
I don’t know what happened. I made Red Velvet “Fwinkies” (fake Twinkies), but covered them with chocolate so basically a hybrid or a Fwinkho. I have a delectovals pan. After piping in the 7-minute frosting, I dipped the bottoms in melted chocolate to seal and then covered the top in chocolate. The next day, I took them to a sorority luncheon as a treat. Well, the cream filling disappeared and I have to wonder did sealing the bottoms with the warm melted chocolate basically disintegrate the cream filling? I want to make something like this for a gender reveal next week, but I may have to change up the cream filling because I can’t leave the bottoms bare. Any advice?
Thank you!