


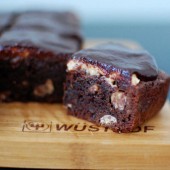
Double Fudge Brownies
I love brownies. I think they might be my favorite dessert. They are so easy to make, they travel well, they’re great straight from the oven and straight from the freezer. Oh and a hot brownie with vanilla ice cream and hot fudge… get out of town. Best.dessert.EVER.

Of course you guys already know that based on how many brownies I’ve posted. This KAF recipe is very similar to my go-to brownie recipe, which is no surprise because that one comes from KAF as well. This one uses whole wheat flour so it’s a tad healthier for you.

Katie and I knew these would be the best brownies ever. With a 1/2 pound of butter, lots of brown sugar and two cups of chocolate chips, how could they not be?

Be sure to let these guys cool overnight. Susan explained in class that the bran is the outside shell of the wheat. The bran is sharp like scissors. That bran is the reason that baking whole wheat bread requires more attention and care because the bran wants to just cut through the gluten that is being formed. She also explained that these brownies will have a much better texture in your mouth if you let the bran settle overnight. Honestly, I almost always let brownies cool overnight anyways, but in this case, be sure not to skip that last step!!


Double Fudge Brownies
Yield: 36
Ingredients:
1 cup unsalted butter
2 cups brown sugar
3/4 cup dutch-process cocoa
1 tsp salt
1 tsp baking powder
1 tsp espresso powder (optional)
1 Tbsp vanilla extract
4 large eggs
1 1/2 cups whole wheat flour
2 cups semisweet chocolate chips
Directions:
Preheat oven to 350.
In a medium sized saucepan set over low heat, melt the butter. Add the sugar and stir to combine. Return the mixture to heat briefly until it's hot and starting to bubble. Heating this mixture a second time will dissolve more of the sugar, which will yield a shiny top crust on your brownies.
Stir in the cocoa, salt, baking powder, espresso powder, and vanilla. Cool mixture. Whisk in the eggs, stirring until smooth. Add the flour and chips, stirring until smooth. Sppon the batter into a lightly greased 9x13" pan.
Bake for 30 minutes until a cake tester comes out clean. The brownies should feel set on the edges and in the center. Cool on a rack overnight. This will give the bran in the whole wheat flour a chance to soften, giving them a more pleasurable texture in your mouth. Cut and serve.
Recipe from King Arthur Flour

Don’t forget about my Power of Pink Challenge – make something PINK by the end of the month to raise Breast Cancer Awareness!


 I am Jen the Beantown Baker. Engineer by day and baking maven by night. Hubby serves as my #1 fan and official taste tester. We got hitched back in 2006. Barefoot. In the sand. With the waves crashing behind us. It was one of the best decisions we’ve ever made.


Holy Yum. This looks amazing!
I’m thinking about making another one so I can take pics of slices. But since it’s for a contest I couldn’t… And we have a no camera policy at work… Yep, it’s decided, I’ll just have to make another one.
Another pie is definitely in order! I’m thinking I’ll have to take this to the family Thanksgiving.
So I think I’ll be using this one – given it combines my two favorite desserts (chocolate chip cookie bars and pie) into one tasty looking combo! Good work 😉
Yes, this was very good. The inside was like a gooey just barely under cooked cookie. AWESOME.