


12 Days of Cookies – Chocolate Peppermint Meringue Kisses
 I picked up the Better Homes and Gardens holiday baking issue at the beginning of the month and turned down this page instantly. I knew I’d be making these cookies for the 12 Days of Cookies. Then, I saw another variation in my Google Reader on the Joy the Baker blog. Hers have a pretty red stripe on the white meringue. I decided to meld these two recipes into one. I basically followed the BHG recipe but just added the red stripes.
As I mentioned the other day, I love the chocolate and peppermint combination. I need to start baking with it more often throughout the year instead of just at the holidays.
 These cookies are very easy to make. The hardest part is probably the piping since meringue is very sticky. I made sure I had everything ready to go before I started. I used a small paintbrush to paint 3 stripes into my piping bag using Wiltons Christmas Red coloring gel. I used my big fat star tip too. The first few came out all white but those will be the taste test cookies. The rest came out with beautiful red stripes.
 It also took me a while to get the hang of piping kisses. My piping skills only go as far as piping big swirls on cupcakes. I looked around the Internet and found this site with information about piping various shapes. I somewhat followed what they said for stars. Basically, I started with my tip a little above the cookie sheet. Then I squeezed some and stopped squeezing before pulling the tip straight up from the kiss. I think they turned out pretty good looking.
 Chocolate Peppermint Meringue Kisses – from Better Homes and Gardens – I got around 100
4 egg whites
1/4 teaspoon salt
1/4 teaspoon cider vinegar
1/4 teaspoon peppermint extract
1-1/3 cups sugar
1 cup milk chocolate pieces – I used a mix of dark, bittersweet, and semisweet chips
1 teaspoon shortening
1-1/4 cups crushed striped round peppermint candies* (about 50 candies) – I used 1 box of candy canes
Place egg whites in a large bowl. Let stand at room temperature for 30 minutes. Preheat oven to 300 degrees F. Line two very large baking sheets with parchment paper or foil; set aside.
 For meringue: Add salt, vinegar, and peppermint extract to egg whites. Beat with an electric mixer on medium speed until soft peaks form (tips curl). Gradually add sugar, 1 tablespoon at a time, beating on high speed until stiff peaks form (tips stand straight) and sugar is nearly dissolved. Be sure to be patient and add the sugar slowly. I wasn’t patient enough so my meringue had a somewhat gritty texture. You can see it in the pictures of the final product if you look closely.
 Transfer meringue to a decorating bag fitted with a 1/2-inch star tip. Pipe 1-inch kisses 1 inch apart onto the prepared baking sheets. Bake all of the meringue kisses at the same time on separate oven racks for 7 minutes. Turn off oven; let meringues dry in oven with door closed for 1 hour. Lift meringues off paper or foil. Transfer to wire racks; cool completely.
 In a small saucepan, combine chocolate pieces and shortening. Cook and stir over low heat just until melted. Remove from heat. Spread crushed candy in a shallow dish. Dip bottoms of meringues in chocolate, then dip in crushed candies. Place on waxed paper and let stand until chocolate is set. Makes about 192 meringue kisses.
 My 12 Days of Cookies:
Day 1: Lumberjacks
Day 2: Peppermint Sandies
Day 3: The great Sugar Cookie Debate
Day 4: Fudge
Day 5: Cranberry Orange Cookies
Day 6: Chocolate Chip Snowballs
Day 7: Peppermint Chocolate Cookies
Day 8: Snickerdoodles
Day 9: Candy Cane & Mint Kiss Cookies


 I am Jen the Beantown Baker. Engineer by day and baking maven by night. Hubby serves as my #1 fan and official taste tester. We got hitched back in 2006. Barefoot. In the sand. With the waves crashing behind us. It was one of the best decisions we’ve ever made.


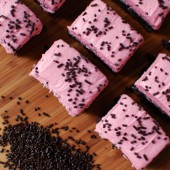
Go pink! Can’t go wrong with a fudgy brownie topped with pretty frosting. So pretty and yummy. 🙂
beantownbaker — October 6th, 2013 @ 8:13 pm
Go pink is right!!
they look so yummy!
This looks super delicious! And a great twist on the typical chocolate or caramel pairing with brownies.
Wow, these look so delicious and beautiful too!!
that raspberry frosting sounds absolutely wonderful!! the more the merrier 🙂