


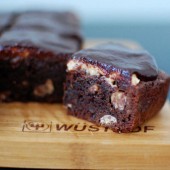
Peanut Butter Brownies
Our kitchen designer, S, for our renovation project was AMAZING. Granted, we had to “break up” with two designers before finding her, but boy are we glad we did! She had so much patience with us me and my indecisiveness. And she tackled our kitchen with all it’s funky angles and obstacles as a challenge not a burden. It was her last minute idea to put a countertop over our radiator to almost double our counter space in the room. We owe her. Big time. But how do you thank someone for all their hard work and patience? In an attempt to show our gratitude, I did what I do best. I baked for her.

The day we went to deliver these brownies, S said she was so glad we love the kitchen and that this is what makes her day. Happy customers coming in smiling say they love the design she came up with. If anyone in the Boston area is looking for a kitchen designer, let me know, because she was awesome.

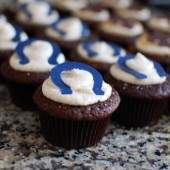
And now, on to the brownies. I had some leftover frosting from the Chocolate Peanut Butter cupcakes and I wanted to incorporate that frosting into the treat for S. Then I decided that I’d stick with the chocolate-peanut-butter theme but make brownies. Now ever since I made these Oreo Brownies, an Ina Garten recipe, I’ve been in love with the brownies. I also made them into Brownie Pops for Hubby’s mom’s surprise birthday party. The brownies are delicious. But I decided I’d try a new brownie recipe just to mix things up.

I asked around and decided on this recipe from What’s Cooking in the Orange Kitchen. These brownies do not disappoint! They’ve got a great texture. Be sure to follow the tip in the recipe to get the nice shiny top to your brownies. I mixed some chocolate-peanut-butter swirled chips into the brownie batter prior to cooking.

Once the brownies were fully cooled, I spread about a 1/2 cup of the leftover frosting onto the brownies. I also had some leftover ganache in the fridge, so I decided to slather that over the peanut butter frosting.

These brownies are very rich and tasty. The peanut butter flavor was not overwhelming, but more of a subtle flavor mixed with the delicious chocolateness of the brownies. Hubby didn’t want to actually deliver these to S because he wanted to eat the entire batch himself.

Don’t forget to enter in my 2nd blogiversary giveaway by midnight on August 13th!


Perfect Brownies
Yield: 16 brownies
Ingredients:
1/2 cup (1 stick) unsalted butter
1 cup + 2 Tbsp sugar
1/2 cup + 2 Tbsp Dutch-process cocoa
1/2 tsp salt
1/2 tsp baking powder
1/2 tsp espresso powder, optional
1/2 Tbsp vanilla
2 large eggs
3/4 cups flour
1 cups chocolate chips - I used chocolate-peanut-butter swirl chips
Directions:
Preheat the oven to 350°F. Lightly grease a 8x8 pan
In a medium-sized microwave-safe bowl, or in a saucepan set over low heat, melt the butter, then add the sugar and stir to combine. Return the mixture to the heat briefly, just until it's hot, but not bubbling; it'll become shiny looking as you stir it. Heating this mixture a second time will dissolve more of the sugar, which will yield a shiny top crust on your brownies.
Transfer the sugar mixture to a medium-sized mixing bowl, if you've heated it in a saucepan. Stir in the cocoa, salt, baking powder, espresso powder, and vanilla.
Whisk in the eggs, stirring until smooth.
Add the flour and chips, again stirring until smooth.
Spoon the batter into a lightly greased 8x8 pan.
Bake the brownies for about 30 minutes, until a cake tester inserted into the center comes out clean, or with just a few moist crumbs clinging to it. The brownies should feel set on the edges, and the center should look very moist, but not uncooked. Remove them from the oven and cool on a rack before cutting and serving.
Recipe from What's Cooking in the Orange Kitchen originally from King Arthur Flour


 I am Jen the Beantown Baker. Engineer by day and baking maven by night. Hubby serves as my #1 fan and official taste tester. We got hitched back in 2006. Barefoot. In the sand. With the waves crashing behind us. It was one of the best decisions we’ve ever made.


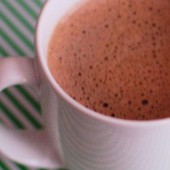
This looks like such a perfect gift! Are those your homemade marshmallows I spy in the mug?
Of course they are! I seriously can’t justify buying marshmallows anymore. They’re just so easy and SO good homemade. I even whipped up a batch to put on our twice baked sweet potatoes for Thanksgiving.
I really wanted to do this this year for gifts but time escaped me. Looks great!
Soooo here’s the deal- A Boston Food Diary is going to look A LOT like Beantown Baker next week as I steal your recipes 🙂 Looks great Jen!
Why have I never thought about doing this? It looks so easy and it definitely would give me an excuse to make some homemade marshmallows!
That looks like an amazing gift! Making a homemade hot cocoa would definetly save money. Thanks for the recipe(:
Ghirardelli cocoa is very good and your homemade hot cocoa mix …too!!! May you have a special merry Christmas!!!Hugs, Flavia
I have never thought of making my own cocoa mix OR marshmallows. I feel a winter project coming on. Looks delicious!
I have had this bookmarked to make to some gifts for a couple of my girlfriends. So awesome and easy to make!
-Amanda
Loads of thanks to you. I can make everyone happy this Christmas. This recipe is even easy to follow.
Yum! What a great holiday gift idea!