


Boogity
I’ve had this recipe book marked for quite some time. It’s so simple to make and you can customize it to your tastes or what you have on hand. You could use festive candies from any holiday as well.

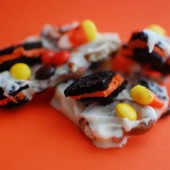
I love the bright orange Oreo filling (yes, I realize there is something inherintly wrong with orange Oreo filling, but I’m ok with that).

I was a little unsure about the candy corn since I’m not a huge fan, but they provided a great textural change due to their softness. I also sprinkled some salt onto the candy melts because I love salty and sweet combos. I was worried that this stuff would be way too sweet without it.

Be sure to press your candy and cookie pieces into the top of the candy melt. I didn’t really press mine in and some of them didn’t stick. Either way this stuff is pretty awesome and dissappeared before I knew it.
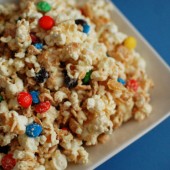
One Year Ago: Pumpkin Pasta and Pumpkin and Chocolate Caramel Corn
Two Years Ago: Ginger Pumpkin Cupcakes


Boogity
Ingredients:
~20 halloween Oreos broken into various sized pieces, divided
1 1/2 cups mini pretzels
1 cup candy corn, divided
1 1/2 cups Reese’s Pieces
28 ounces (two bags) white chocolate candy melts
Directions:
Line a large cookie sheet with waxed paper. Spread 3/4 of cookies, pretzels, and 3/4 cup of the candy corn onto the waxed paper.
Place candy melts in a microwave safe measuring cup and heat in microwave at 50% power in 30 second intervals until completely melted.
Drop melted chocolate immediately over cookie mixture, spreading with an offset spatula to coat evenly. Top with reserved cookies, candy corn and Reese’s Pieces, working quickly before chocolate hardens.
Place into refrigerator until firm. Remove and gently break apart (or use a sharp knife to press into the cookie bark – it will break apart easily) into small pieces for serving. Store in airtight container.
Recipe from Culinography, originally from Recipe Girl

Don’t forget about my Power of Pink Challenge – make something PINK by the end of the month to raise Breast Cancer Awareness!


 I am Jen the Beantown Baker. Engineer by day and baking maven by night. Hubby serves as my #1 fan and official taste tester. We got hitched back in 2006. Barefoot. In the sand. With the waves crashing behind us. It was one of the best decisions we’ve ever made.


I can never turn down a CCC. These look good! And happy 7 years to you! Hope you had a cookie to celebrate! 🙂
beantownbaker — September 7th, 2014 @ 11:08 am
As many other treats as I make, I too, can never turn down a CCC. They’re just magical 🙂