


Strawberry Cobbler
 First things first. Happy Memorial Day! And Happy 19th Birthday to my brother A who will be here in Boston tomorrow! We’re taking him to a game at Fenway on Thursday to celebrate his birthday. And now on to your regularly scheduled post.
It’s the height of strawberry season. To me, strawberries mean summertime. The weather starts to warm up and the strawberries are plump, sweet, and plentiful. And there are the strawberry festivals! Now that’s a good time. Around this time of year, I really wish Hubby and I lived somewhere that we could have a garden. Nothing beats freshly picked strawberries!!
Hubby and I absolutely have been gobbling up strawberries at a crazy rate recently. To celebrate this awesome summertime fruit, I’m going to be featuring a week of strawberries this week! Be sure to come back each day to see what I’m doing to use up the strawberries in our fridge.

To kick things off, I wanted to bake a tasty dessert. Now don’t get me wrong, Hubby and I both enjoy just eating cut up strawberries for dessert. In fact one night without even noticing, we polished off an entire pint before we even knew it.

Anyways, back to this cobbler. I was surprised to find that there aren’t that many strawberry cobbler recipes out there. I found this one in my Google Reader and it does NOT disappoint. I cut the recipe down because Hubby and I don’t need a whole casserole dish worth of cobbler in the house!
I followed Cassie’s advice and bumped up the biscuit topping. Then I divided the entire recipe by 3. It came out to the perfect amount for my 4 ramekins.

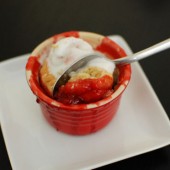
I was really excited to have a chance to use my ramekins. I spotted them at TJMaxx a couple weeks ago. I got them on the spot and have been trying to figure out how to use them for the first time. They were perfect for this cobbler.
When Cassie made the cobbler, she just dropped the biscuit topping on her strawberry filling. I’m a bit too OCD for that. When I patted out the biscuit topping, I divided into four equal sized pieces of dough. Then I took that piece of dough and shoved it in to a round cookie cutter that was about the size of the ramekins. That way I could use up all of the biscuit topping and have nice round tops to my cobbler. Yes, very OCD of me, but that’s how I roll.

One thing I didn’t do was plan for the mess these little guys would make in the oven. The strawberry filling spilled out over the edge while they were baking. Of course the drippings look pretty cool, but they sure do make a mess. If you use ramekins, definitely line your cookie sheet with some foil for easy cleanup!
And now I’m sure you’re all wondering how these little beauties tasted. Well, they’re amazing. I served them hot with a small scoop of ice cream on top (whipped cream would also be great). I couldn’t stop eating this little pot of strawberry cobbler. In fact, I burnt my tongue because I simply couldn’t wait for them to cool long enough.

Two Years Ago: Cookie Dough Ice Cream Cupcakes and Frito Cupcakes
Check out my entire week of Strawberry recipes here.


Strawberry Cobbler
Ingredients:
For the Strawberry Filling
1/2 cups sugar
2 tsp cornstarch
2 tsp water
1 1/2 tsp fresh lemon juice
2 cups strawberries, washed and hulled
1 tsp unsalted butter, softened
For the Biscuit Topping
3/4 cups flour
1 1/2 tsp baking powder
1/4 tsp salt
1 Tbsp granulated sugar
2 1/2 Tbsp shortening
1/4 cup cold milk
Directions:
Preheat the oven to 400 degrees F. Line a large cookie sheet with foil. Butter 4 deep ramekins and place on the cookie sheet.
First, prepare the strawberry filling. In a large nonreactive saucepan stir together the sugar and cornstarch. Stir in the water and lemon juice. Stir in the strawberries.
Cook over medium heat, stirring often until thickened. Remove from the heat and stir in the butter. Pour filling into ramekins.
Prepare the biscuit topping. Stir or sift together the flour, baking powder, salt, and sugar. Rub in the shortening with your fingers. Using a fork, gently stir in the milk, just until the dough cleans the bowl.
Toss on a lightly floured surface until no longer sticky, and then pat or roll out to a shape that fits the top of the dish being used.
Bake for 25 minutes.
Recipe adapted from How to Eat a Cupcake


 I am Jen the Beantown Baker. Engineer by day and baking maven by night. Hubby serves as my #1 fan and official taste tester. We got hitched back in 2006. Barefoot. In the sand. With the waves crashing behind us. It was one of the best decisions we’ve ever made.


Yay! You’ve had a delicious 12 days of cookies and I’m so glad I got to follow along. So many wonderful treats that I feel like I’m armed for next year! Here’s wishing you a Merry Christmas! 🙂
Congratulations on finishing your 12 cookies! I know it wasn’t easy. I felt like I was constantly baking and eating cookies for 2 weeks straight when I made mine. My co-workers were very happy though. I thought this was a lot of fun and I hope to do it again next year (if my husband lets me. lol). I need to plan earlier on what cookies I want to make too.
Merry Christmas!
I really enjoyed your 12 days of cookies. I am saving your list to add to my baking next year.
PS – I tagged you!