


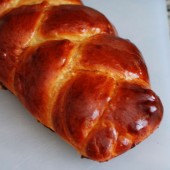
Challah Bread
Every time I make bread at home, I instantly proclaim that it’s so good I should really do this more often. And then it’s usually a few months before I actually get around to making bread again.

If you have never made bread at home, this Challah bread would be a good thing to start with. The dough was very forgiving and easy to work with. A coworker of mine came over to make this bread with me on Sunday. We were having a French toast party at work and decided that homemade Challah would be much better than store-bought.

My coworker had never made bread before, but like I said, this dough was very easy to work with. Like most breads, this does require some time with all the rising and waiting. But that’s ok, we enjoyed watching some cheesey chick flick while our bread was doing it’s thing.
Everyone at work was impressed that we made the bread from scratch. And of course, it made some great French toast!
One Year Ago: Strawberry and Spinach Salad
Three Years Ago: Goat Cheese and Spinach Turkey Burgers


Challah Bread
Yield: 2 loaves
Ingredients:
1 1/2 packages active dry yeast (1 1/2 Tbsp)
1 Tbsp plus 1/2 cup sugar
1/2 cup vegetable oil, plus more for greasing the bowl
5 eggs
1 Tbsp salt
8 to 8 1/2 cups flour
Directions:
In a large bowl, dissolve yeast and 1 tablespoon sugar in 1 3/4 cups lukewarm water.
Whisk oil into yeast, then beat in 4 eggs, one at a time, with remaining sugar and salt. Gradually add flour. When dough holds together, it is ready for kneading. (You can also use a mixer with a dough hook for both mixing and kneading, but be careful if using a standard size KitchenAid–it’s a bit much for it, though it can be done.)
Turn dough onto a floured surface and knead until smooth. Clean out bowl and grease it, then return dough to bowl. Cover with plastic wrap, and let rise in a warm place for 1 hour, until almost doubled in size. Dough may also rise in an oven that has been warmed to 150 degrees then turned off. Punch down dough, cover and let rise again in a warm place for another half-hour.
At this point, you can knead the raisins into the challah, if you’re using them, before forming the loaves. To make a 6-braid challah, either straight or circular, take half the dough and form it into 6 balls. With your hands, roll each ball into a strand about 12 inches long and 1 1/2 inches wide. Place the 6 in a row, parallel to one another. Pinch the tops of the strands together. Move the outside right strand over 2 strands. Then take the second strand from the left and move it to the far right. Take the outside left strand and move it over 2. Move second strand from the right over to the far left. Start over with the outside right strand. Continue this until all strands are braided. For a straight loaf, tuck ends underneath. For a circular loaf, twist into a circle, pinching ends together. Make a second loaf the same way. Place braided loaves on a greased cookie sheet with at least 2 inches in between.
Beat remaining egg and brush it on loaves. Either freeze breads or let rise another hour.
If baking immediately, preheat oven to 375 degrees and brush loaves again. Sprinkle bread with seeds, if using. If freezing, remove from freezer 5 hours before baking.
Bake in middle of oven for 30 to 40 minutes, or until golden. (If you have an instant read thermometer, you can take it out when it hits an internal temperature of 190 degrees.) Cool loaves on a rack.
Recipe as seen on Smitten Kitchen


 I am Jen the Beantown Baker. Engineer by day and baking maven by night. Hubby serves as my #1 fan and official taste tester. We got hitched back in 2006. Barefoot. In the sand. With the waves crashing behind us. It was one of the best decisions we’ve ever made.


You’re not the only one…I bought a ton of pumpkin too! But I love food with pumpkin. I also put pumpkin puree straight into a small muffin tin and freeze it as a treat for my dog. She loves it!