


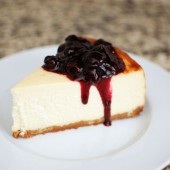
New York Style Cheesecake with Blueberry Sauce
Cheesecake has not been my friend in the past. For one, cream cheese is my biggest dairy enemy. I can handle small amounts of butter, cheese, milk, etc but cream cheese? Forget about it. I can’t come anywhere near that stuff. So if I ever want a hope of enjoying cheesecake, it has to be made at home with dairy free cream cheese. Second, I don’t have a roasting pan or anything to use for a sufficient water bath. My last attempt at cheesecake resulted in a cracked mess of a pie that looked like a disaster, but tasted really good.

So when I added cheesecake to my 30-by-30 list, I wanted to find a cheesecake recipe that could be made without a water bath and that wouldn’t crack. I realize that you can cover cracks with a variety of toppings like caramel, whipped cream, fruit, or just about anything else. But, this is just one of those things I wanted to be able to do.

I’ve been saving cheesecake recipes all year in the hopes of finding one that would be suitable to try. Then Bridget did this comparison post. After reading through her comparison and the various recipes I had saved, I decided to go with the Cooks Illustrated version of cheesecake. Everything I’ve made from them has been delicious and the recipe didn’t require a water bath.
I decided to make a blueberry topping with the last two cups of the blueberries Hubby and I picked last fall. The cheesecake was very smooth and lucious even without the topping, but Hubby and I both agreed that the blueberry sauce really took this dessert to the next level.

I did take a few extra steps to ensure the cheesecake would not crack. The reason cheesecakes crack is because they are cooling too quickly. After the hour and a half at 200 degrees, instead of removing my cheesecake from the oven, I simply turned off my oven, cracked the door, and stuck a wooden spoon in the door such that the oven and the cheesecake cooled down slowly. After about thirty minutes, I opened the oven door to let the cheesecake cool another couple hours before finally letting it sit on a cooling rack until completely cooled to room temperature.

Now, I have to come clean with you guys. This cheesecake didn’t turn out as perfectly as I had hoped… As you can see, the top of my cheesecake burnt! The recipe says to bake for 10 minutes at 500 degrees. My oven runs hot and always has. I set my oven to 475 and the thermometer in my oven said 500 when I popped the cheesecake in the oven. I think it may have gone through a hot streak (gas ovens have a tendency to do this) during these 10 minutes, because when I turned the oven down to 200 and peaked in through the window, it had already burned. I contemplated remaking the cheesecake to get a pretty picture of the top, but I decided instead to share this mishap with you guys. It didn’t affect the taste of the cheesecake, just the appearance. But that was all covered up by the blueberry sauce anyways!
One Year Ago: Oreo Cream Cheese Swirl Brownies
Three Years Ago: Baked Eggplant Chips


New York Style Cheesecake
Ingredients:
For the Crust
5 Tbsp unsalted butter, melted, plus 1 additional Tbsp, melted, for greasing the pan
4 ounces (approximately 8 whole) graham crackers, broken into rough pieces and processed into fine, even crumbs
1 Tbsp sugar
For the Cheesecake
2 1/2 pounds (5 8-ounce packages) cream cheese, room temperature
1/8 tsp salt
1 1/2 (10.5 ounces) cups sugar
1/3 cup sour cream
2 tsp freshly squeezed lemon juice
2 tsp vanilla extract
2 egg yolks, at room temperature
6 large eggs, at room temperature
For Blueberry Sauce
2 cups frozen blueberries
2-4 Tbsp sugar depending on the sweetness of your berries (I used 2)
1/2 Tbsp cornstarch
1 tsp lemon juice
1 1/2 Tbsp water
Directions:
For the Cheesecake
To make the crust, adjust an oven rack to the lower-middle position and heat the oven to 325 degrees F. Brush the bottom and sides of a 9-inch springform pan with ½ tablespoon of the melted butter. In a medium bowl combine the graham cracker crumbs, 5 tablespoons melted butter, and sugar. Toss with a fork until the crumbs are evenly moistened. Transfer the crumbs to the springform pan and use the bottom of a ramekin to firmly press the crumbs evenly into the pan bottom. Bake until fragrant and beginning to brown around the edges, about 13 minutes. Cool on a wire rack while preparing the filling.
Increase the oven temperature to 500 degrees F. In the bowl of a stand mixer fitted with the paddle attachment, beat the cream cheese at medium-low speed to break up and soften it slightly, about 1 minute. Scrape the beater and the bottom and sides of the bowl well with a rubber spatula; add the salt and about half of the sugar and beat at medium-low speed until combined, about 1 minute. Scrape the bowl; beat in the remaining sugar until combined, about 1 minute. Scrape the bowl; add the sour cream, lemon juice, and vanilla. Beat at low speed until combined, about 1 minute. Scrape the bowl; add the egg yolks and beat at medium-low speed until thoroughly combined, about 1 minute. Scrape the bowl; add the remaining eggs 2 at a time, beating until thoroughly combined, about 1 minute, scraping the bowl between additions.
Brush the sides of the springform pan with the remaining ½ tablespoon melted butter. Set the pan on a rimmed baking sheet to catch any spills in case the pan leaks. Pour the filling into the cooled crust and bake 10 minutes; without opening the oven door, reduce the oven temperature to 200 degrees and continue to bake until the cheesecake reads about 150 degrees on an instant-read thermometer inserted in the center, about 1½ hours. Transfer the cake to a wire rack and cool until barely warm, 2½ to 3 hours. Run a paring knife between the cake and the springform pan sides. Wrap tightly in plastic wrap and refrigerate until cold, at least 3 hours.
To unmold the cheesecake, removed the sides of the pan. Slide a thin metal spatula between the crust and the bottom of the pan to loosen, then slide the cake onto a serving plate. Let the cheesecake stand at room temperature about 30 minutes, then cut into wedges and serve. (Use a long, thin, sharp knife that has been run under hot water and then dried for slicing. Wipe the blade clean and rewarm between slices.)
For Blueberry Sauce
Place blueberries and sugar in a pan and heat until the blueberries release their juices.
Combine cornstarch, juice, and water in a small bowl. Stir together until smooth.
Add slurry to pan and stir to mix completely. Bring mixture to boil for a few minutes. Allow to cool to room temperature.
Recipe as seen on The Way the Cookie Crumbles, originally from Cooks Illustrated


 I am Jen the Beantown Baker. Engineer by day and baking maven by night. Hubby serves as my #1 fan and official taste tester. We got hitched back in 2006. Barefoot. In the sand. With the waves crashing behind us. It was one of the best decisions we’ve ever made.


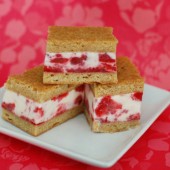
AND just perfect for Canada Day!! 🙂 I love the colours, and they are cut PERFECTLY… I’m terrible at cutting bars.
I wish I’d seen this a few days ago when I had fresh picked strawberries in my house! But a strawberry rhubarb pie will have to suffice 😉
These are gorgeous! I remember seeing the blueberry ones that you did last year and they looked amazing, but I think you outdid youself this time!
These are gorgeous! I remember seeing the blueberry ones that you did last year and they looked amazing, but I think you outdid youself this time!
These look amazing! I would so love to have one of these now!
These look amazing! When you were talking about not being able to find cheesecake ice cream I immediately thought of Cold Stone. Good thing someone turned you on to that idea. It would have been a shame to think these bars could have not come to fruition 🙂
these sound incredible! Love the sound of the blondie-like sandwich layers. I am so sorry you had to make something you couldn’t enjoy though!
These bars look fantastic!!!! YUM!