


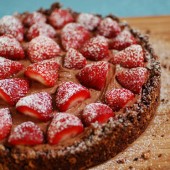
Marbled Cheesecake, also known as…
… not everything I make turns out as expected. Or looking good for that matter… A lot of people ask if I ever make things that don’t turn out right. This is a prime example of the fact that it does happen to everyone. I decided to make cheesecake for our monthly cooking club. The theme this month was indulgent foods and I immediately thought of the cheesecake pictures in Baking from My home to Yours. Dorie’s cheesecake looks absolutely perfect. I’ve never made a cheesecake before. I made the Daring Baker’s Cheesecake pops last year, but it didn’t have a crust… When I was getting everything together, I realized I don’t have a pan big enough to make a water bath for my 9″ springform pan. After some research online, I decided to put a pan with hot water on the bottom rack below the cheesecake.
 I opted to make the marbled variation of the cheesecake with a chocolate graham cracker crust. I think I used more than 1/3 of the batter in the chocolate because it didn’t look very marbled. I should have taken a picture of it before I baked it to show the marbled top…
After the hour and a half, I pulled the cheesecake out a tad just to stick a knife in it to see if it was done. It had risen up but didn’t look done so I put it back in for 15 more minutes. When I checked it at that point, some of the edge had fallen over the pan. I turned the oven off and propped the oven open with a wooden spoon for an hour. When that timer went off, I found my hideous looking cheesecake. Not only had a good amount flowed overboard, the cheesecake was cracked, and sunken in. Not my best showing… BUT, it does taste like a delicious cheesecake, so I guess that’s all that matters.
If anyone has any advice on how to prevent this next time, I’d greatly appreciate it.
 To see the entire recipe, check out the Tuesday’s with Dorie member who chose the recipe for the group, Anne of AnneStrawberry. Be sure to see how all the TWD members did (also check out what Dorie herself says about the cheesecake). The recipe says you can use 1 1/3 cup sour cream or heavy cream or a combination of the two. I used 2/3 cup sour cream and 2/3 cup heavy cream.

 I am Jen the Beantown Baker. Engineer by day and baking maven by night. Hubby serves as my #1 fan and official taste tester. We got hitched back in 2006. Barefoot. In the sand. With the waves crashing behind us. It was one of the best decisions we’ve ever made.


These cookies look great! Hope you feel better soon Jen!
These look awesome. I love chocolate and cinnamon together.
Feel better!
Love oatmeal cookies! Hope you’re feeling better 🙂
Aw, I didn’t realize you hadn’t gone to the swap! What a bummer. But then at least you didn’t have to share these cookies. 😉
Yum. I really love the combo of chocolate and cinnamon! Glad they came out well.
Feel better!!
hope you were able to get some rest and are feeling better! we missed you, but hopefully we’ll have another chance to catch up soon. these look great, and i’ve got some cinnamon chips in my house too 😉
I’m not sure I’ve had chocolate & cinnamon together before but I bet the combination is great! And if it’s in an oatmeal cookie, you can’t really go wrong.
I love cinnamon chips and put them in oatmeal cookies. I never thought of putting them in chocolate chip oatmeal cookies-they look amazing!
Jenn, these sound awesome, and I have some cinnamon chips to use!
These look wonderful! I’m sure being stuck in the house with a whole batch of them made you feel a little bit better, right? I love cookies with cinnamon chips in them!
Sues
These look so delicious. Getting sick on important (dessert related!) events is the absolute worst. I think another cookie swap is in your future.