Oreo Cream Cheese Swirl Bars

Oreos make everything more indulgent. Cream cheese has the same affect. Imagine the super-indulgence of adding them BOTH to a brownie recipe. Yea, it’s pretty much like heaven.

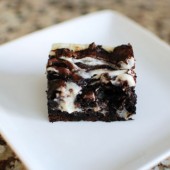
I cut these brownies really small because they are so deliciously rich. The layer of cream cheese is awesome smothered between the two layers of Oreo brownies. And I like how they look like Oreos. The dark brownie batter sandwiches the white cream cheese layer just like an Oreo cookie!

I found this brownie batter to be extremely thick. This made it difficult to make swirls with the super creamy cream cheese layer. I think I made it work, but it was difficult. Also, be sure to let these cool completely. And store them in the fridge. They get all gooey and super soft when they come to room temperature. They still taste great, but I prefer the texture when they’re cold straight from the fridge.

Two Years Ago: Baked Eggplant Chips

See all of my Week Of Oreo Recipes here.

Print Save

Oreo Cream Cheese Swirl Brownies

Yield: 25

Ingredients:

1/2 cup unsalted butter
3/4 cup granulated sugar
1 package (8 oz) cream cheese, softened
3/4 cup confectioners' sugar
2 teaspoons vanilla extract
1 cup flour
1/2 cup unsweetened dark cocoa powder
1/2 teaspoon salt
2 eggs
1 1/3 cups coarsely chopped Oreo cookies

Directions:

Preheat oven to 350 degrees F. Line an 8x8-inch square baking dish with foil; coat foil with cooking spray.

Melt the butter in a small saucepan, over medium heat. Whisk in sugar and bring to a boil, whisking frequently; boil 1 minute. Set aside to cool for 5 minutes.

In a small mixing bowl, using a mixer on medium speed, beat together cream cheese, confectioners' sugar and vanilla extract, until well combined, about 1 minute.

In a medium sized mixing bowl, sift together flour, cocoa powder and salt; whisk until combined.
In a large mixing bowl, whisk together eggs, until combined. Whisk in melted butter-sugar mixture until well combined. Stir in flour mixture until just combined, followed by Oreo cookies.

Spread half of brownie batter into baking dish, followed by cream cheese layer; dot the top with remaining brownie batter, and spread evenly, as best as you can. Run a knife through batter to make "swirls".

Bake at 350 degrees F, for 23-28 minutes.

Cool on a wire rack to room temperature before slicing. Lift foil out of baking dish, and slice. For easier slicing, try freezing the brownies for 30-60 minutes.

Recipe from Sugar Plum

    Pin It

36 Responses to “Homemade Ding Dongs or Ring Dings or whatever you call them”

  1. #
    1
    SimplySweeter — May 24, 2010 at 12:37 pm

    Jen, I think I just died and went to heaven! Long live the Ring Ding!! LOL

    http://www.simplysweeter.blogspot.com

  2. #
    2
    Cara — May 24, 2010 at 1:22 pm

    Love this theme, so fun! The whole menu sounds delicious 🙂

  3. #
    3
    Jane — May 24, 2010 at 1:30 pm

    Hi Jen,
    Wow! These babies look really authentic. I’ve seen a lot of faux Ding Dongs in my day, and yours rank right up there. Very nice job!
    🙂 Jane

  4. #
    4
    bridget {bake at 350} — May 24, 2010 at 2:16 pm

    Oh, I LOVE Ding Dongs!!! And yours look fabulous!

  5. #
    5
    roxan — May 24, 2010 at 3:04 pm

    Even at 8a on a monday morning, I feel like I could eat a whole stack of those. Great job, they look delicious!

  6. #
    6
    Kasey — May 24, 2010 at 7:11 pm

    There is a local baking partnership here in the Los Angeles area that makes individual sized cakes and treats. They also recreate classic favorites such as the Ho-Ho. Thought you might enjoy the link. http://www.cakemonkey.com/

  7. #
    7
    Memória — May 24, 2010 at 8:01 pm

    Oh your Ding Dongs look perfect. Absolutely perfect!! They make me want to jump up and make them now. Goodness!! Thanks for sharing the photos and recipe with us. I’ve yet to make the 7-minute frosting, so I’m looking forward to that.

  8. #
    8
    Katherine — May 24, 2010 at 8:11 pm

    Oh my, what a great recipe!

  9. #
    9
    Kara — May 24, 2010 at 11:31 pm

    You’re killing me! Now I have to think about when I can fit Ring Dings into my schedule this week! They’d be so much better from scratch than they would out of the box…

  10. #
    10
    ellysaysopa.com — May 25, 2010 at 1:15 pm

    These & oatmeal creme pies were my absolute favorite as a kid. I think they were called King Dons when I ate them. I definitely need to try this!

  11. #
    11
    oneordinaryday — May 25, 2010 at 3:32 pm

    Oh, how fun. WIsh I had a couple right now.

  12. #
    12
    Ingrid — May 29, 2010 at 1:44 am

    Ring Dings! :)But that’s what they were called when Drake’s made them and we lived in NYC. Once we moved to FL they were Ding Dongs. Or do I have that backwards, hmm now I’m not exactly sure. Either way it wasn’t I that ate them but my Mom. I’ll have to give them a whirl for her and score some brownie points, hee-hee!

    Hope you have a safe and Happy Memorial Day weekend!
    ~ingrid

  13. #
    13
    hannah! — May 29, 2010 at 3:44 pm

    omigosh YUM!! they sure do remind me of hostess cupcakes

  14. #
    14
    Katherine — July 4, 2010 at 1:30 pm

    Your ding dongs look perfect! Great job!

    I’ve been thinking of making these for my mother for her birthday next week…but since she LOVE chocolate peanut butter, I thought I would fill the cakes with a peanut butter version of the white cream. Any suggestions on what peanut butter cream I should fill them with??

    I would love your input, I trust you more than myself in this matter, haha.

  15. #
    15
    GadgetGirl — January 4, 2011 at 8:22 pm

    FYI for anyone interested, I made mine into cupcakes since I don’t have round cake pans. The cupcakes take about 25 minutes to bake at the same temp. Really good but tons of work! Oh yeah I got 32 cupcakes using 1/4 cup batter in each cup. I had plenty of filling but I had to made a little more ganache, BUT I was a little heavy with it in the beginning so if you keep that in mind you could have enough.

  16. #
    16
    Souffle Bombay (Colleen) — January 6, 2011 at 2:42 pm

    Love these…I am an East Coat gal and I knew what you meant lol! I will NOT buy these for my kids with what is used for ingredients, but you have inspired me to make them! Thanks!

  17. #
    17
    Carol — February 12, 2012 at 2:35 am

    Sorry to say but mine fell apart and it was entirely to much work. Much better to just go to the store and buy them.

  18. #
    18
    Kari@Loaves n Dishes — January 5, 2013 at 7:26 pm

    These look just like the original, but I bet they’re so much more tasty. Great job!

    • beantownbaker — January 5th, 2013 @ 11:44 pm

      They sure are better than the original – a lot more work though, but definitely worth it!

  19. #
    19
    Anna — January 17, 2013 at 9:38 am

    Can the coffee be substitutes with anything else?

    • beantownbaker — January 17th, 2013 @ 4:51 pm

      The coffee just enhances the chocolate flavor. You can just use water instead if you don’t have any coffee or don’t like coffee.

  20. #
    20
    jennifer — February 2, 2013 at 4:11 pm

    I just made these for my mothers birthday(ring dings are the only dessert she enjoys) they came out great! Awesome recipe

    • beantownbaker — February 3rd, 2013 @ 9:46 pm

      So glad you enjoyed them. Happy birthday to your mother!

  21. #
    21
    Kathy — February 21, 2013 at 1:51 pm

    hey.. made these.. testing recipes for a summer camp job I start this June.. so good, but might stick with cupcakes for kids..
    took cake chunks and extra frosting.. made cake balls! Rolled in melted peanut butter then dripped chocolate over… YUM… love your site.. looking for more camp ideas.. kid friendly!

    • beantownbaker — February 24th, 2013 @ 10:28 am

      Cupcakes definitely would be less messy for kids. I really like the portability of bars and brownies. I have tons of those on my blog too.

      Making cake balls with PB and chocolate on top sounds amazing!

  22. #
    22
    Carmen — July 24, 2013 at 8:30 pm

    Never had these before but look good! I might just use the whole cake and cut out rings with the cutter and fill them up in the whole cake then cover in choc. What if you put marshmallow filling? Do you think it would be to soft to cut into pieces of cake?

  23. #
    23
    Virginia — August 3, 2013 at 9:26 pm

    OMG Jen, just saw this recipe linked from HuffPo article! Sorry, can’t get the link on my phone. 🙁 Slide show on manufactured foods that taste better homemade.

    • beantownbaker — August 4th, 2013 @ 6:43 pm

      Thanks for letting me know! I found the post.

  24. #
    24
    Trisha — August 26, 2013 at 11:01 pm

    Amazing results. Rarely do I find the recipes that claim to be “just like” the original actually live up to those claims. This one did. LOVE.

    • beantownbaker — August 27th, 2013 @ 7:58 am

      So glad you enjoyed them!

  25. #
    25
    Jody — March 13, 2014 at 2:00 pm

    The recipe says to use filling same day. I need to make the cakes a day or 2 ahead of party. If I fill them right away, will they hold for a day or so in the refrigerator ? I don’ t want them to get soggy.

  26. #
    26
    Chaya — October 22, 2014 at 9:44 am

    Can these be frozen?

  27. #
    27
    Lynmarie — January 26, 2015 at 1:27 pm

    Made these for a friend’s birthday party. Definitely time intensive…assembly took me forever. I made 16 cupcakes and 24 mini-cupcakes and had lots of extra cake batter. The cake is amazing, super moist and flavorful…but fally-aparty so hard to work with when dipping in ganache or spreading ganache over it. After I spent hours making these, they ended up smashed together in one side of the pan that I packed them in to the party. i would highly recommend transporting them in a cupcake tin or something where they will not move. The ganache never “dried” for me so mine were gooey on the outside too, and pretty much a mess to eat. Don’t get me wrong, they taste amazing and everyone enjoyed eating them…but if I was to do it over again, I would just use the ingredients to make a cake.

  28. #
    28
    Kimberly Westervelt — March 31, 2015 at 4:15 pm

    Do you have to use hot coffee? Can you just use plain hot water.

  29. #
    29
    Colleen — May 7, 2015 at 7:52 pm

    I don’t know what happened. I made Red Velvet “Fwinkies” (fake Twinkies), but covered them with chocolate so basically a hybrid or a Fwinkho. I have a delectovals pan. After piping in the 7-minute frosting, I dipped the bottoms in melted chocolate to seal and then covered the top in chocolate. The next day, I took them to a sorority luncheon as a treat. Well, the cream filling disappeared and I have to wonder did sealing the bottoms with the warm melted chocolate basically disintegrate the cream filling? I want to make something like this for a gender reveal next week, but I may have to change up the cream filling because I can’t leave the bottoms bare. Any advice?

  30. #
    30
    Stan — September 1, 2021 at 8:58 am

    Thank you!

Leave a Comment