


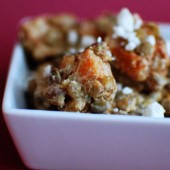
Spicy Butternut Squash, Goat Cheese and Lentil Salad
 Hubby and I have been on a big lentil kick. They’re so easy to make, great for you, and delicious. I saw this salad recently on Smitten Kitchen and knew I needed to make it this week. I used the lentils I had on hand, so I didn’t get the pretty black and orange salad that Deb got, but that’s ok, it’s still pretty freaking awesome.

Hubby and I really enjoyed this salad. It’s very hearty and filling. We ate it for a midafternoon snack and almost didn’t need dinner that night. I’ve written the recipe as I made it below, be sure to click through to Smitten Kitchen to get the original recipe.

This is unfortunately one of those dishes that is difficult to get a great photo of… But it’s really good so I had to post about it. Don’t hate on lentils just because they’re not pretty!
One Year Ago: Apple Cranberry Cake Pie
Two Years Ago: Pie Crust


Spicy Butternut Squash, Goat Cheese, and Lentil Salad
Yield: 3-6
Ingredients:
3/4 cup black or green lentils
6 cups peeled, seeded and cubed butternut squash or sugar pumpkin (1-inch cubes)
3 tablespoons olive oil, divided
1 teaspoon ground cumin
1 teaspoon smoked paprika
1/2 teaspoon coarse salt
1 cup soft crumbled goat cheese
1 tablespoon red wine vinegar, plus additional to taste
~1/2 cup toasted pumpkin seeds
Directions:
Preheat oven to 400°F. Toss squash with 2 tablespoons oil, cumin, paprika and salt. Arrange in a single layer on baking sheet and roast 20 minutes. Flip pieces and roast for an additional 10 to 15 minutes, until tender. Cool.
Meanwhile, soak lentils for 10 minutes in a small bowl, then drain. Cook lentils in boiling salted water until tender but firm, about 30 minutes. Rinse with cold water, then drain and cool.
Combine lentils, squash, half of goat cheese, vinegar, and 1 tablespoon oil. Season with salt and pepper and extra vinegar, if desired. Serve with remaining goat cheese to sprinkle.
Recipe adapted from Smitten Kitchen, originally from Bon Appetit
![]()
Boston area readers, don’t forget that I’m selling pies for Pie In the Sky. The cost of your pie will feed someone in need for an entire week! Please consider buying a pie for a good cause.


 I am Jen the Beantown Baker. Engineer by day and baking maven by night. Hubby serves as my #1 fan and official taste tester. We got hitched back in 2006. Barefoot. In the sand. With the waves crashing behind us. It was one of the best decisions we’ve ever made.


