


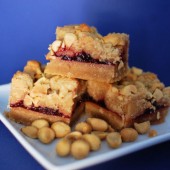
Peanut Butter and Jelly Bars
It’s back to school time in Boston. The little kids start up again on Wednesday here in Massachusetts. When I was young, I always got nervous before the first day of school. Maybe excited is a better word for it? Either way, I could never fall asleep the night before the first day of school. It was part anxiety about whether I’d wake up in time after enjoying sleeping in all summer and part excitement about seeing my friends every day again.

Peanut butter and jelly is such a classic nostalgic flavor combination. It can whisk anyone back to the 3rd grade lunch room. These bars do just that. They’re ooey gooey and delicious.

I originally thought I’d have enough of my homemade blueberry and strawberry jam to use in these bars. When I realized I was almost out, I let Hubby choose the jam flavor for these bars. He went with Bonne Maman Four Fruits Preserves. It’s got strawberry, raspberry, red currants, and cherries. It is a high quality jam that really did shine in these bars.

Hubby and I both agreed that we liked the middle pieces best. I usually and edge person and actually prefer corners the best. But with these bars, the peanut butter started to take over as you got closer to the edge of the pan. The center pieces had a great ratio of PB&J. If I were to make these again, I’d either add more jelly to the mix, or at least spread it further to the edge (I had read in the reviews of the recipe that if you have jelly exposed it would burn, so I was nervous about that).
What do you remember about going back to school when you were young?
One Year Ago: Fish Tacos
Three Years Ago: Spice Cupcakes


Peanut Butter and Jelly Bars
Yield: 24
Ingredients:
2 sticks unsalted butter, at room temperature
1 1/2 cups sugar
1 tsp vanilla
3 eggs, at room temperature
2 cups (18 ounces) creamy peanut butter
3 cups flour
1 tsp baking powder
1 1/2 tsp kosher salt
1 1/2 cups (18 ounces) raspberry jam or other jam
2/3 cups salted peanuts, coarsely chopped
Directions:
Preheat the oven to 350 degrees F.
Grease a 9 by 13 by 2-inch cake pan. Line it with parchment paper, then grease and flour the pan.
In the bowl of an electric mixer fitted with the paddle attachment, cream the butter and sugar on medium speed until light yellow, about 2 minutes. With the mixer on low speed, add the vanilla, eggs, and peanut butter and mix until all ingredients are combined.
In a small bowl, sift together the flour, baking powder, and salt. With the mixer on low speed, slowly add the flour mixture to the peanut butter mixture. Mix just until combined.
Spread 2/3 of the dough into the prepared cake pan and spread over the bottom with a knife or offset spatula. Spread the jam evenly over the dough. Drop small globs of the remaining dough evenly over the jam. Don't worry if all the jam isn't covered; it will spread in the oven. Sprinkle with chopped peanuts and bake for 45 minutes, until golden brown. Cool and cut into squares.
Recipe from Ina Garten

 I am Jen the Beantown Baker. Engineer by day and baking maven by night. Hubby serves as my #1 fan and official taste tester. We got hitched back in 2006. Barefoot. In the sand. With the waves crashing behind us. It was one of the best decisions we’ve ever made.


You are my hero for emailing the hotline! I always assume that bakers like you and Megan know every trick to baking…but it weirdly comforts me that you get nervous sometimes too!
How cool! This is so unique and fun-looking. And I love that you contacted the KAF hotline… I’m definitely going to have to do that in the future!
Sues
Glad you used the hotline! I called it this weekend for a cake question. So helpful!
Happy baking season!
These look great!
Nice to check out your blog~ I’m just north of you, and it looks like your food choices lately are VERY similar to mine! Must be the “air” in New England! 🙂
Oh I totally have no shame in asking for help. Like I always say, I’m really good at following recipes, but the second I have to do something out of the ordinary, I get really nervous…
How nice to know they are there for help you out!
This dessert looks great. Perfect for Fall 🙂
One of the many reasons I love KAF! I think this is a great thing to have in the freezer for last-minute company or planning ahead. I only wish I had seen it when I still had a surplus of apples!