


Chocolate Overdose Cake
This cake is no joke. It really is an overdose of chocolateness all in one cake. Save this recipe for a special occasion. Or throw a party so you can make this cake. Whenever you do decide to make it, you will definitely impress your friends and family.

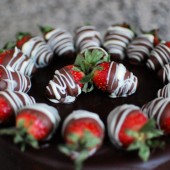
The cake starts with a layer of brownie. Then it’s filled with a chocolate mousse. On top of the mousse is a layer of chocolate cake. Then to top it off, you pour a whole batch of chocolate ganache over the cake. I decorated with chocolate covered strawberries. All in all I think this cake took about two and a half pounds of chocolate to make. But boy was it worth it!

I made this for a celebration party at the in-laws. Everyone there knows I bake and lot an always loves whatever I make. When Hubby’s mom asked if I’d bring a dessert, I knew I had to make this cake. I had been eyeing it for quite some time. It was even on my Top 10 list back in June! I got so many raves over this cake. Everyone really enjoyed it. Even a couple people who claimed they don’t like chocolate cake.

The cake should be kept in the fridge until ready to serve. We drove almost 3 hours with it in the car and it was fine. We just kept it cold again once we got to the in-laws. There are just quite a few components to this cake, so it takes some time. Be sure to read through everything before you start this project. Here’s how I tackled the cake. First I made the brownie layer. While that was in the oven I mixed up the cake batter so it could go straight into the oven when the brownie came out. While the cake was baking, I made the mousse. Once the cake came out, I made the ganache since it has to chill for an hour. Once the cake was cooled, I assembled the cake and let it chill for the hour. It took me about that long to clean up the massive mess in the kitchen and then it was time to cover the cake with ganache. Once I poured on the ganache, I put the whole cake in the fridge overnight to set up. The next morning, I heated up the reserved ganache and used it to glue the strawberries to the cake.


Chocolate Overdose Cake
Yield: Serves 12-16
Ingredients:
18-20 chocolate covered strawberries
For the Brownie Base
5/8 cup (1/2 cup + 2Tbsp) cake flour
1/4 tsp salt
1/2 tsp baking powder
3 oz unsweetened chocolate, chopped fine
6 tablespoons unsalted butter, cut into six pieces
1 1/8 cups (1 cup + 2 Tbsp) sugar
2 large eggs, room temp
2 tsp vanilla extract
For the Chocolate Mousse Filling
6 oz semisweet chocolate, broken into 1/2-ounce pieces
1 7/8 cups (15 oz) heavy cream
1 Tbsp granulated sugar
For the Chocolate Cake
6 tablespoons unsalted butter, soft
7/8 cups (3/4 cup + 2 Tbsp) unbleached all-purpose flour
2 oz unsweetened chocolate, coarsely chopped
1/8 cup (2 Tbsp) Dutch-processed cocoa
1/4 cup hot water
7/8 cups (3/4 cup + 2 Tbsp) sugar
3/4 tsp baking soda
1/2 tsp salt
1/2 cup buttermilk
1 tsp vanilla extract
2 large eggs
1 large egg yolk
For the Ganache
1 1/2 cups heavy cream
2 Tbsp unsalted butter
18 oz semisweet chocolate, chopped into 1/2-ounce pieces
Directions:
To make the brownie base:
Adjust oven rack to middle position; heat oven to 325 degrees. Cut parchment paper to fit the bottom and line the sides of a 9-inch springform pan. Spray lined pan with nonstick cooking spray.
Whisk to combine flour, salt, and baking powder in medium bowl; set aside.
Melt chocolate and butter in large heatproof bowl set over saucepan of almost-simmering water, stirring occasionally, until smooth.
When chocolate mixture is completely smooth, remove bowl from saucepan and gradually whisk in sugar. Add eggs on at a time, whisking after each addition until thoroughly combined. Whisk in vanilla. Add flour mixture in two additions, folding with rubber spatula until batter is completely smooth and homogeneous.
Transfer batter to prepared pan; using a small off-set spatula or bench scraper, spread batter evenly and smooth the surface. Bake until toothpick or wooden skewer inserted into center of brownies comes out with few moist crumbs attached, 25-30 minutes. Cool on wire rack to room temperature, about 1 hour (do not remove the springform ring or parchment collar).
To make the cake:
Adjust oven rack to middle position; heat oven to 325 degrees. Line the bottom of a 9-inch round cake pan with parchment and spray bottom and sides with baking spray.
Combine chocolate, cocoa powder, and hot water in medium heatproof bowl; set bowl over saucepan containing 1 inch of simmering water and stir with rubber spatula until chocolate is melted, about 2 minutes. Add 1/4 cup sugar to chocolate mixture and stir until thick and glossy, 1 to 2 minutes. Remove bowl from heat and set aside to cool.
Whisk flour, baking soda, and salt in medium bowl. Set aside. Combine buttermilk and vanilla in small bowl and set aside.
In bowl of stand mixer fitted with whisk attachment, whisk eggs and yolks on medium-low speed until combined, about 10 seconds. Add remaining sugar, increase speed to high, and whisk until fluffy and lightened in color, 2 to 3 minutes. Replace whisk with paddle attachment.
Add cooled chocolate mixture to egg/sugar mixture and mix on medium speed until thoroughly incorporated, 30 to 45 seconds, pausing to scrape down sides of bowl with rubber spatula as needed. Add softened butter one tablespoon at a time, mixing about 10 seconds after each addition. Add about one-third of flour mixture followed by half of buttermilk mixture, mixing until incorporated after each addition (about 15 seconds).
Repeat using half of remaining flour mixture and all of remaining buttermilk mixture (batter may appear separated). Scrape down sides of bowl and add remaining flour mixture; mix at medium-low speed until batter is thoroughly combined, about 15 seconds. Remove bowl from mixer and fold batter once or twice with rubber spatula to incorporate any remaining flour. Pour into prepared pan; smooth batter to edges of pan with an offset spatula.
Bake until toothpick inserted into center comes out with a few crumbs attached, about 30 minutes. Cool cake in pan 15 minutes, then invert onto wire rack and cool completely.
To make the Chocolate mousse filling:
Place stand mixer bowl and whisk attachment in the freezer or fridge.
Heat 1-inch of water in the bottom half of a double boiler over medium heat. Place the semisweet chocolate in the top half of the double boiler. Tightly cover the top with film wrap and allow to heat for 8 to 10 minutes. Remove from the heat and stir until smooth. Transfer the melted chocolate to a stainless steel bowl and set aside until needed.
Place heavy cream and sugar in the well-chilled bowl of an electric mixer fitted with a well-chilled whisk attachment. Whisk on high until stiff peaks form, about 1 1/2 minutes. Remove the bowl from the mixer.
By hand, whisk to combine 1/4 of the whipped cream into the melted chocolate until smooth and completely incorporated. Add the combined whipped cream and chocolate to the remaining whipped cream and use a rubber spatula to fold together.
To make the Ganache:
Heat the heavy cream and the butter in a 3-quart saucepan over medium high heat. Bring to a boil.
Place the semisweet chocolate in a 3-quart stainless steel bowl. Pour the boiling cream over the chocolate and allow to stand for 5 minutes. Stir until smooth. Reserve ~1/2 cup of ganache to use as glue for strawberries. Remaining ganache should be brought to room temperature (about 40 minutes).
To assemble the cake:
Spread mousse over top of the brownie base evenly. Use an offset spatula or bench scraper to smooth the top.
Place cake round over mousse, pressing down lightly. Chill for 1 hour.
Cover the edges of a round cake board with waxed paper strips. Remove springform ring and parchment collar. Use spatula to move cake to a cake board. Use a spatula to smooth the room temperature ganache over the cake top and sides, covering evenly. Place entire cake in fridge for ganache to set.
Once ganache has set, remove waxed paper strips from cake board. Heat reserved ganache in microwave for a few seconds. Use as glue to attach 15-16 chocolate covered strawberries. Serve chilled and store leftovers in the fridge. Cut the cake with a hot, dry knife, using the strawberries as a serving guide (1 strawberry per serving).
Recipe from Confections of a Foodie Bride
![]() I am submitteing this for Mele Cotte’s Kitchen of Love event.
I am submitteing this for Mele Cotte’s Kitchen of Love event.
 I am also submitting this as my entry for Flavor of the Month on Bake at 350. This is the last Flavor of the Month which makes me a bit sad.


 I am Jen the Beantown Baker. Engineer by day and baking maven by night. Hubby serves as my #1 fan and official taste tester. We got hitched back in 2006. Barefoot. In the sand. With the waves crashing behind us. It was one of the best decisions we’ve ever made.


Looks great!! I love the history info too 🙂 Congrats you did an awesome job!
Love the history info and your buttercream looks so silky. Nicely done!
good job! rolls like the yule log and the pumpkin roll really aren’t too hard to make, but they’re great to bring to get togethers b/c everyone loves them 🙂
Congrats on your first “real” yule log. I wasn’t crazy about the buttercream either, though I did like the coffee flavor!
Yum! Very nice, creamy-looking buttercream. Looks delish! Merry Christmas and Happy New Year!
I went for raspberry inside too – and agree that chocolate frosting would be tastier. Good job!
You did an awesome job, Jen!
Your log turned out so pretty – as did the mushrooms!
Way to go!
xoxo
Your log looks wonderful, so silky creamy. Happy Holidays!
Your log looks awesome. Congratulations on completing the challenge.
Very pretty! I thought this one was harder than the “Buche” I made in French class too.
I love your texturing – nice log!
Job well done. I made it with chocolate buttercream and I think it would have gone lovely with raspberry.
I love the idea of the raspberry filling with the coffee buttercream. That must have tasted incredible.
As worldly as I thought I was at the time, I never could have attempted anything this complex in high school. You did a great job with your… it looks luscious!
I hope you had a joyous holiday, and that 2008 brings you health and happiness, laughter and love.
Great bûche de Noël and I loved reading your post.
Happy Holidays!
Julius from Occasional Baker
You aced this challenge like a pro! It looks gorgeous!
Hope you had a wonderful Christmas!
Your filling looks and sounds delicious! I went with chocolate for the outside, and loved it. Great job!
A very pretty log! Well done!
Cheers,
Rosa
Nice work there. I love the combination of raspberry and chocolate – mmmm! Congrats on your challenge and happy new year 🙂
jen at use real butter
Oooh I love the idea of the raspberry in the log!