


Lime Meltaway Recipe (Bookmarked Recipes)
 And now, back to your regularly scheduled blogging… Sorry about all the photography posts recently. I’ve kind of been in a cooking/baking rut recently and haven’t been making blog-worthy food. But I’m back with some posts that should remind everyone that I do love to bake!
I added a star to this recipe when I saw it come into my Google Reader. I made some Lemon Curd cookies earlier this year that everyone loved. It’s very unexpected to eat a cookie that is very bright and citrusey. Don’t get me wrong I love all sorts of chocolate cookies but these sure are a nice change of pace.
This is my second entry in Bookmarked Recipes. Every Monday I see the roundup and every Monday I tell myself that this is the week I’m going to submit a post. The majority of my meals come from other bloggers or Food Network shows so it makes sense.

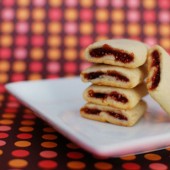
I ended up almost doubling the amount of lime juice and I forgot to put the food coloring in until the very end, so the green color is a little swirled.
Lime Meltaways – from How to Eat a Cupcake – originally from Martha Stewart – makes 2 dozen
3/4 cup (1 1/2 sticks) unsalted butter, room temperature
1 cup confectioners’ sugar – divided into 1/3 cup and 2/3 cup
Finely grated zest of 2 limes
2 tablespoons fresh lime juice
1 tablespoon pure vanilla extract
1 3/4 cups plus 2 tablespoons all-purpose flour
2 tablespoons cornstarch
1/4 teaspoon coarse salt
 Put butter and 1/3 cup confectioners’ sugar in the bowl of an electric mixer fitted with the whisk attachment (I thought it was weird to use the whisk here, next time I’d use the paddle attachment), and mix on medium speed until pale and fluffy. Add lime zest and juice and vanilla, and mix until fluffy.
Whisk together flour, cornstarch, and salt in a bowl. Add to butter mixture, and mix on low speed until just combined.
Divide dough in half. Place each half on an 8-by-12-inch sheet of parchment paper (I used plastic wrap). Roll in parchment to form a log 1 1/4 inches in diameter, pressing a ruler along edge of parchment at each turn to narrow log. Refrigerate logs until cold and firm, at least 1 hour (I let mine chill overnight in the fridge).
Preheat oven to 350 degrees. Remove parchment from logs; cut into 1/4-inch-thick rounds. Space rounds 1 inch apart on baking sheets lined with parchment paper. Bake cookies until barely golden, about 13 minutes, rotating sheets halfway through. Transfer cookies to wire racks to cool slightly, 8 to 10 minutes. While still warm, toss cookies with remaining 2/3 cup sugar in a resealable plastic bag. Cookies can be stored in airtight containers at room temperature up to 2 weeks.


 I am Jen the Beantown Baker. Engineer by day and baking maven by night. Hubby serves as my #1 fan and official taste tester. We got hitched back in 2006. Barefoot. In the sand. With the waves crashing behind us. It was one of the best decisions we’ve ever made.


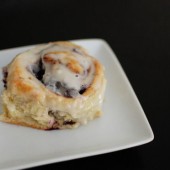
I love blueberries in pancakes and waffles. They’ve gotta be good in cinnamon rolls too!
Yum! I have always wanted to make my own cinnamon rolls but have always been a tad nervous about he process!!! These look amazing with the blueberries!!
P.S. I found your blog today when you posted that you were from Boston on Tina’s blog! I am from just outside of Boston too!
these look amazing. I love cinnamon rolls, and this combo sounds great!
Can you tell me how to make the frosting?
I love the blueberry, I tried swapping them with raspberries and they were just as good if not better. Love the base recipe.
I made these today cheating with crescent roll dough. They were amazing!
Da bomb! Brilliant, as well as yummy:)
Thank you! I will make an impression at brunch tomorrow..lol
Made these for Easter breakfast (blueberry cinnamon rolls, hardboiled eggs, and thick sliced ham slices). What a delicious treat! I don’t know if I’ll ever go back “regular” cinnamon rolls again! I cut the recipe in half. Perfect amount for my husband, myself, and 3 teenaged boys. Honestly, I can’t say enough about this recipe. These rolls are worth every minute spent making them. To avoid having to get up so early, I saved the second rise for the morning. After slicing the rolls and placing them in the greased pan, I covered them tightly with plastic wrap and placed them in the fridge overnight. I took them out of the fridge and let them set at room temperature to rise for about an hour before placing them in the oven. They were perfect! Thanks so much!
beantownbaker — April 27th, 2014 @ 2:50 pm
So glad you enjoyed them!! I’ve done the second rise the next morning as well.
Forgot to mention that a step was left out of the recipe: it never tells you to sprinkle the rolled out dough with sugar and cinnamon mixture (& 2 T flour?).
beantownbaker — April 27th, 2014 @ 3:01 pm
Thanks for pointing this out. I updated the recipe to reflect this.
Hi there – I was wondering if this dough would be okay to freeze? I’m a novice when it comes to anything baking related!
beantownbaker — September 2nd, 2014 @ 7:14 pm
I have blogged about freezing cinnamon rolls here: http://www.beantownbaker.com/2011/01/pumpkin-cinnamon-rolls.html I like to par-bake them, then freeze them, then finish baking them when you want them.
I found that the cinnamon was over powering. I will add 3 tsp next time 4 Tablespoons was way to much.
Is there any kneading involved???