


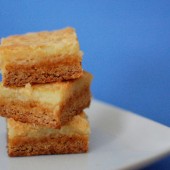
Gooey Bars (aka Cream Cheese Bars)
I have no idea what these bars should actually be called or where this recipe really came from… It’s likely to have come on the back of a cream cheese box for all I know. (Actually, Google helped me to find this recipe which is the same). This is another recipe that my family loves. My sisters practically know this recipe by heart. Similar to the “best dang thing ever bars”, my sisters also prefer to underbake these bars, hence the name gooey bars. I tend to like my bars fully cooked so they hold their shape better. If you prefer an even gooier texture, take these out of the oven a couple minutes early.

I know some of you will shudder at the thought of using a box cake mix. I agree that in general, I would much rather make a cake/cookie/brownie from scratch. For starters, it’s a lot more fun as a baker to measure everything out and follow a recipe that has more than two steps. Not to mention knowing exactly what is in your food (and being able to pronounce it all!) I do however believe that boxed cake mix has a time and a place. One of those places being in this bar.

These bars taste almost like a cheesecake with a great chewy shortbread crust. Everyone that tried one really enjoyed them and Hubby ate an embarassingly large number of these bars.


Gooey Bars
Yield: 30
Ingredients:
1 box yellow cake mix
1/2 cup butter, melted
3 eggs
1 pound powdered sugar
1 8-oz package cream cheese
Directions:
Mix cake mix, margarine & 1 egg with fork. Press into bottom of greased 9 x 13 pan, set aside.
Beat powdered sugar, cream cheese and 2 eggs for 4 or 5 minutes. Pour over cake mixture.
Bake at 350 for 40 minutes. Cool completely. Cut into bars.
Recipe from my step mom
![]()
Don’t forget – I’m offering a chance to win a cute tote if you donate $5 or more to my Avon Walk by the end of January. See details here.


 I am Jen the Beantown Baker. Engineer by day and baking maven by night. Hubby serves as my #1 fan and official taste tester. We got hitched back in 2006. Barefoot. In the sand. With the waves crashing behind us. It was one of the best decisions we’ve ever made.


Thanks for sharing this recipe! My mom is doing the Avon Walk for Breast Cancer this fall and I’m going to make some of these to sell at her fundraiser. They look delicious and summery!
These look perfect to take along to a cookout or picnic. Great summer flavor.
These look great to me! Yum!
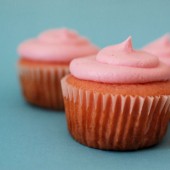
I love lemon cupcakes! Yummy and oh so cute!
I love pink lemonade but I agree it’s a summer dessert.
These look awesome! You are creative:)
Totally going to try these…maybe make up a similar version with limeade and green frosting…hmmm…
These are so cute!!! And the lemonade kick is perfect for last minute summer get togethers!
These are so cute. How can your husband say they are to sweet. Is that possible!
I feel like I can almost taste these…and they are so pretty!!!
Thank you for linking them to Flavor of the Month! 🙂
These cupcakes sounds extra yummy! Can’t wait to try the recipe. Thanks for sharing.
Is it just me, or does pink lemonade taste better than regular? I don’t consider myself a girly gal, but I love pink stuff! Your cupcakes look wonderful! 🙂
great idea!!!
thanks for the recipe! i shared it on my blog here and linked back to you! so yummy!!!
http://funshinealy.blogspot.com/