


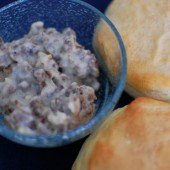
Monkey Bread
Growing up in my household, there were a few recipes that my dad would make with us kids on a regular basis. Monkey Bread was always a Sunday morning favorite. It really helps to have some extra hands around when it comes to all the cutting and coating in sugar that is required. I think this recipe is the single reason why you could always find a 4 pack of Pillsbury biscuits in the fridge growing up.
 I made this when Hubby’s siblings were in town and we all enjoyed the sugary sweetness just as much as I remember from my childhood. I later found out that my younger siblings back home made it that day as well since I had to call home to get the recipe.
 Since this was the first time I’ve made Monkey Bread without the help of my Dad, I did overcook the syrup a bit. It caramelized more than it should. You really want it to be a gooey sticky mess gooing out of the bread. But even the more caramelized version was delicious.
 One year ago – Tomatoes Stuffed with Salmon Dill Dip
Monkey Bread – recipe from my Dad – no idea where it originally comes from
4 cans Pillsbury biscuit (get the kind that come in a 4 pack, the small ones, not the Grands)
Sugar coating:
2/3 brown sugar – I was running low on brown sugar, so I used 1/3 cup white and 1/3 cup brown
1/2 tsp cinnamon
Syrup topping:
3/4 cup (1 1/2 sticks) butter
1 cup brown sugar
1/2 Tbsp cinnamon
Preheat oven to 350. Spray your angel food cake or bundt pan.
Mix the sugar coating in a ziplock bag (feel free to add more cinnamon and/or sugar if you run out during the coating process). Cut the biscuits into 4 (kitchen shears work great for this). Drop the biscuit pieces into the ziplock bag and shake to coat. Drop coated biscuit pieces into the prepared pan.
Bring syrup ingredients to a boil. Boil for 5 minutes, then pour over biscuit pieces. Bake for 35 minutes.
Turn over onto plate and serve while hot.


 I am Jen the Beantown Baker. Engineer by day and baking maven by night. Hubby serves as my #1 fan and official taste tester. We got hitched back in 2006. Barefoot. In the sand. With the waves crashing behind us. It was one of the best decisions we’ve ever made.


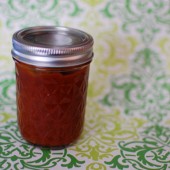
I love homemade BBQ sauce. I’m partial to my fathers but this one looks great too 🙂
Homemade bbq sauce sounds great! I’ve never attempted to make it at home but it doesn’t look too hard. Thanks for the recipe!
I love homemade BBQ sauce…well homemade everything!!! I love that you photographed it in a mason jar…I’m a sucker for those things!
This sounds great and I will have to try it. I made BBQ chicken quesadillas for lunch and this would have been great to use for that. Next time I will use this recipe! Thanks for sharing.
I’ve made homemade BBQ sauce and bottled has nothing on homemade. It’s been a while and BBQ season is here. I’ll have to give your recipe a try.
~ingrid
How long does this last in the fridge?
Ashley – We store our BBQ sauce in the fridge and it has been fine for a few months. It never goes bad before we use it up.