


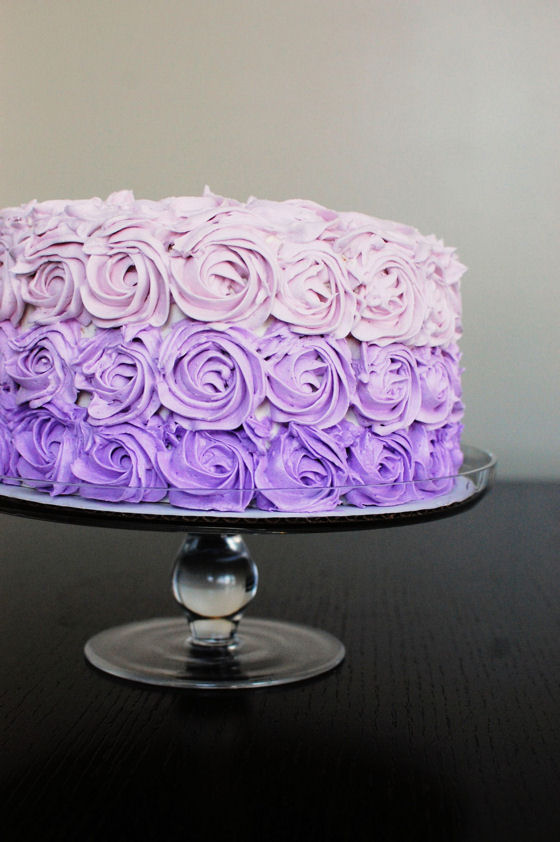
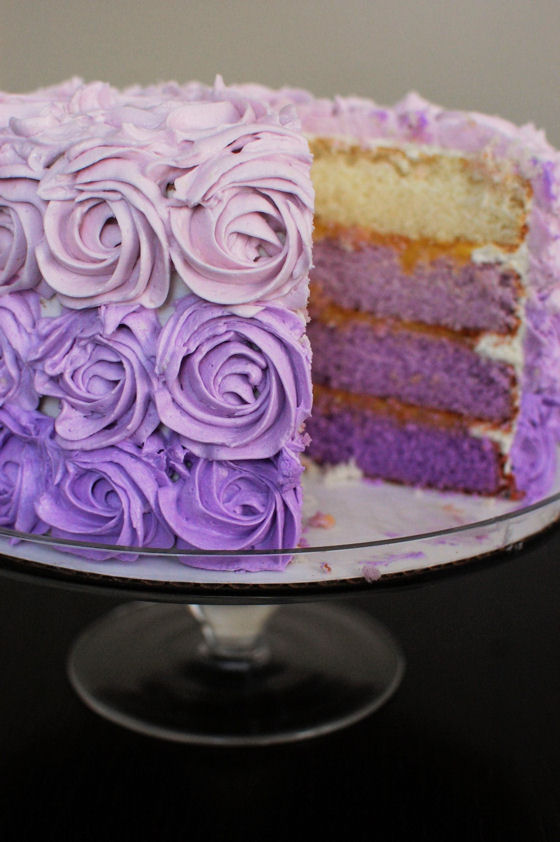
Purple Ombre Cake
For obvious reasons, this Purple Ombre Cake was the centerpiece of the entire 1000th Post Party last weekend. It stole the show. I kept it in the fridge while all the savory treats were being consumed so that it wouldn’t distract everyone from the awesome food they were eating. But that didn’t work. Inevitably, someone had to open the fridge to get a new bottle of champagne, and then the exclamations of amazement started.
I have to admit, I’m very proud of how this cake turned out. I wasn’t really sure how it would go. I knew I could do it, but I was worried I’d be frustrated with the decorating. As I have mentioned many times before, decorating a cake is not my strongest skill. Hubby even admitted later that when he saw the inspiration behind the cake, he didn’t think I had it in me. He honestly thought I was being over ambitious.
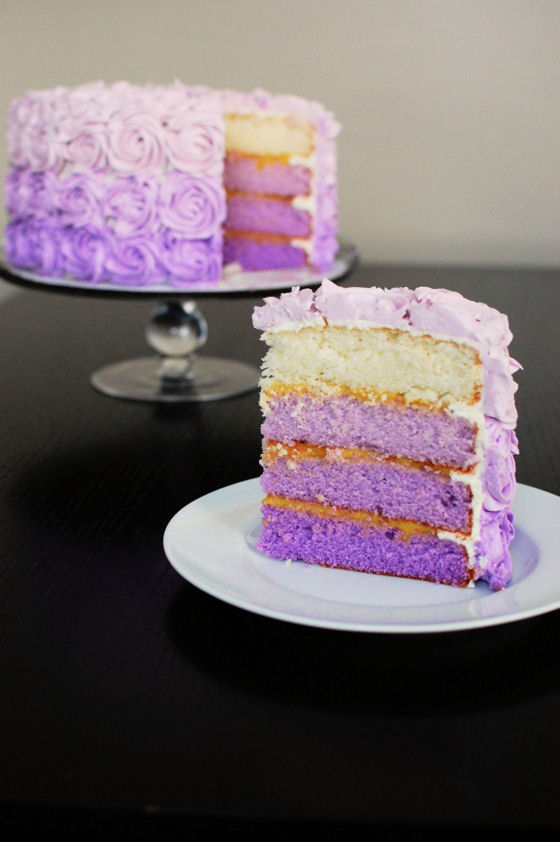
Don’t get me wrong, this is an ambitious cake. Four layers of cake, all a different gradient of purple, covered in roses, again piped in varying shades of purple. But believe me, with a little planning, and some practice, anyone can make this cake. I have a few tips on some things not to do, and some things to do when considering making this cake.
1. Don’t forget the sugar in two of the cake layers. This cake method is a bit different than most. Most cakes start with creaming butter and sugar. Not this one. It’s more like mixing biscuits. You add the butter to the dry ingredients before adding the liquid ingredients. So when your brain goes into autopilot and you mix the flour, baking powder, and salt in a bowl, don’t make the mistake I made and assume that’s all that goes in there! Add the sugar. FYI, I tried stirring in the sugar at the end and baking them because I hate wasting ingredients. The cake looked like cake when it came out of the oven. But it tasted… well, like the sugar was mixed in at the end. It was really sweet. And a little gummy.
So I had to re-bake two of the cake layers. Which means I have 18 egg yolks in my fridge right now. I see a lot of creme brulee in our future.
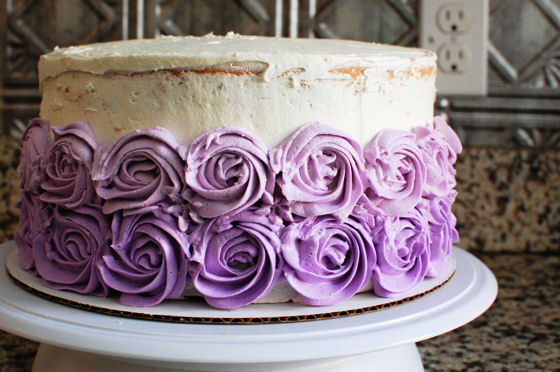
2. Don’t change your mind about the color of your frosting at the end. My original plan was to have the lightest shade of frosting be white. After piping the bottom two rows, I piped the first white rose and decided it was too big of a difference from the previous color. So I scraped that rose off, stirred in some purple food coloring and mixed up the lightest shade that you see in the finished cake. I’m sure you all think it looks fine, but I wish I had done that up front so I could have done the crumb coat in the lightest color. It annoyed the perfectionist in me that you could see specs of white peaking through between the roses.
3. Do mix up the cake batter in two batches. Trust me, you mixer can’t handle a double batch of that batter. To make your life easier, measure everything out for both batches at once. So when you put the flour in the bowl of your mixer, measure the same amount out and put it into another bowl. Then when it’s time to make the second batch, everything is measured and ready to go.
4. Do invest in a cake decorating turn table. Hubby is always on my case about the amount of baking gadgets I have. I have been eyeing one of these bad boys for quite some time but I didn’t know where I’d store it. I finally decided to just get one and figure it out later. I’m SO glad I did that. Applying the crumb coat took about 1/3 of the time that it takes without one and it helped when I was piping the roses too. Believe me, it’s worth the $18.
5. Do make this fruit passion curd. I don’t care if you’re intimidated by this cake, if you do nothing else, make the filling. Eat it with a spoon, on a graham cracker, or stuffed into a cupcake. It’s seriously delicious. Goya makes great frozen fruit purees in a variety of flavors. I want to make this curd in every possible flavor available (you can find the purees in the frozen food aisle near the other Hispanic foods). It’s SO simple and delicious.
6. Do as much ahead of time as you can. I feel like a broken record here, but the key with layer cakes not becoming too overwhelming is to break things up. I made the curd on Thursday night, baked the cakes on Friday, and made the frosting on Saturday. Then I just had to stack and decorate it before the party.
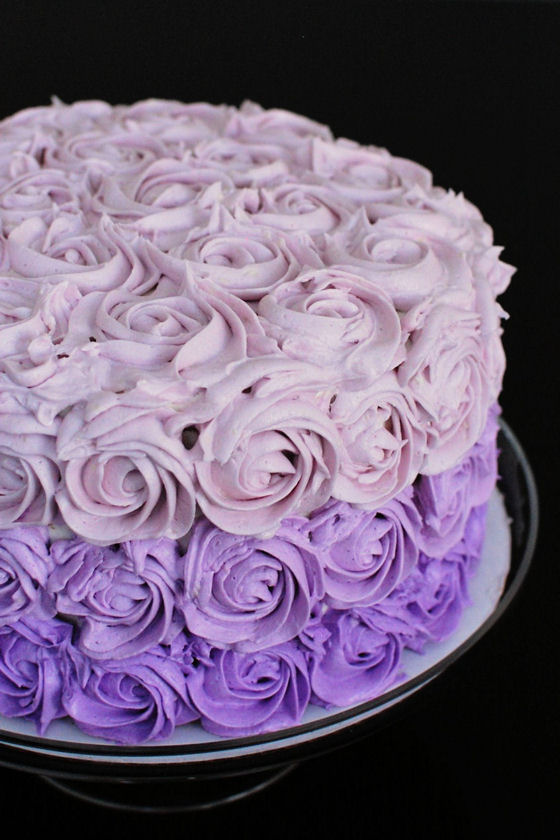
And last but not least, don’t be intimidated by the roses! They’re very simple to do and with a little practice, you’ll be a pro in no time. Just remember that to pipe roses, you start in the center and make one big swirl from the inside to the outside.
UPDATE: Click here for the Video Tutorial on How to Pipe a Rose
Hubby was shocked to watch me decorate the cake because it honestly took about 15 minutes total. The biggest pain was washing the tip between colors of frosting. And, to convince you guys even further, I’ve recorded a video of how to pipe roses! It needs a smidge of editing over the weekend, and I’m hoping to post it first thing Monday. So be sure to come back for that!
One Year Ago: Hot Cross Buns
Two Years Ago: Raspberry Curd
Three Years Ago: Raspberry Cheesecake Swirl Brownies


Purple Ombre Cake
Such an impressive cake for any special occasion
Yield: Serves 16-20
Ingredients:
For the Cake Layers
Double batch of White Cupcakes, baked into four 9-inch layers
Food coloring of your choice
For the Passion Fruit Curd
3/4 cup sugar
1/4 cup cornstarch
1 cup passion fruit nectar or puree - Look in the hispanic aisle in your grocery store - Goya makes all sorts of fruit purees
4 egg yolks
1 vanilla bean - split, seeds scraped
1 stick unsalted butter, cut into tablespoons
For the White Chocolate Buttercream
2 cups unsalted butter, softened
5 cups powdered sugar (or more, depending on desired consistency)
Pinch of salt
12 oz. good quality white chocolate, chopped (not white chocolate chips or candy melts!)
1/2 cup heavy whipping cream
1/2 tsp vanilla
Food coloring of your choice
Directions:
For the Cake Layers
I recommend making the cake twice instead of doubling the recipe. While you're measuring out the ingredients for the cake, just measure out enough for the second batch at the same time so it's easier the second time around.
The first time through, leave one layer white. Add a few drops food coloring to the second layer prior to baking (I used 5 drops in my lightest layer).
When making the third and fourth layers, add a bit more food coloring to each layer such that you'll have gradually darker layers (I used 9 and 18 drops for my darker layers).
Allow all layers to cool completely.
For the Passion Fruit Curd
In a saucepan, whisk the sugar and cornstarch.
Whisk in the passion fruit nectar, egg yolks and vanilla seeds and cook over moderate heat, stirring constantly, until thick, 6 minutes.
Remove from the heat; whisk in the butter, 1 tablespoon at a time, until incorporated.
Scrape the filling into a glass bowl, press a sheet of plastic wrap on the surface and refrigerate until chilled, about 2 hours.
For the Frosting
Put the chopped white chocolate into a small bowl. Heat the chocolate in 30 second increments in the microwave set to 60% power. Stir after each increment, and continue to heat 30 seconds at a time, until the chocolate is melted and smooth. Set aside and allow to completely cool.
Once white chocolate has cooled, sift the salt and powdered sugar over the butter, in a large bowl. Cream the butter and sugar mixture together until light and fluffy, scraping the sides of the bowl as needed.
Measure the whipping cream into a cup, and stir in the vanilla extract.
With the mixer running on low speed, gradually pour the cream mixture the bowl.
Once the cream mixture has been incorporated into the frosting, fold on the melted (but cooled) white chocolate until incorporated.
Increase the mixer speed to medium-high, and beat frosting for an additional 3 minutes.
To Assemble the Cake
Once all of the cake layers have cooled, level each of the layers except the white layer.
Place a small amount of frosting on a cake board to stabilize the cake. Center the darkest layer on the cake board. Pipe a small ring around the edge of the cake layer. This will ensure the filling doesn't spill out between the layers.
Spoon a heaping 1/3 cup filling into center of cake and spread to the edges.
Stack the next lighter cake on top and continue the process until all layers are stacked and the white layer is on top.
Frost the cake with a crumb coat and chill in the fridge for at least an hour.
To Decorate the Cake
Place ~3/4 cup of frosting into two separate bowls (you'll have three bowls of frosting at this point, two with 3/4 cup, and one with the rest, which will be more than 3/4 cup).
The bowl with the most frosting will be your lightest color. Add food coloring to that bowl first until the desired color is reached. Color the other two bowls of frosting such that you have three shades of frosting.
Alternatively, leave all of the frosting one color.
Place the cake on a rotating cake stand. Starting at the bottom, pipe a row of roses along the cake using the darkest frosting color. You're going to pipe three rows of roses, so make sure they cover about 1/3 the height of the cake.
Continue with a second row of roses in the next lighter shade of frosting. Place the roses directly above the bottom layer.
Finish with one last row of roses in the lightest color. Next, decorate the top of the cake by piping a rose in the center of the top of the cake. Work your way around from there piping three circles of roses on the top of the cake.
If there are any large spaces between roses, you can pipe small stars into them to fill the space.
Filling recipe from Kaitlyn in the Kitchen, Frosting recipe from Country Cleaver


 I am Jen the Beantown Baker. Engineer by day and baking maven by night. Hubby serves as my #1 fan and official taste tester. We got hitched back in 2006. Barefoot. In the sand. With the waves crashing behind us. It was one of the best decisions we’ve ever made.


Thank you for the nice recipe. Happy Valentine’s Day to you and your family.
Oh yum, I adore thick chewy oatmeal cookies 🙂 these look like perfection!
“2 dozen large cookies” my butt! i followed this recipe and got 16 cookies the size of my 17 month old’s fist 🙁 they’re kinda bland, not a big fan. i’ve had much better!
beantownbaker — May 12th, 2014 @ 4:56 pm
Sorry to hear you didn’t enjoy this recipe 🙁
Making my second batch of these delicious cookies. The best Oatmeal/Raisin cookie recipe I’ve tried. Thank you!
beantownbaker — September 2nd, 2014 @ 7:06 pm
So glad you enjoyed this recipe!
These were fantastic. I only got about ten cookies from the batch so I made sure to double it the next time. Everyone loved them. 🙂
beantownbaker — September 2nd, 2014 @ 7:08 pm
Glad you liked these 🙂 I have updated the recipe to reflect the yield change.
The cookies were thick, moist and chewy. This is an awesome recipe! Definitely doubling the recipe and adding some m&m’s next time. My family loved them, thanks!
beantownbaker — September 2nd, 2014 @ 7:12 pm
Adding M&Ms is a great idea! I’m going to have to do that next time myself.
Just made my 4th batch! And I must say, I’m a great big fan of oatmeal raisin cookies and these were perfection!!! Thank you so much for sharing!
beantownbaker — September 2nd, 2014 @ 7:29 pm
Wow, 4 batches! That’s awesome. Glad you have enjoyed them.
While it only yielded 17 cookies for me, they were chewy and yummy! Will be baking more soon! 🙂
beantownbaker — September 2nd, 2014 @ 7:29 pm
So glad you enjoyed them.
Thank you for the recipe!
I bake your cookies for our homeless clients at our “lunch club”. I can honestly say that a batch of 24 disappears within 5 – 7 minutes flat. 😉
Definitely the best oatmeal cookie recipe I’ve ever tried.
beantownbaker — September 2nd, 2014 @ 7:31 pm
So glad these are a hit for you!
Made these last night. Still chewy in a ziploc today. These are the biggest, softest homemade cookies oatmeal cookies ever. I doubled and got 28 fist size cookies. I like mine with extra flavor, so I doubled the cinnamon and vanilla and added a few dashes of pumpkin pie spice. I also substituted dried cherries for raisins Delicious and a smidge tart. If you want your family and friends to question whether you actually made these or bought them in a bakery, this is the recipe for you!! Thanks beantownbaker!
beantownbaker — September 2nd, 2014 @ 7:32 pm
So glad you enjoyed these cookies!
I loved this recipe. If they didn’t turn out well, you didn’t do it right! However, the measurements only made 8 large cookies. But they were chewy and delicious so I’m just going to try doubling the mixture 🙂
beantownbaker — September 2nd, 2014 @ 7:32 pm
So glad you enjoyed it. I’ve updated the yield in the recipe.
Three words: Yum, yum, yum! I’m not a fan of oatmeal raisin cookies, but I made them because my boyfriend likes them. I’ve been converted! Thanks for the recipe.
I am always looking for different oatmeal raisin cookie recipes and really enjoyed this one! My husband said yummmy too while eating them. I will definitely save this recipe for future use. Thanks for sharing! 🙂
Just made a double batch of these. They TASTE amazing, but are flat as pancakes. Does anyone know what I’ve done wrong??
Followed the recipe and While these tasted great they came out a lil dry not too sure why ??? I will try again
How many calories per cookie?
Can I substitute the flour for self raising flour?
I got 9 perfectly huge cookies. Delicious and hearty using whole rolled oats. I think this time I’ll plump the raisins in some vanilla rum.
Oh my god I think I may have died and gone to cookie heaven…
I made these tonight and they are hands down the BEST cookies I think I have EVER tasted. EVER.
Just in case anyone is interested I made a few adjustments for food allergies…
Replaced the egg for 1/4 cup unsweetened Apple sauce
Subbed the all purpose flour for the same amount of cassava flour… I think tapioca could work too.
I also only had half the amount of unsalted butter as I ran out so I made the rest of the measure up with lard.
Thanks for the incredible recipe – I’ll definitely make these again…and again…
Do you know how many grams one cookie would be?
Been baking your cookies now for a few months….love them!
Make a version using ‘fake butter and fake br sugar’ and nobody knows the difference!!
Wow, these are the BEST oatmeal cookies I’ve ever had, and I bake a lot. I can taste a little baking soda, but it’s a great recipe. I plan to lessen the baking soda next time. I am so happy I found this recipe, because my other recipe from a cook book was not even edible. I will be making more oatmeal raisin cookies for now on. THANKS.
Listen people. This recipe is the one for you. My cookies turned out to be effing amazing, do you hear me? Of course you don’t. This isn’t audio. DO YOU SEE THESE WORDS? DO YOU UNDERSTAND THEM? These cookies were so good. The recipe made 11 med-large cookies in total for me. And guess what? I ate 8 of those in the span of 12 hours. Needless to say I paid for it, but it was worth it. These cookies are amazing. They held consistency. They were thick yet cooked all the way, and still chewy…. Just. Heaven in my mouth. Hallelujah. Amen.
Hi, looking at the recipe. What happened no baking powder? Why?
Great!
Loved these!! Oatmeal are my favorite and THESE were the best I’ve ever had! I’m wondering if there’d be a way to incorporate pumpkin into these? …and maybe replace raisins with choc chips? Thoughts?
I goofed and thought I had raisins when I didn’t, and didn’t have quite enough brown sugar. So, I made them with dried cranberries and substituted a bit of white sugar to make up for the brown sugar. They spread out more than what is pictured, but baked up beautiful and tasted wonderful. Can’t wait to make them the “right” way, but it all worked out! Thank you for sharing!
The crack tool saved from some other sources or even web
sites is just not work as we now have determined to atteinte
all the apps downloaded from all other websites simply because they usually consist of viruses.
Oatmeal is a very wonderful food to me. I love using it for my breakfast. Your recipe sounds so delicious. I’ll try this. Thank you for sharing.
My husband always talks about how much he loves oatmeal raisin cookies. After five years, I have finally made them… I found this recipe, and needles to say, I will NEVER use another recipe. He has eaten oatmeal raisin cookies all over the world, and loves these best… Your recipe, with all my love thrown into them, how can I go wrong. Thank you so much for the wonderful recipes
just made these after following recipe to the letter.. all I am saying is what a waste of ingredients. not using this site/blog again.
I make oatmeal chocolate chip cookies all the time. I love these cookies. I have made them as written and with extra dark chocolate chips and cranberries. Really good both ways. I keep frozen cookie dough in my freezer and make 2 at a time for a quick snack or dessert. I use an ice cream scoop to scoop out, put in my lock and lock containers and freeze. I haven’t bought store bought cookies for years.
Thank you for this great recipe.
Hello,
Can I make cookie bars with these? Will the cooking time be different?
thank you
Just about to make my second batch of these in two days – amazing 🙂
These are wonderful cookies! I make two dozen at a time and only use 1 1/2 stick of butter and a little less of the brown sugar than called for. I add two heaping cups of raisins and they are super delicious!
I tried these after trying different recipe’s,i have to say these is the best I have ever had,soon as I made them they have done,only a empty plate left,i have to make them twice a week,i don’t it them in the fridge for a hour,i just make them into a small ball and,press gentle on top and cook them on my silicone mat,love them,i also but a bit of melted chocolate on top of some of them.
Tried this recipe twice, both times were a hit. I was concerned about the 2/3 cups light brown sugar, but they actually taste good, for a less blander cookie I would a add more sugar according to taste preference.
I adore these cookies…and so does everyone I’ve shared them with! Over the years, I’ve tried variations and come up with a couple changes that work for me. I use Vietnamese Cinnamon and extra strength Mexican vanilla, and I double the amount. Voila – perfect for me!