


Peanut Butter Chocolate Chip and Bacon Blondies
I’ve been on a big bacon kick lately. I’m not sure why, but I’ve just been throwing bacon into everything. No one is complaining about this recent obsession. I needed a sweet treat to share with friends and my mind instantly went to bacon. I found this recipe and knew it would be a hit.

I decided to throw some bittersweet chocolate chips into the blondie batter. And once again, I used Peanut Butter and Co’s White Chocolate Wonderful in the frosting (which was AMAZING). After initial taste testing, we decided they needed more bacon so I crumbled more bacon on top than the original recipe listed. I have reflected my changes in the recipe below.

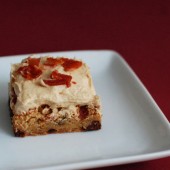


Peanut Butter Chocolate Chip and Bacon Blondies
Peanut butter, chocolate, and bacon make an amazing combination!
Yield: 24 bars
Ingredients:
For the Blondies
1 cup of butter, melted
2 cups of brown sugar
2 eggs
2 teaspoons of vanilla
1 teaspoon baking powder
1/4 teaspoon of baking soda
Pinch of salt
2 cups of all-purpose flour
1 cup bittersweet chocolate chips
6 sliced of bacon, fried and crumbled
For the Peanut Butter Frosting
1 stick butter, softened
3/4 cup creamy peanut butter
2-3 cups powdered sugar
1 teaspoon vanilla
2-3 tablespoons milk
9 slices bacon, fried and crumbled
Directions:
For the Blondies
Preheat oven to 350.
In a large bowl, whisk together sugar and melted butter until smooth. Add in eggs and vanilla.
Combine dry ingredients together, and whisk into the batter. Fold in chocolate chips and bacon.
Spread evenly in an 9 x 13 pan. Bake for 30-35 minutes, or until done.
For the Peanut Butter Frosting
Cream butter and peanut butter. Add sugar gradually. Add vanilla. Add milk 1 tablespoon at a time until desired consistency is reached. More liquid may be needed depending on how thick or creamy you want the frosting.
Frost blondies, then top with crumbled bacon.
Recipe from How Sweet It Is


 I am Jen the Beantown Baker. Engineer by day and baking maven by night. Hubby serves as my #1 fan and official taste tester. We got hitched back in 2006. Barefoot. In the sand. With the waves crashing behind us. It was one of the best decisions we’ve ever made.


Wow! THey turned out great! 🙂
Oh I love the idea of using condensed milk. I was trying to figure out how I could use these for holiday tins with the need for refrigeration, and this is the answer!
I have seen these pop up on a few blogs, and I am dying to make them!!
Neat way to make candies from cookie…they look divine.
Hi! I just found that you linked to me. These truffles are always a huge hit. I am so pleased to hear you enjoyed these… Especially from a fellow Bostonian!
lol. did you know that chocolate was banned in switzerland for many years. read this
I made batches and batches of these last year – I absolutely love the idea of the condensed milk, so they don’t have to be refrigerated. I’ll have to try that!
I can not wait to try these! I’m not so good at baking though. Can you give me a tip on how best to dip them in the chocolate? Should I put them on a spoon? Help!
How much 1 pack oreo?
24 oreo or 36 oreo?
Thank you.