


Fall Bruschetta
Hubby and I are off to Canada for a long weekend today. We’re going to see Niagara Falls with some friends from college. I’m really looking forward to the extra long weekend. But don’t worry, I have some posts scheduled to keep you guys company while we’re away. I finally admitted to myself (and my stomach) that fall has arrived. So now I’m starting to get really excited about all the fall baking that I have coming up!

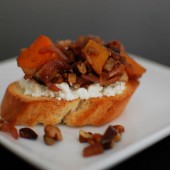
This bruschetta screams fall to me. I brought it to Megan’s surprise birthday party and it was a big hit. As you can see, the recipe includes butternut squash, apple, and eggplant. I honestly couldn’t taste the apple or eggplant, so if I made this again, I’d probably leave them out unless I had some in the house to get rid of… Since I can’t eat ricotta, I subbed goat cheese. Feel free to use whichever you prefer. When the topping came out of the oven, I tasted it and thought it needed some texture. So I added some toasted walnuts. The texture was a nice addition and I’m glad I made it!

This fall bruschetta is a great appetizer to bring to a potluck or party. I brought all of the components (toasts, goat cheese, and topping), then assembled them once we got to Megan’s place. It worked out really well.
One Year Ago: Pizza Dough
Four Years Ago: Tofu and Veggies in Peanut Sauce


Fall Bruschetta
Yield: Serves 10
Ingredients:
For the Toasts:
1 baguette
Olive oil
For the Caramelized Onion:
1 red onion
1 Tbsp olive oil
1/4 cup balsamic vinegar
2 Tbsp sugar
For the Topping:
1 Tbsp olive oil
3 cups peeled & cubed butternut squash
1 1/2 cups finely diced eggplant, unpeeled
1 cup finely diced apple,unpeeled
kosher salt & freshly ground pepper
1 tsp smoked paprika
1/2 cup walnuts, chopped and toasted
1 cup goat cheese, at room temp
Directions:
To make the Toasts:
Preheat the oven to 400 degrees. Slice the baguette into 1/2" slices & lay them out on a baking sheet. Drizzle the bread slices with some olive oil & bake for about 5 minutes per side, or until lightly browned. Set aside.
To make the Caramelized Onions:
Quarter & thinly slice the onion. Heat 1 Tbsp of olive oil in a non-stick skillet. Add the onions, balsamic vinegar & sugar. Cook until the onions are softened & all the liquid is absorbed. Set aside.
To make the Topping:
Preheat the oven to 425 degrees. In a mixing bowl, toss the butternut squash, eggplant, apple, 1 Tbsp olive oil & smoked paprika. Season with salt & pepper. Spread the mixture out on a baking sheet & bake for 20-25 minutes, tossing halfway through, until the squash is just tender.
Transfer to a mixing bowl; add the onions and walnuts. Toss well. Check for seasoning & add a bit more salt & pepper, if needed.
To assemble:
Spread a bit of ricotta cheese over each toast, then spoon some of the bruschetta on top. Transfer to a serving platter & serve.
Recipe adapted from The Parsley Thief


 I am Jen the Beantown Baker. Engineer by day and baking maven by night. Hubby serves as my #1 fan and official taste tester. We got hitched back in 2006. Barefoot. In the sand. With the waves crashing behind us. It was one of the best decisions we’ve ever made.


