


Homemade Mayo
There are some things I absolutely love about this time of year.
Cookouts with friends.
Being able to be outside without sweating from head to toe.
Tomatoes. Oh fresh tomatoes. Absolutely nothing beats a perfectly ripened tomato.

Hubby and I have been getting about 10 big tomatoes in our CSA for the past few weeks. It’s been amazing. We’ve been eating tomatoes in all sorts of salads, sandwiches, and just sliced and seasoned.

It was actually Hubby’s mom who encouraged me to make homemade mayo. She told me that it was really easy and really brightens a tomato sandwich. And boy was she right.
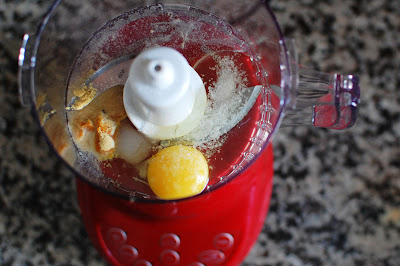
Now when I say making mayo is really easy, I’m not kidding. It takes about 2 minutes total. You put most of the ingredients in your food process or blender. Once everything has been whizzed around, you stream in a mixture of olive oil and canola oil while the food processor is still running. After about a minute, you have this:

Who knew mayo could be so pretty to look at… I used garlic olive oil to give my mayo a garlic kick. That’s one of the great things about making your own mayo. You can throw in flavored oils, or mix up the spices to your tastes.
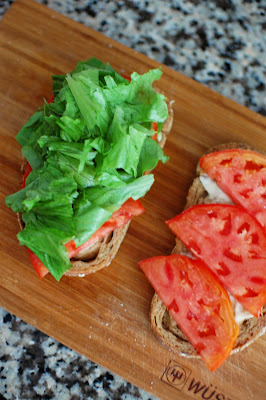
I have been eating tomato, mayo, and lettuce sandwiches every day since I made this mayo. It pairs so well with the fresh tomatoes, I can’t imagine ever buying mayo again.


Homemade Mayo
Yield: ~1 1/4 cups
Ingredients:
1 egg
1 tsp dry mustard
1/2 tsp salt
1 tsp sugar
1 Tbsp vinegar or lemon juice
1/4 cup olive oil
1 scant cup canola oil
Directions:
Add the egg, dry mustard, salt, sugar, and vinegar or lemon juice to your food processor or blender. Process until completely mixed.
Turn on your food processor and slowly stream the oils into the food processor. Once all the oil has been added, process an extra 30 second.
Cover and store in the fridge.
Recipe from Joy of Cooking


 I am Jen the Beantown Baker. Engineer by day and baking maven by night. Hubby serves as my #1 fan and official taste tester. We got hitched back in 2006. Barefoot. In the sand. With the waves crashing behind us. It was one of the best decisions we’ve ever made.


I love fun new burger recipes, can’t wait to see what else is in the line up. This recipe is intriguing. I’m really curious about the use of smoked salmon along with regular salmon. Too bad I had a whole bunch of smoked salmon this weekend for a party, and there is none leftover – otherwise I would definitely be trying this this week!
I love the combo with the smoked salmon – so much flavor! And these look really moist too. I’ll have to give them a shot! Yum!
We do salmon burgers with the canned salmon when we want a quick and delicious meal! I also always add some chopped peppers into the patty.. delicious! Can’t wait to see what you come up with next!
Sold! I love salmon burgers and I love smoked salmon. I am sure they will be great combined! 🙂
I’ve been looking for a good salmon burger recipe. This sounds divine!
Oooh I’m looking forward to a week of burger recipes, and this salmon one sounds fantastic! I like the idea of using both fresh and smoked varieties. Yum!
i think i have to add salmon burgers to my list of things to try
my my, i just got back from alaska, where i purchsed some smoked salmon to bring back 🙂 definitely trying this one!!!
Insta Pro is 100% safe and secure.Insta Pro is verified through multiple malware and virus protection platforms like TotalAV,Norton 360 Antivirus, Bitdefender Antivirus Plus, Surfshark Antivirus, and Malwarebytes.If you are still worrying about the safety feel free to cross-check.Every update you will get from Instapro will be safe and you can enjoy Instapro without any worry.For more informative Visit