


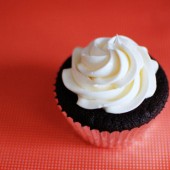
My Favorite Swiss Meringue Buttercream Frosting Recipe
Swiss meringue buttercream is like heaven. It’s so light and fluffy and not at all overly sweet like some frosting. I definitely prefer it over any other kind of frosting.

Ever since I first tasted SMBC I have been searching for a fool proof recipe that I love. I have found that recipe. Trust me on this one. It’s amazing.

Most people seem intimidated by SMBC because of the fact that sometimes it curdles when you’re mixing it up. You have to be patient and know that it’ll come back together. Because of the technique used in this recipe, you won’t have to worry about that here. I was a bit skeptical when I first tried this recipe, but it works every time.

I prefer to refrigerate my cupcakes after frosting them with this SMBC. This will set the frosting. Then bring them to room temperature prior to serving.
One Year Ago: Rice and Beans


Swiss Meringue Buttercream
This is my favorite Swiss meringue buttercream
Yield: Enough to frost 24 cupcakes
Ingredients:
4 oz egg whites (3-4 large egg whites or about 1/2 cups)
1 cup granulated sugar
1 lb unsalted butter, room temperature
2 tsp lemon extract, almond extract, orange extract, or vanilla extract
Directions:
Lightly whisk egg whites and sugar together over simmering water until egg-white mixture is hot to touch or a candy thermometer reads 140°F (60°C).
Pour hot whites into a room-temperature bowl and whip with a wire whip until double in volume on MEDIUM-HIGH speed. When the mixer stops, the meringue should not move around in the bowl. Meanwhile cut up butter into 2-inch pieces. (The butter should be slightly moist on the outside but cold inside.)
On your mixer, remove the whip and attach the paddle. Add half the butter into the bowl immediately and pulsate the mixer several times until the meringue has covered the butter completely. To pulsate the mixer, turn it on and off in a jerky motion. This forces the butter on the top to the bottom of the bowl. Add the balance of the butter and pulsate mixer several times. Slowly increase the mixer's speed, starting with the lowest speed and increase the speed every 10 seconds until you reach a MEDIUM-HIGH speed.
Continue beating until the mixture begins to look light and fluffy. Stop the mixer and scrape the bowl. Reduce speed to LOW. Add flavoring and continue to beat on LOW speed for 45 seconds. Then beat on MEDIUM-HIGH speed for an additional 45 to 60 seconds.
Leftover buttercream can be placed in plastic containers with lids and kept in the freezer for up to 3 months. Defrost completely (several hours) and rewhip before using.
Storage: Store the icing in an airtight container and freeze for up to 3 months.
Recipe from epicurious


 I am Jen the Beantown Baker. Engineer by day and baking maven by night. Hubby serves as my #1 fan and official taste tester. We got hitched back in 2006. Barefoot. In the sand. With the waves crashing behind us. It was one of the best decisions we’ve ever made.


They were absolutely delicious, that’s all I know. Agree that they’d be perfect after a nice holiday meal (or really any time).
Oooh, pecan pie?!? I love the idea of these… and that they taste like so many delicious things 🙂
Sues
Can I request these for ReRack playoffs?
ohhh my word do these sound amazing and brilliant! I definitely need to give this a try! I am a new follower!
xo
These sound so unique – love the idea of the graham crackers and pecans together in them!
They look super delicious!
Has anyone ever tried to freeze these and then thaw out to use at a later date? Im looking for good bar recipes tha5 freeze well! TiA