


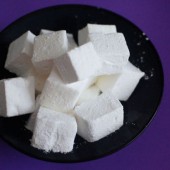
Homemade Marshmallows
 Aahhhh s’mores… They remind me of camping and fall and leaves changing colors and brisk weather and sitting around campfires. There’s really nothing better than a smore. It’s such a great little treat. Day or night, for kids or adults, I have yet to meet someone who doesn’t love this gooey chocolately treat.
I personally love my marshmallows charred. I toast them gently at first, then light them on fire. Once I blow out the flames, I smash them onto the graham crackers and dig in!

As you know, making marshmallows is one of the things on my 30-by-30 list. And since I recently purchased a candy thermometer while up at King Arthur Flour, I decided to give it a shot to kick off a week of S’mores recipes.
After making these little fluffy white pillows of sugar, I will never go back to store-bought again. I swear to you, they are so easy and SO delicious. In fact, I just went to grab one out of the pantry to snack on just now.

I have to admit that to prep for making the marshmallows, I did do some research. I knew Alton Brown had done an episode on marshmallows, so I checked my DVR. No luck there, so I headed over to YouTube. Sure enough, the entire episode was on there (Part 1 here, Part 2 here). Now I’d trust AB with my first born child, so clearly I trust his recipes. After printing it, reading it, watching the episode about marshmallows and measuring out all of my ingredients I was ready to go!

In the end, all that prep work and research wasn’t really necessary. You do need a good stand mixer. My KitchenAid worked up quite a sweat while beating the marshmallow, but that was the hardest part. Well that or watching the thermometer while the sugar was boiling. Either way, this recipe is easy peasy. The marshmallows do require a 4 hour wait time (mine set overnight) so factor that in if you plan to make these. You definitely won’t regret it!
Two Years Ago: Grilled Beef Ribs


Homemade Marshmallows
Yield: ~9 dozen
Ingredients:
3 packages unflavored gelatin
1 cup ice cold water, divided
12 ounces granulated sugar, approximately 1 1/2 cups
1 cup light corn syrup
1/4 tsp kosher salt
1 tsp vanilla extract
1/4 cup powdered sugar
1/4 cup cornstarch
Nonstick spray
Place the gelatin into the bowl of a stand mixer along with 1/2 cup of the water. Have the whisk attachment standing by.
Directions:
In a small saucepan combine the remaining 1/2 cup water, granulated sugar, corn syrup and salt. Place over medium high heat, cover and allow to cook for 3 to 4 minutes. Uncover, clip a candy thermometer onto the side of the pan and continue to cook until the mixture reaches 240 degrees F, approximately 7 to 8 minutes. Once the mixture reaches this temperature, immediately remove from the heat.
Turn the mixer on low speed and, while running, slowly pour the sugar syrup down the side of the bowl into the gelatin mixture. Once you have added all of the syrup, increase the speed to high. Continue to whip until the mixture becomes very thick and is lukewarm, approximately 12 to 15 minutes. Add the vanilla during the last minute of whipping. While the mixture is whipping prepare the pans as follows.
Combine the confectioners' sugar and cornstarch in a small bowl. Lightly spray a 13 by 9-inch metal baking pan with nonstick cooking spray. Add the sugar and cornstarch mixture and move around to completely coat the bottom and sides of the pan. Return the remaining mixture to the bowl for later use.
When ready, pour the mixture into the prepared pan, using a lightly oiled spatula for spreading evenly into the pan. Dust the top with enough of the remaining sugar and cornstarch mixture to lightly cover. Reserve the rest for later. Allow the marshmallows to sit uncovered for at least 4 hours and up to overnight.
Turn the marshmallows out onto a cutting board and cut into 1-inch squares using a pizza wheel dusted with the confectioners' sugar mixture. Once cut, lightly dust all sides of each marshmallow with the remaining mixture, using additional if necessary. Store in an airtight container for up to 3 weeks.
If you want to make mini-marshmallows, click through to the original recipe for directions.
Recipe from Alton Brown

Don’t forget about my Power of Pink Challenge – make something PINK by the end of the month to raise Breast Cancer Awareness!

 I am Jen the Beantown Baker. Engineer by day and baking maven by night. Hubby serves as my #1 fan and official taste tester. We got hitched back in 2006. Barefoot. In the sand. With the waves crashing behind us. It was one of the best decisions we’ve ever made.


Yum that looks delicious and welcome back to my hometown! Cincinnati’s actually a great town that grows on you and has been evolving quite a bit in the time that you’ve been away. I suspect given your profession and work location history that we probably work for the same company as our day jobs ;).
beantownbaker — January 23rd, 2013 @ 8:30 am
Yes, Cincinnati has changed a LOT since we moved away in 2007.
I would suspect you’re right. There’s enough info to know where I work, especially if you work here too 😉 Going to go check out your blog now. I would love to meet some other Cincinnati area bloggers!
beantownbaker — January 23rd, 2013 @ 8:31 am
Ok I work for the *other* big company in town (just checked your About page).
Isn’t the KA ice cream attachment the best thing ever? I am always making ice cream, even in the wintertime, but I never thought of using canned coconut milk as the base. I’ll have to try this out soon!
beantownbaker — January 23rd, 2013 @ 11:37 am
Absolutely. I didn’t think I could love my KAM any more than I already did. The ice cream attachment proved that I can.
I have lots of cans of coconut milk laying around and I know they make a good ice cream! Adding this one to my list 🙂
I bought myself KA ice creamer maker for my birthday this summer and I adore it! I’ve been thinking about making non-dairy ice creams, but the recipes all sounded strange. It’s great to see a recipe from a trusted source. Can’t wait to try.
beantownbaker — January 23rd, 2013 @ 10:28 pm
Let me know what you think if you try it. I am going to be experimenting with different milks since I can’t have cow’s milk…
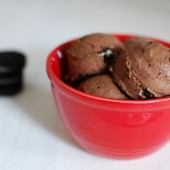
love coconut milk based ice creams!! this one looks fabulous, and good call throwing in those oreos 😉
beantownbaker — January 24th, 2013 @ 12:05 pm
It’s ALWAYS a good idea to throw oreos in 🙂
My brother’s favorite thing to get at Coldstone is chocolate oreo ice cream. Too bad I don’t have an ice cream maker, or I would definitely try this!
beantownbaker — January 29th, 2013 @ 7:51 am
I’ve been told you can make ice cream without an ice cream maker. I never tried it before I got mine though…
I just made your recipe and luckily I tasted it before I cooled it. The ratio of sugar to cocoa powder is off. You should use at least twice the amount of sugar to cocoa powder in order for it not to have a horribly bitter taste. After adding more sugar it had a nice sweet to chocolately balance. Thanks for the recipe, my daughter is lactose intolerant and she will enjoy it.
beantownbaker — January 31st, 2013 @ 2:03 pm
I am glad you were able to adjust this recipe to suit your needs. Hubby and I both enjoyed the sweetness level of this recipe. I’m sure different cocoa powders have different levels of sweetness. I plan to try this recipe without the cocoa powder to make vanilla ice cream too. We loved the creaminess of it!
This look yummy and chocolate ice cream is one of my favorite. Thanks for sharing the directions and ingredients.
I just opened a can of coconut milk and it looked extremely curdled. I shook it a lot but it was still completely curdled. Is that how coconut milk is supposed to be out of the can? Are there any brands that you specifically like to use?
beantownbaker — April 24th, 2013 @ 1:44 pm
Hm. It doesn’t usually look curdled, more just separated. Did you try shaking it up? I use Native Forest since that’s what they sell in my grocery store. It looks like this: http://www.amazon.com/Native-Forest-Organic-Classic-13-5-Ounce/dp/B001HTJ2BQ/ref=sr_1_1?ie=UTF8&qid=1366829034&sr=8-1&keywords=coconut+milk
Oh how I wish I could try this.. I am currently gluten and dairy free.. However this being dairy free is is not gluten free with the oreo’s… Bummer!!
beantownbaker — October 23rd, 2013 @ 12:28 am
I’ve made this recipe again without the Oreos and it’s really good. Not quite as good as with the Oreos, but if you wanted to make it gluten free, just leave them out.
Enjoy the Best Movie of All Time
What video do you want to be able to watch today? Sniper
videos may be required on your list. This will be the most exciting shooting fight, where every sniper activity is always interesting to watch.