


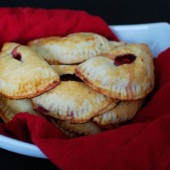
Strawberry Hand Pies

For today’s recipe I wanted to do something I’d never done before. I have had these hand pies bookmarked for quite some time now and decided to make the strawberry version since we have all these strawberries on hand.
After reading a bunch of the comments about the recipe for the pastry dough, it sounded like it was a pain to deal with. And since it’s been hot here in Boston, I didn’t want to deal with the repeated chilling of the dough.

I started to think about another dough recipe. I debated just using my go-to pie crust recipe… Then I remembered the Good Eats episode “A Pie in Every Pocket”. Alton Brown made handpies (and even used the same dough to make homemade pop-tarts!) Once I found Alton’s recipe and read the reviews it looked like this dough would be easier to work with.

I had a lot of fun making a big mess in the kitchen the night I made these. The pastry dough is VERY easy to work with. And quite tasty. After the hand pies cooled, I popped them in the freezer. Hubby and I have been eating them for breakfast. Popping them in the toaster oven at work does the trick for reheating them.
One Year Ago: Corn Tomato and Avocado Salad
Check out my SECOND week of Strawberry Recipes HERE


Strawberry Hand Pies
Yield: ~20
Ingredients:
For the Pastry Dough
9 1/2 ounces all-purpose flour, approximately 2 cups
2 tsp baking powder
3/4 tsp kosher salt
2 1/2 ounces shortening, approximately 6 tablespoons
3/4 cup milk
1 egg mixed with 1 to 2 teaspoons water
For the Filling
2 pounds of strawberries (~4 cups, chopped)
1/4 cup flour
1/4 cup sugar
Pinch of salt
1/2 tsp vanilla extract
Directions:
Make the Filling
Hull and cut strawberries into small pieces. Mix them with the flour, sugar and pinch of salt, and add vanilla.
Make the Pastry Dough
In the bowl of a food processor, combine the flour, baking powder and salt. Pulse for a few seconds and then pour into a large mixing bowl.
Add the shortening and knead it into the flour with your hands until it is crumbly.
Add the milk all at once and mix in with a spatula until it begins to come together.
Lightly flour your hands and the countertop and turn the dough out onto the countertop. Knead the dough ball, folding over 10 to 20 times.
Using a rolling pin roll the dough to 1/3 to 1/2-inch thickness, then cut into rounds using a 2 1/4-inch ring. Roll each round as thinly as possible or to 5 to 6 inches in diameter.
Assemble and Bake the Pies
Preheat the oven to 350 degrees F.
Spoon 1 to 2 tablespoons of filling onto the dough, brush the edges of half of the dough lightly with the egg wash, fold over and seal the edges together with the tines of a fork, dipping it into flour as needed. Gently press down to flatten and evenly distribute the filling and snip or cut 3 slits in the top of the pie.
Brush a little bit of egg wash on the outside of the pie and sprinkle with decorating sugar.
Place finished pies onto an ungreased cookie sheet and bake for 25 to 30 minutes or until golden brown.
Dough Recipe from Alton Brown
Filling Recipe from Dinner and Dessert, originally from Smitten Kitchen


 I am Jen the Beantown Baker. Engineer by day and baking maven by night. Hubby serves as my #1 fan and official taste tester. We got hitched back in 2006. Barefoot. In the sand. With the waves crashing behind us. It was one of the best decisions we’ve ever made.


it looks delicious!
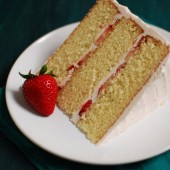
Beautiful cake! I can’t get over the ending either, too soon!
beantownbaker — December 26th, 2013 @ 10:56 am
Right! It happens every year, but I feel like this year flew by especially quickly.
Wow – super gorgeous!! I’m so glad you love this cake as much as I do! Happy Christmas and almost New Years, doll!!
beantownbaker — December 26th, 2013 @ 10:58 am
Happy Holidays to you too!
This cake looks so beautiful and I bet it tastes divine 🙂 can’t wait to try it!
definitely perfect for new years! i can’t believe this year is almost over, either- crazy!
this is perfect for our holiday-the Florida strawberries have been so sweet – thank you
beantownbaker — January 2nd, 2014 @ 1:31 pm
I wish I lived somewhere where the strawberry season was longer than a few weeks…
I was just thinking, what if we made this w/pink champagne?
beantownbaker — January 2nd, 2014 @ 1:30 pm
I think it would be great with pink champagne!
I know what you mean we grew up and lived in Michigan all our lives. When our kids were little I would take them to the farms to pick blueberries, raspberries and apples. The strawberry season was always short or not at all due to the wet springs we so often had. But we did get farm fresh ones at our local farm market. I now live in Central Florida where I’m learning so much about fresh grown foods. We live a few blocks from Oviedo where DUDA farms are. They are known especially for their celery but so many other fresh veggies. We have a few local farms where you can pick strawberries and blueberries. The gulf coast really has a lot of strawberry farms. On Tuesday our local Publix store had Florida fresh strawberries on sale. I just cleaned them last night (I think my husband took about 1/2 of them to work) We are fortunate, but I still miss Michigan and all the farming communities in our area.
beantownbaker — January 4th, 2014 @ 10:38 am
Wow – I bet things in FL are very different than Michigan! We can usually get strawberries at the farmers market as well. But again, it’s SUCH a short season. Last year we missed it completely. I’m still adjusting to the different seasonal timing in Ohio vs what it was in Boston. We always make a point to pick strawberries, blueberries, peaches, and apples. Peaches and strawberries are two of my favorite summertime fruits.
Woah, thanks a bunch for sharing!
I made this cake for my girlfriend’s surprise birthday party, and it was freaking delicious. Granted this was my first cake I have ever baked, but there wasn’t enough frosting to cover the whole thing and keep part of the actual cake from showing through. I don’t even like cake, and this was bomb!
This CAKE IS THE BOMB!!!!, I found this online in 2014. I showed it to my twin sister, I said, I won’t this for our B-Day, but we didn’t have it until September 2015, and again this year. So delicious, my son Loves it as well, we’re making it tomorrow December 28th 2015 for his birthday. Yummmmy!