


Rocky Ledge Bars
 It’s been a while since I’ve done a Week of something, so I thought I’d feature 5 bar/brownie recipes. They’ve been my favorite dessert recently.
A couple weeks ago was my brother’s wife’s baby shower. We’re all really excited about the first grandchild in our family and I can’t wait to meet my nephew in just a couple months. The majority of my family is still in the Midwest, but luckily quite a few of them got to make the trip out East for the shower. One of my sisters, my mom, and 3 of her sisters all came to Boston for a 3 day weekend.
 The day before the shower, the plan was to hang out at my brother’s house in the evening. I offered to bring over a dessert to snack on. One thing I love about making bars is that they travel so well! You don’t have to worry about them toppling over like you do with cupcakes.
 We all really enjoyed these bars. They had the perfect amount of candy mixins and surprisingly weren’t too sweet. I think all of my aunts and my mom asked for this recipe so they could make them for their families. I did slightly adjust the amount of chocolate in the recipe as shown below.
Two Years Ago: Lemon and Key Lime Curd
Check out my entire week of bars and brownies here.
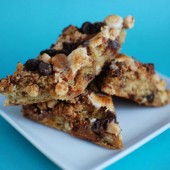


Rocky Ledge Bars
Yield: ~36
Ingredients:
1 stick unsalted butter, room temperature
2 1/4 cups all-purpose flour
2 1/4 tsp baking powder
1 tsp salt
1 1/2 cups brown sugar
3 eggs
1 tsp vanilla extract
1 cup mini marshmallows, divided
1/2 cup semisweet chocolate chips, divided
1 cup white chocolate chips, divided
18 squares individually wrapped caramels, divided and chopped into quarters
1 1/2 cup chocolate covered toffee chips, divided
Directions:
Preheat oven to 350 degrees. Lightly butter a 9-by-13-inch baking pan. Cut a piece of parchment paper large enough to cover the bottom of the pan and to overhang the longer sides. Place the parchment in the pan, butter the parchment, and set aside. In a medium bowl, whisk together flour, baking powder, and salt; set aside.
In a medium bowl using a wooden spoon, beat butter and sugar until light and fluffy, about 2 minutes. Add eggs and vanilla; beat until well combined. Add the flour mixture to the butter mixture; mix just until combined. Fold in half of the marshmallows, chocolates, caramels, and toffee chips.
Using an offset spatula, spread the batter in the prepared pan. Scatter the remaining marshmallows, chocolates, caramels, and toffee chips over the surface of the batter. Bake until golden brown and a cake tester inserted into the center comes out almost clean, about 35 minutes. Transfer to a wire rack until completely cooled. Using the overhanging parchment paper, remove from pan. Place on a baking sheet, and chill in the refrigerator until set, about 30 minutes.
Remove from refrigerator, and peel off the parchment paper. Using a serrated knife, cut into 15 irregular-shaped bars. Stack bars vertically. Store in an airtight container for up to 1 week.
Recipe from Martha Stewart


 I am Jen the Beantown Baker. Engineer by day and baking maven by night. Hubby serves as my #1 fan and official taste tester. We got hitched back in 2006. Barefoot. In the sand. With the waves crashing behind us. It was one of the best decisions we’ve ever made.


Seriously how cute are these? They looks awesome!
This is a good idea! I make the same kind of idea but with hershey’s kisses. If you are able to get the square pretzels (snyders makes them… their shape is called butter snaps or something like that) you top them with a hershey kiss. Then you pop them in the oven on 200 degrees for a few minutes. You will know they are done when the chocolate looks shiny. After that, you can either press down the kiss a bit to join it with the pretzel, or top the pretzel with another pretzel to make a pretzel and chocolate sandwich. They are yummy and super easy! 🙂
This is, quite possibly, the worst recipe I’ve ever made. The only redeeming quality about this is the taste.
So, the first issue is that there was WAY too much liquid in the cake batter. This is where everything went to hell. I decided to make these in cupcake form since I didn’t have round cake pans. The cake crumbled as I attempted to remove the cupcake wrappers.
Next, the marshmallow filling. This was literally the worst trying to put sticky filling into a crumbly cake.
For my surviving cakes that didn’t crumble to death, I attempted to cover in ganache. The ganache was too dang thick for this delicate cake.
So, as I sit here on Christmas eve writing this review, I have toppling, crumbly ding songs sitting in my freezer as I make my last attempt to save these monstrosities.
Afterwards, I will promptly burn your recipe and enjoy it.
I am sure you are a very wonderful person and meant no I’ll will, but this recipe must be destroyed.