


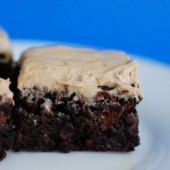
Mocha Brownies
 As I was trying to figure out what to make this week, I realized I’ve never made brownies with frosting. I guess that’s not completely true. I’ve made brownies with peanut butter frosting and chocolate ganache and I’ve also made Texas sheet cake. But never just brownies with just some sort of frosting. I decided to do that this week. Hubby requested mocha brownies, so I upped the amount of coffee in the brownie batter and made some coffee flavored frosting.

I used my go-to brownie recipe. It never fails me. It already calls for instant coffee, so I just bumped it up to 1 Tbsp. I used 1 Tbsp in the frosting as well. These brownies had a great jolt from the caffeine and everyone seemed to enjoy them. I couldn’t wait to try these, so I frosted and cut them while they weren’t completely cool. I love that these brownies have chocolate chips in them. So when you eat them still warm, the chocolate chips are all gooey and delicious!

Check out my entire week of bars and brownies here.


Mocha Brownies
Yield: ~36
Ingredients:
For the Brownies
1 cup (2 sticks) unsalted butter
2 1/4 cups sugar
4 large eggs
1 1/4 cups cocoa
1 tsp salt
1 tsp baking powder
1 Tbsp espresso powder, optional
1 Tbsp vanilla extract
1 1/2 cups all-purpose flour
2 cups chocolate chips
For the Frosting
1/2 cup butter
1 tsp vanilla extract
2 cups powdered sugar
1 1/2 Tbsp milk
1 Tbsp instant coffee
Directions:
For the Brownies
Preheat the oven to 350°F. Lightly grease a 9" x 13" pan
In a saucepan set over low heat, melt the butter, then add the sugar and stir to combine. Return the mixture to the heat briefly, just until it's hot, but not bubbling; it'll become shiny looking as you stir it. Heating this mixture a second time will dissolve more of the sugar, which will yield a shiny top crust on your brownies.
Transfer the sugar mixture to a medium-sized mixing bowl, if you've heated it in a saucepan. Stir in the cocoa, salt, baking powder, espresso powder, and vanilla.
Whisk in the eggs, stirring until smooth.
Add the flour and chips, again stirring until smooth.
Spoon the batter into a lightly greased 9" x 13" pan.
Bake the brownies for about 30 minutes, until a cake tester inserted into the center comes out clean, or with just a few moist crumbs clinging to it. The brownies should feel set on the edges, and the center should look very moist, but not uncooked.
Remove them from the oven and cool completely on a rack.
For the Frosting
In a bowl cream butter and vanilla. Add powdered sugar and beat on medium speed. Dissolve instant coffee in milk and add to the mixture. Beat until lightly and fluffy.
Spread the frosting over the cooled brownies.
Brownies adapted from King Arthur
Frosting Recipe from Blog Chef


 I am Jen the Beantown Baker. Engineer by day and baking maven by night. Hubby serves as my #1 fan and official taste tester. We got hitched back in 2006. Barefoot. In the sand. With the waves crashing behind us. It was one of the best decisions we’ve ever made.


These look yummy!
I’ll have to try adding sprinkles to cupcake batter. I love the patriotic colors! I made something for the inauguration too!
Radical Obama cupcake icon! Love it! I was totally gonna do the same thing for my cupcake blog but I ran out of time. GMTA. 😉
/Clara
These look great! I love the patriotic colors. I saw red, white and blue cupcakes today and they were so cute! Sprinkles were a great idea.
What a great poster. Thanks for the link!