


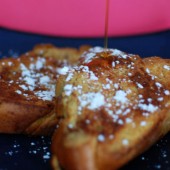
Overnight French Toast
I LOVE French toast. Absolutely love it!! I love ordering it when we go out for breakfast. I rarely make it at home because Hubby isn’t a huge fan of French toast, and you always have that issue of how to keep all of the French toast warm while cooking it. Same issue with pancakes. Although a good griddle pan does help (we love this one, although now we have a built in griddle pan as the middle burner in our stove). I also have yet to master making French toast that is crisp on both sides in a skillet. This French toast is definitely crispy on both sides!

Anyways, this French toast is great because you prep it the night before, then it soaks up the custardy goodness while you sleep, and all you have to do in the morning is pop it in the oven. It would be great to make if you have guests staying over or for any other weekend morning.

I used Challah bread because of it’s softness. I let it get a bit stale prior to make French toast out of it. I cut it pretty thick and sprinkled some freshly ground nutmeg over the toast.


Overnight French Toast
Yield: 6
Ingredients:
2 T butter, softened
12 - 3/4" thick slices of bread
6 eggs
1 1/2 cups whole milk
1/4 cup sugar
2 T maple syrup
1 tsp vanilla extract
1/2 tsp salt
1/4 - 1/2 cup powdered sugar
1 - 1 1/2 cups maple syrup
Berries, Nuts, Whipped Cream, etc for topping as desired
Directions:
Spread softened butter in a thick coating over a large rimmed (about 1" sides) heavy baking sheet. In a large mixing bowl, whisk together eggs and sugar, add maple syrup, vanilla extract, and salt and whisk together. Add milk and continue whisking until well combined. Lay out bread slices on baking sheet. Pour milk mixture over the bread. Turn each slice, coating both sides. Cover the baking sheet with plastic wrap and refrigerate overnight.
The next morning, preheat oven to 400 degrees. Bake French toast for approximately 10 minutes and then flip each slice of bread. Bake another 5-10 minutes, flipping again if necessary until both sides are golden brown and crisped.
Sprinkle with powdered sugar and serve with warmed maple syrup and other toppings as desired.
Recipe from Homemade by Holman


 I am Jen the Beantown Baker. Engineer by day and baking maven by night. Hubby serves as my #1 fan and official taste tester. We got hitched back in 2006. Barefoot. In the sand. With the waves crashing behind us. It was one of the best decisions we’ve ever made.


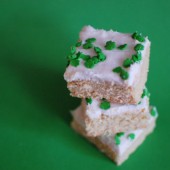
Mmmm sugar cookies bars! What an awesome combo!
http://www.brisbanebaker.blogspot.com
Top o’ the mornin’ to ya! These bars look fabulous!
http://www.simplysweeter.blogspot.com
Oh – YUM! I want to go home immediately and bake these!
I love baking that has simple recipes and turn out delicious! These look great for any occasion 🙂
LOVE THOSE!!! They are super cute. And you can’t go wrong with green sprinkles! 🙂
Oooooh! These sound delicious, I am definitely going to make these. Thanks for sharing, have a wonderful day! Denise@cottagesisters
I’m newer to the blogging scene so these bars are new to me! Thanks for posting it again.
They may have been all the rage last year but they are new to me! I wasn’t able to find any st. patricks day sprinkles … bummer. Yummy looking pictures
Happy St. Patty’s Day! What yummy sugar cookie bars – love the sprinkles!
mmmm…mmm…mmmm… making these right now for my nephew and niece! =)
Thank you for sharing! =)
I love this recipe – and I know what you mean about the supermarket sprinkles. I have a huge tub of heart shaped ones leftover from a purchase last year and I think there’s enough to last me for the next twenty years of Valentine’s day treats.
I made these the other evening for a picnic and they were all that you had promised! Oh my! One of my new favorites for sure. Thanks for sharing this and for the rec for a half batch!
Just made these. My kids are loving them.