


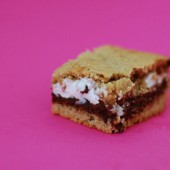
S’mores Cookie Bars
Marshmallow fluff is something I have never eaten. I don’t know if it’s because I grew up in the Midwest or what… This recipe called for marshmallow fluff so I was excited to be able to check this fluff out and see what all the buzz is about. Marshmallow fluff is interesting. Since I had to use the entire jar for the bars, I didn’t get a chance to try a fluffer-nutter sandwich.
My sister B and I agreed that the proportions seemed a bit off on these bars. The chocolate was thick and seemed to overpower the other flavors in a classic S’mores. I think next time I would use regular Hershey’s bars instead of the king-sized ones which are pretty hefty.


S'mores Cookie Bars
Yield: ~16 bars
Ingredients:
1/2 cup butter, room temperature
1/4 cup brown sugar
1/2 cup sugar
1 large egg
1 tsp vanilla extract
1 1/3 cups all purpose flour
3/4 cup graham cracker crumbs
1 tsp baking powder
1/4 tsp salt
2 king-sized milk chocolate bars (e.g. Hershey’s)
1 1/2 cups marshmallow creme/fluff (not melted marshmallows)
Directions:
Preheat oven to 350°F. Grease an 8-inch square baking pan.
In a large bowl, cream together butter and sugar until light. Beat in egg and vanilla. In a small bowl, whisk together flour, graham cracker crumbs, baking powder and salt. Add to butter mixture and mix at a low speed until combined.
Divide dough in half and press half of dough into an even layer on the bottom of the prepared pan. Place chocolate bars over dough. 2 king-sized Hershey’s bars should fit perfectly side by side, but break the chocolate (if necessary) to get it to fit in a single layer no more than 1/4 inch thick. Spread chocolate with marshmallow creme or fluff. Place remaining dough in a single layer on top of the fluff.
Bake for 30 to 35 minutes, until lightly browned. Cool completely before cutting into bars.
Recipe from Lovin' from the Oven

 I am Jen the Beantown Baker. Engineer by day and baking maven by night. Hubby serves as my #1 fan and official taste tester. We got hitched back in 2006. Barefoot. In the sand. With the waves crashing behind us. It was one of the best decisions we’ve ever made.


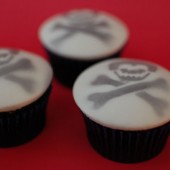
Your costumes are so cute!
I love the fondant too. I’m going to be trying fondant for the first time next weekend. You make it look so simple!
I MUST try this! I’ve been avoiding fondant cause of all the terrible things I’ve heard about the taste. Problem solved – thanks! You guys are so creative with the costumes too.
That is so awesome. An annual pirate party? Sounds like a blast. I love your shirts too. If my kids weren’t already set on their Halloween costumes, I’d suggest being a treasure map instead. That is so creative!!!
Oops – forgot to mention the cupcakes. : )
Very cool. I’ve never made fondant because I’m afraid it tastes bad. Is it good?
It is good! It tastes like marshmallow but sweeter.
Delicious! If that was your first time making fondant I would give yourself a big pat on the back:) It looks awesome! I need some mad cupcake skills like yours!
After my current box of fondant has run out I am so making some marshmallow fondant – and now that I know you can use the KitchenAid even better!
Wow, you did an amazing job! Thank you for the fondant tutorial, I’ve never made fondant before… you make it look so easy!
just went to a party on saturday. if you show up without a costume the rest of the guests get to pick a costume out of the box of last years costumes for you to wear heeh