


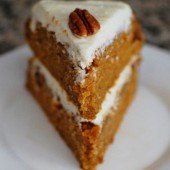
Mini Pumpkin Whoopie Pies (October Cookie Carnival)
 This month’s Cookie Carnival recipe is for pumpkin whoopie pies. When I saw the email, I thought they’d be Pumpkin with a cream cheese filling. I’ve seen quite a few recipes floating around for those. But these are chocolate cookies with pumpkin filling. That way they’re black and orange for Halloween 🙂 The recipe is from Martha and you can even watch her make them with Cookie Monster here.
I’ve never made whoopie pies before so this was fun for me. The chocolate cookie batter is very chocolatey and delicious 🙂 The filling is also great. It only uses 1/4 cup of pumpkin, so it looks like I’m going to be making something else pumpkin-ey soon. I’m looking forward to that! Next time I’ll definitely make a double batch of the filling. I thought the cookie somewhat overwhelmed the pumpkin filling. But overall, these were great and I’ll definitely be making these again. Probably very soon.
 Mini Pumpkin Whoopie pies – from Martha Stewart – makes ~20
For the Cookies1 3/4 cups all-purpose flour
3/4 cup unsweetened cocoa powder (not Dutch-process)
1 1/2 teaspoons baking soda
1/2 teaspoon coarse salt
1 tablespoon unsalted butter, softened
1/4 cup vegetable shortening
1/2 cup granulated sugar
1/2 cup packed dark-brown sugar
1 large egg
1 cup whole milk – I used soymilk
1 teaspoon pure vanilla extract
For the Filling4 ounces cream cheese, at room temperature
1/2 cup (1 stick) unsalted butter, at room temperature
1/2 cup confectioners’ sugar
1/4 cup canned solid pack pumpkin
Pinch of cinnamon
Pinch of nutmeg
Prepare cookies: Preheat oven to 375 degrees. Sift together flour, cocoa powder, baking soda, and salt into a medium bowl; set aside.
Place butter, shortening, and sugars into the bowl of an electric mixer fitted with the paddle attachment. Mix on high speed until smooth, about 3 minutes. Add egg; mix until pale and fluffy, about 2 minutes. Mix in half the flour mixture, then the milk and vanilla. Mix in remaining flour mixture.
 Drop about 2 teaspoons dough onto baking sheets lined with parchment paper, spacing 2 inches apart. Bake until cookies spring back when lightly touched, 12 to 14 minutes. Transfer baking sheets to wire racks and let cool 10 minutes. Remove cookies from baking sheets and transfer to wire racks using a spatula; let cool completely.
Prepare filling: In the bowl of a mixer fitted with the paddle attachment, whip together cream cheese, butter and confectioners’ sugar on medium speed until smooth, about 3 minutes. Add pumpkin, cinnamon, and nutmeg; whip until smooth, scraping down the bowl as necessary.
Pipe or spoon about 2 teaspoons filling on the flat sides of half the cookies. Sandwich with remaining cookies, keeping the flat sides down.

 I am Jen the Beantown Baker. Engineer by day and baking maven by night. Hubby serves as my #1 fan and official taste tester. We got hitched back in 2006. Barefoot. In the sand. With the waves crashing behind us. It was one of the best decisions we’ve ever made.


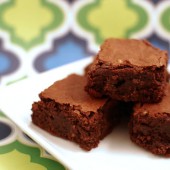
Can’t beat an Ina classic!
Ina’s sound decadent, but I’m with you – I’d never have that much of anything on hand if I got a sudden brownie craving. Like that addition of mint here, but then I’m a sucker for anything chocolaty and minty.
What lovely, yummy-looking brownies. I love your addition of mint. YUM!
I’ve yet to try Ina’s brownies; I need to rectify that ASAP.
I have tried Ina’s brownies before and I have to agree….awesome! Although like you said I don’t have a lot of that stuff just sitting around. I love addition of mint in this recipe. Such a nice spin on the normal brownie 🙂
I just tried the Andes baking chips and really like them! Your brownies look SO good!
My favorite brownies of all time are a cocoa based recipe. I think that they are just as rich and chocolatey as any bar-chocolate recipe as long as coffee is added. These look DElish!