


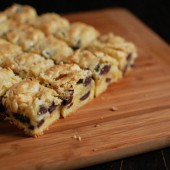
Tasty Tools II – Peanut Butter Chocolate Chip Cookies
 This month’s Tasty Tools event (hosted by Joelen) asked that we make something using a scoop. I love my scoops. I use an ice cream scoop to make cupcakes. Since I make so many cupcakes, my cookie scoop often gets neglected. I love using a scoop when I make cookies because it gives them all a uniform size and shape.
I saw this recipe come up in my Google Reader and it sounded perfect for our Beirut league. I figured a cookie was perfect because you can hold a beer in one hand and a cookie in the other. And the saltiness of the Peanut Butter would go with the beer.
 As usual, the cookies disappeared and everyone seemed to love them. I’m glad I ate one before we left the house or I wouldn’t have been able to try them.
 The recipe is from Jessica, who has an orange kitchen. I love when people are not afraid to use color in their house. Our house in Cincinnati had red, yellow, orange, green, and brown paint on various walls in the house. I loved it.
 Peanut Butter Chocolate Chip Cookies – from Jessica – original recipe from the Magnolia bakery cookbook – makes about 36
1 1/4 cups all-purpose flour
3/4 teaspoon baking soda
1/2 teaspoon baking powder
1/4 teaspoon salt
1/2 cup unsalted butter, softened
1 cup peanut butter at room temperature
3/4 cup plus 1 tablespoon (for sprinkling) sugar – I omitted this1/2 cup firmly packed light brown sugar
1 large egg, at room temperature
1 tablespoon milk
1 teaspoon vanilla extract
1/2 cup peanut butter chips (I used milk chocolate peanut butter swirl chips)
1/2 cup chocolate chips
 Preheat oven to 350 degrees.
In a large bowl, combine the flour, the baking soda, the baking powder, and the salt. Set aside.
In a large bowl, beat the butter and the peanut butter together until fluffy. Add the sugars and beat until smooth. Add the egg and mix well. Add the milk and the vanilla extract. Add the flour mixture and beat thoroughly. Stir in the peanut butter chips. Place sprinkling sugar on a plate. Drop by rounded teaspoonfuls into the sugar, then onto ungreased cookie sheets, leaving several inches between for expansion. Using a fork, lightly indent with a crissscross pattern (I used the back of a palette knife to keep it smooth on top), but do not overly flatten cookies. Bake for 10 to 12 minutes. Do not overbake. Cookies may appear to be underdone, but they are not.
Cool the cookies on the sheets for 1 minute, then remove to a rack to cool completely.


 I am Jen the Beantown Baker. Engineer by day and baking maven by night. Hubby serves as my #1 fan and official taste tester. We got hitched back in 2006. Barefoot. In the sand. With the waves crashing behind us. It was one of the best decisions we’ve ever made.


Peppermint for sure
Love all things pumpkin this time of year!
ralphlucy at comcast.net
The richness of eggnog is one of my fave parts of the holiday season
jlynch6341@aol.com
I can’t decide if it’s peppermint or pumpkin! Oooh or egg nog!
yet another choc/peppermint combination to tempt me. Oh my! These look lovely! Peppermint is Christmas to me!
I tweeted too! breit85@gmail.com
love,
cathy b. @ brightbakes
I looooooooooooooooooooooove chocolate and peppermint. Especially when the chocolate is hot and the peppermint is liquor. Or any other way, really.
Oh I love Pumpkin and Peppermint! Two things my husband hates!
Apple Cider!! I drink it all winter long.
smartash1218@yahoo.com
Definately chocolate and peppermint or anything heavy on the cinnamon and nutmeg! Too bad I can’t win these liners with your cupcakes already in them! They look wonderful!
I <3 peppermint, it's a guilty pleasure. Also that I get to overeat gingerbread. That's where i pudge at the holidays, with Gingerbread flavor. its decadent and delicous.
Also: my word verification is redip. which entertains me.
I love the chocolate/peppermint combo.
My favorite holiday sweet is gingerbread cookies. rhisomers(at)gmail(dot)com
I tweeted it. and bragged you up.
So weird that it came out so thin for you! Maybe I should’ve specified what size can? Whoops. Anyway, I used a 14 ounce can and it came out pretty thick. Weird. I’m going to update my recipe with size now. 😉
The cupcakes look great anyway! 🙂
Okay, ignore me. Apparently I only used 3/4 of a cup of the condensed milk. Seriously, the cold weather is messing with my head.
I love chocolate and coconut this time of year. oh and of course marshmallow!
goorsky at g mail dot com
I agree – I love chocolate and peppermint this time of year. And your idea to fill the cupcakes w/peppermint and top w/chocolate ganache sounds amazing! But really who minds a bit of a mess when eating something so tasty?
Just tweeted
yum, these look delicious. i love homemade eggnog this time of year:)
Chocolate and Peppermint is a classic xmas combo that I just love.
ive been drinking peppermint mocha lattes like they’re going out of style. definitely a favorite combo! I love gingerbread this time of year too!
I love my Grandma’s almond puff 🙂 Soooo yummy
I’m lovin’ everything almond! Banket is a holiday staple at our house & I can’t get enough almond paste!
I’m partial to peppermint, especially those Andes Peppermint Chocolates. They’re like crack.
sarah(dot)chverchko(at)gmail(dot)com
Anything chocolate!
my fav is peppermint! i love candycanes and mint choc! 🙂
mandaala.blogspot.com
any kind dessert that looks “Christmas-y” is on my list!
I am in complete agreement- chocolate-peppermint is my favorite!!!
My favorite holiday flavor: Rum. Rum in Truffles, rum in eggnog, Rum in banana muffins, rum in pineapple upside down cakes…..yup, rum. 🙂
peppermint and chocolate is one of my favorite holiday flavors, but you know I have to remain loyal to pumpkin!
those look so good! peppermint is by far my fave holiday flavor!
but really also love buttery goodness in cookies. hmmm.
ctcupcake8@yahoo.com
GREAT!!!! hugs, Flavia
Peppermint (ideally with chocolate)!
Those look amazing!
I love mint chocolate and for the holidays put amaretto in EVERYTHING.
I am kind of peppermint obsessed so I absolutely love your cupcakes. Not to mention a peppermint patty frosting just sounds like pure bliss!
xo
ps I am your newest follower
Molasses. Or coconut. And butter. Those are the dominant flavors in three of my favorite holiday cookies. nsp429@gmail.com
I’m also on the peppermint bandwagon!
Chocolate and peppermint defo!
shelly8806@hotmail.com
I didn’t used to love the whole chocolate peppermint combo until I made an amazing cake from Bon Appetit last year. Now I’m hooked. I just ate a peppermint chocolate cookie for lunch today.
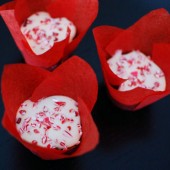
Those wrappers are so cute!
Pumpkin for sure. I love my pumpkin choc chip muffins! sunshine4342 at juno dot com
Yum! I am all about mint, and so is my bf.
PUMPKIN PUMPKIN PUMPKIN!!! Can’t get enough!
chocomuncher88 @ yahoo . com
Peppermint and gingerbread. YUM!
cmerrey at gmail dot com
My favorite flavor would have to be Egg Nog, or Peppermint :)!
meggie_sue@woh.rr.com
Peppermint for sure!!!
Silly I know but I love Fruitcake in all its yummy, rummy goodness.
Love eggnog! And mulled cider.
– Amanda
I love peppermint and pumpkin best! 🙂
Cinnamon!
Peppermint is definitely my fave! cnahorvath@yahoo.com
my favorite holiday flavor is eggnog. I think I could eat or drink about anything with eggnog
Pumpkin pie spice 🙂 … in everything from homemade pumpkin spice lattes to pumpkin bread! My fav!
Peppermint for me! These cupcakes look delicious…love the baking liners!
It’s a toss up between pumpkin and chocolate/peppermint.
phjones21@yahoo.com
These cupcakes look awesome! They are so pretty 🙂
Such a fun giveaway too. My favorite holiday flavors are ginger and molasses….yum!
Eggnog for sure!!! I just made Eggnog cookies that are actually TOO good….I can’t stay away!
I love simple molasses cookies! Molasses is one of my favorite things this time of year=)
I am SO with you on the chocolate/mint combo! Beyond delicious! I always make some peppermint biscotti at this time of year – yum! : )
love the combo of peppermint and chocolate. also love KA flour – use it all the time.
jacquieastemborski AT comcast DOT net
Well they look delicious! But I can see the pain of the ooziness!
Peppermint and chocolate is my favorite!
I love sweet things – especially egg nog!
Peppermint – I get addicted to peppermint mochas this time of year.
Mint chocolate! Yum!!
Cranberry! I think this started when we were giving our ‘grown up’ drink for Christmas Eve dinner. The real adults had wine and we had cran-raspberry juice for the kids version.
jfalksen at gmail dot com
As always, your post makes me want to lick my computer screen! I made your Snickerdoodle brownies the other day and I ate just about the whole pan. By myself. Need to give away the rest and then make them again because they made my apt smell AMAZING!
chocolate and mint, yum!
ljyoung85 at gmail.com
Coconut is my favorite! I put in mostly everything I bake during this time of year.
I love sweet things at this time of year. Especially the peppermint bark or candy cane hershey kisses.
I love anything eggnog flavored, especially baked goods. Mint is a good one too.
Peppermint hot chocolate! Or caramel…or pumpkin….
ooh, for the holidays i’d have to go with eggnog or peppermint!
I love peppermint! Can’t get enough of it this time of year!
My favorite holiday flavor has to be molasses. We have a family cookie recipe involving molasses that never gets old!
Almond flavoring goes into several of our cookies- including the candy cane cookies. The combo of almond with mint makes for a great cookie!! Eggnog and chex mix add to this yummy Christmas Eve combination.
My favorite holiday flavor is sweet – the chocolate-peppermint combo, mmm!
Vanilla (as in the icing on my mother-in-law’s fabulously delicious sugar cookies). Mmmm….
Chocolate is my favorite flavor year round!
I’m not sure if I have a favorite holiday flavor… I’ve been sitting here thinking about it for a few minutes. Mint perhaps? But not in excessive amounts.
My favorite holiday flavor is really my favorite year round flavor — cinnamon! I love cinnamon anything.
Hood Golden Egg Nog – yum!
Egg nog. I discovered Silk Egg Nog flavor as well as the See’s egg nog truffle this year. So happy.
amazing! can’t wait to bake them!
I love anything that is baked with eggnog! This year I’m thinking I might have to try to make eggnog truffles! YUM!
bbscabral@gmail.com
Peppermint and chocolate used to be my favorite flavor combo, but lately it’s become chili pepper and chocolate. I love the juxtaposition of spicy and sweet!
Pumpkin for Thanksgiving-time, eggnog for Christmas-time. I always forget how much I love eggnog until the time is here! 🙂
pumpkin bread! hbhalsod@gmail.com
I worship KAF. I mean WORSHIP! So I would love to win this one. My fave flavour combo for the holidays is probably chocolate and mint too, but I am really into gingerbread these days.